1. Welcome to Tacoma World!

    You are currently viewing as a guest! To get full-access, you need to register for a FREE account.

    As a registered member, you’ll be able to:
    • Participate in all Tacoma discussion topics
    • Communicate privately with other Tacoma owners from around the world
    • Post your own photos in our Members Gallery
    • Access all special features of the site

Rack and pinion + ball joint replacement

Discussion in '1st Gen. Tacomas (1995-2004)' started by ksralaska, Jun 4, 2019.

  1. Jun 4, 2019 at 2:30 AM
    #1
    ksralaska

    ksralaska [OP] New Member

    Joined:
    Oct 6, 2018
    Member:
    #268551
    Messages:
    4
    Gender:
    Male
    First Name:
    Keane
    Vehicle:
    1996 Tacoma 4x4
    So I thought I would give back a bit and post an update compiling some info I learned after just finishing replacing ball joints and the rack and pinion on my 96 taco 4wd. I took it in to get it aligned before changing tires, but the mechanic told me I really needed a new rack and joints, and as I wasn’t going to pay the ~3000 or so for parts and labor (in rural Alaska, prices are spendy!) I decided to do it myself. Be warned: I am an amateur mechanic. Please do post corrections to the methods here if you know of them.

    On the first gens, the rack and pinion comes off super easy. I started by removing both wheels, removing the castle nuts on the tie rod ends, lower ball joint, and upper ball joint (again, I was doing ball joints, the toe rod end is the only castle needed to be replaced if you’re just doing the rack). Those are easy to see and find. To get the tapered, cone shaped fitting apart inside the joints, I hit the metal around the fitting. I think there are better and worse places that cause the most vibration with minimal damage, but they came off easy enough. Bigger hammers cause less damage and work faster. Learned that the hard way...

    I also removed he caliper and brake hose mounting bracket bolt and hung the caliper carefully under the front fender. I took off the rotor and took the axel nut off because I wanted to remove the entire knuckle with upper ball joint still attached. More on that later... I don’t have a c-press or puller and my friend’s didn’t work. Turns out you don’t need one, at least not for my truck.

    One thing I learned is that if you leave the upper ball joint until last that fitting comes apart easier if the knuckle is sort of hanging from it. I tried to be careful it didn’t just fall and strain the cv or axle when it separated, it not sure it would matter much.

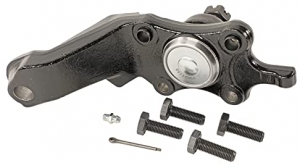
    I then took the four bolts off the lower ball joint mounting bracket. That joint is also a press in but the part you buy comes built into the mounting bracket already.

    So for ball joints, three castle nuts, the four lower ball joint mounting bolts, two caliper bolts, and one brake line bracket bolt. I think that was it. I took the axle nut off as well to take the whole knuckle out.

    So time to remove the upper ball joints from the upper control arm / knuckle unit. As the c press adapters didn’t work my friend had, we just used a nice large socket (forget the size), put the knuckle in a vise, and hammered down on it. Again, big hammer. Little hammer didn’t work really at all. It came right out. It’s pressed in from the bottom, so to get the new one in, we just flipped the knuckle around in the vise so that the top was straddling the jaws (not too tight or the ball joint boot will hit them and tear) and hammered in the new ball joint. It was ridiculously easy. Not saying it is like that for everyone, perhaps I just got lucky with mine. My mechanic friend informed me that it is important to hit the outside of the ball joint only and not the metal near the center which can affect the housing of the ball joint itself. Hence the nice socket to pound on.

    I set those aside and began to tackle the rack and pinion. I started by unbolting the two steering fluid lines, up near where the steering rod comes down into the coupler, which in turn attaches to the rack. The only way I can see to unbolt the lines is to reach up and over part of the frame and use a wrench to make the tiniest, teeniest turns from above. It almost seems like you can reach above the sway bar from the side and get at then that way, but I found it was easiest getting the wrench in from above. By far the most frustrating part of the whole operation.

    After that, I removed the small holding bolt on the top of the rack where the coupler attaches. This bolt holds the two gears in place. There are then only four (I think?) bolts holding in the rack: a through bolt from the top, a bolt through the frame horizontally, and a bolt and another nut that attaches a bracket around the rack to the frame. Pretty simple. After this the rack wants to drop down, but there is a spot it is resting on the frame where the top through bolt attaches. I was able to sort of bench press lower it from there. I did have some trouble getting the rack separated from the coupler. There’s a bunch of rubber bits that absorb a lot of tension and l didn’t want to break them, so i held up the rack and worked the gear free with my other hand. And voila, it was free.

    Installation was pretty much the reverse. I torqued the suspension nuts to specs I found on this forum with a torque wrench. To (kind of) get the steering straight I tied the steering wheel in place and then removed the other small bolt holding the coupler to the steering rod. This allows the coupler to slide up, off the rack. You can then get the tires pointed straight and slide the coupler back onto the rack. Logic was that would keep steering relatively straight. Didn’t entirely work, but I am having it aligned anyway. My understanding from others here is that you can adjust your steering wheel through the tie rod ends, but that is playing with your usable range of motion in the steering mechanisms and it is better to get your wheel perfect using the method above (read, some variation of this method that actually works). Anyway, assuming steering wheel isn’t straight after the alignment, I will continue to tinker with it.

    I put dexron atf in the ps tank, not power steering fluid, as folks on here say ps fluid can ruin seals etc. on these engines. I turned the wheel back and forth, added more, repeated, until no bubbles turned up and the fluid read full. Of course this burping process takes place with the cap off.

    That’s it. It took me forever, and I probably did most things incorrectly, so feel free to add some notes for the next newbies trying this.

    If I were to do it again, I’d also replace the tie rod ends. My rack and pinion came from a junkyard but is in exponentially better condition than my old one. I would have felt better having those joints new also, though.

    Sorry about no pictures!
     

Products Discussed in

To Top