

-
Welcome to Tacoma World!
You are currently viewing as a guest! To get full-access, you need to register for a FREE account.
As a registered member, you’ll be able to:- Participate in all Tacoma discussion topics
- Communicate privately with other Tacoma owners from around the world
- Post your own photos in our Members Gallery
- Access all special features of the site
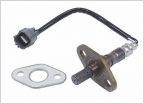 P0420 code, heavy exhaust smell, bad mpg, rough idle
 Who owns an OBD2 scanner?
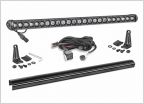 Mounting 30 inch LED lightbar in lower valence
 B&M tranny cooler + Autometer temp gauge
Replacing 97 2.7l Tacoma Head Gasket
Discussion in '1st Gen. Tacomas (1995-2004)' started by LilRedRocket, May 14, 2016.


