1. Welcome to Tacoma World!

    You are currently viewing as a guest! To get full-access, you need to register for a FREE account.

    As a registered member, you’ll be able to:
    • Participate in all Tacoma discussion topics
    • Communicate privately with other Tacoma owners from around the world
    • Post your own photos in our Members Gallery
    • Access all special features of the site

Repositioning sliders

Discussion in 'Armor' started by RushT, Apr 26, 2020.

  1. Apr 27, 2020 at 7:34 PM
    #21
    RushT

    RushT [OP] Amateur Everythingist

    Joined:
    Dec 10, 2017
    Member:
    #238171
    Messages:
    5,665
    Gender:
    Male
    North Texas
    Vehicle:
    '18 DCSB TRDOR Inferno
    That's something I've considered. The plate holes are horizontal slits of course, for fore-aft adjustment. I was thinking to just 'hole out' a half-hole on top of the horizontal (damn, need to draw some pics here). Now it comes down to your comment.... how much have I diminished the holding power of the bolt/washer combo.

    Do I plan to use them as designed? Hopefully not. But... I thanked heaven and earth for the rails I had on my FJ. Obligatory story here: I pulled into a Sonic for burger and fries. Backing out, I knew there was grass median so I had to do a 3 point. Front tire bumped up against what I thought was the curb and due to traffic I said 'screw it... skinny pedal = go, right'? Well, turned out to be an architectural rock. Before I realized it I was up and over that boulder. 18" vertical drop on the far side. It took 4x4 to get off that damn thing. I snuck of snacking on my fries. A week later I notice a front quarter panel dimple/crease off the wheel well. I figure I came down hard enough to stress the body panels and got a new little bubble crease. So... I don't plan on anything where I'll actually NEED them, but I'd like them to work as designed if necessary.

    I'll have to think on your concern some more. Good news is, I get a die grinder out of it either way!

    33k commuting miles? That shape? :)

    So.... body lift? Is that where you're headed? Nah, I understand. I don't expect they're worn or that I could get lift by replacing them with new OEM.
     
  2. Apr 28, 2020 at 7:09 AM
    #22
    Warles

    Warles Well-Known Member

    Joined:
    May 24, 2015
    Member:
    #155937
    Messages:
    148
    SoCal
    Vehicle:
    2015 Tacoma TRD,
    OME Suspension, Pelfreybilt bumper & skids
    I wasn't thinking of a body lift, just that the bushings may have "settled", lowering the body a bit. Another member here had a similar problem as yours and found his body bushings were bad.
     
  3. Apr 28, 2020 at 7:13 AM
    #23
    RushT

    RushT [OP] Amateur Everythingist

    Joined:
    Dec 10, 2017
    Member:
    #238171
    Messages:
    5,665
    Gender:
    Male
    North Texas
    Vehicle:
    '18 DCSB TRDOR Inferno
    Is there a method to reliably determine if they’ve settled?
     
  4. Apr 30, 2020 at 9:14 AM
    #24
    RushT

    RushT [OP] Amateur Everythingist

    Joined:
    Dec 10, 2017
    Member:
    #238171
    Messages:
    5,665
    Gender:
    Male
    North Texas
    Vehicle:
    '18 DCSB TRDOR Inferno
    Following up on this one in case anybody is still reading. Is there a preferred Rust-oleum color and line that matches semi gloss black powder coat?
     
  5. May 2, 2020 at 8:11 PM
    #25
    RushT

    RushT [OP] Amateur Everythingist

    Joined:
    Dec 10, 2017
    Member:
    #238171
    Messages:
    5,665
    Gender:
    Male
    North Texas
    Vehicle:
    '18 DCSB TRDOR Inferno
    For anyone still following... here's the status.

    Bought a decent Dewalt cordless from Grainger. Ordered a set of off-brand carbide burs from Amazon scheduled to deliver Friday. Friday morning I get notice they are delayed to 5/5 - 5/9. Friday night I get notice delivering Sunday by 9pm. Saturday 2pm the doorbell rings and Prime drops off my bits.

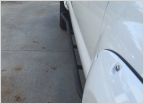
    I started with the passenger side as it's the worst (and easier of the two). Marked center on each bolt, and anywhere there were frame dimples or other accessories mounted. Drilled out about 3/16 - 1/4" on the front two bolt holes, and zero on the rear bolt hole. Did my best to estimate how much on all the ones in between. Painted, waited, painted again. Waited and painted again. Mounted up and it turns out the accessory mount bolts wouldn't get through the frame. Took them off and opened up those two holes some more and repeated the paint dance. Remounted them.

    I was hoping to get a wee bit more drop, but we'll see how this does. Did a test spin and hit a few spots I knew would make them knock and quiet so far. We'll see if they stay there or work their way up some. Ran out of time for the second one so may attempt it tomorrow.

    Right side wasn't touching the weld before this, but it was darn close; perhaps 1/8th at most. Now I have a bit more.

    IMG_0717.jpg
     
    EatSleepTacos likes this.

Products Discussed in

To Top