

-
Welcome to Tacoma World!
You are currently viewing as a guest! To get full-access, you need to register for a FREE account.
As a registered member, you’ll be able to:- Participate in all Tacoma discussion topics
- Communicate privately with other Tacoma owners from around the world
- Post your own photos in our Members Gallery
- Access all special features of the site
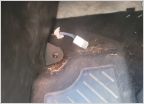 Un identified plug at drivers firewall
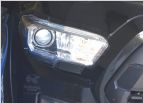 Factory Tundra LED Fog Lights in 3rd Gen Tacoma ?? Anyone know if they fit?
 Slip yoke knock/clunk
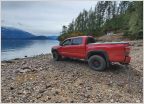 Ruby the red Turd (photo heavy)
 Sr steer wheel cover
 More Trans. Temp Questions......
Scared to drill holes for tailgate extender
Discussion in '3rd Gen. Tacomas (2016-2023)' started by TheLastLatin, Jun 28, 2019.
Page 1 of 2
Page 1 of 2


