1. Welcome to Tacoma World!

    You are currently viewing as a guest! To get full-access, you need to register for a FREE account.

    As a registered member, you’ll be able to:
    • Participate in all Tacoma discussion topics
    • Communicate privately with other Tacoma owners from around the world
    • Post your own photos in our Members Gallery
    • Access all special features of the site

Simple yet Satisfying DCLB

Discussion in '2nd Gen. Builds (2005-2015)' started by crazy joker, Apr 5, 2015.

  1. Aug 24, 2015 at 9:50 AM
    #61
    KB Voodoo

    KB Voodoo Well-Known Member

    Joined:
    Dec 20, 2012
    Member:
    #93425
    Messages:
    9,850
    Gender:
    Male
    First Name:
    Chad
    Glenwood, NY
    www.kbvoodoo.com
    :dancingbacon::broccoli::bikewhoops::burnrubber::woot:
     
  2. Aug 24, 2015 at 10:04 AM
    #62
    Crom

    Crom Super-Deluxe Member

    Joined:
    Jun 22, 2009
    Member:
    #18782
    Messages:
    9,634
    Gender:
    Male
    First Name:
    Nick
    San Diego, CA
    Vehicle:
    2009 4x4 DCSB Camp Supreme
    Millions
    Excellent, smart move, wish I had done the same a few years back!
     
    KB Voodoo likes this.
  3. Aug 24, 2015 at 10:21 AM
    #63
    KB Voodoo

    KB Voodoo Well-Known Member

    Joined:
    Dec 20, 2012
    Member:
    #93425
    Messages:
    9,850
    Gender:
    Male
    First Name:
    Chad
    Glenwood, NY
    www.kbvoodoo.com
    It's never too late....
     
  4. Aug 24, 2015 at 12:08 PM
    #64
    crazy joker

    crazy joker [OP] Well-Known Member

    Joined:
    Oct 11, 2012
    Member:
    #88787
    Messages:
    1,455
    Gender:
    Male
    First Name:
    Jesse
    Charlotte area, NC
    Vehicle:
    2014 DCLB sport 4x4
    Real men just call it camping
    Thanks. This gives me the option to bolt strait down onto the tie-down channels as well instead of of sliding bolt heads into them. A much better way to attach, and the load will sit right on the strongest part of the bed sides. Should have done this sooner.
     
  5. Aug 24, 2015 at 7:30 PM
    #65
    Bsheriff11

    Bsheriff11 Remember Your ABC's. Always. Be. Casual.

    Joined:
    Apr 6, 2013
    Member:
    #101499
    Messages:
    5,363
    Gender:
    Male
    First Name:
    Brandon
    Virginia livin', South Carolina raised
    Vehicle:
    2000 Limited T4R
    Click My Sig Homie
    I'm looking at these as well, can't wait to see it!
     
    crazy joker[OP] likes this.
  6. Aug 25, 2015 at 2:26 PM
    #66
    crazy joker

    crazy joker [OP] Well-Known Member

    Joined:
    Oct 11, 2012
    Member:
    #88787
    Messages:
    1,455
    Gender:
    Male
    First Name:
    Jesse
    Charlotte area, NC
    Vehicle:
    2014 DCLB sport 4x4
    Real men just call it camping
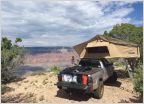
    I figured I was a little overdue doing a write up on my homemade RTT rack. When I bought my roof top tent, I knew I wanted to mount it low in the bed to keep it all as aerodynamic as possible. It had to be high enough though to fit my kayak and gear under the tent and off of the roof (basically for better center of gravity and aerodynamics). I went with 8".

    Next was pricing out the options. They are really expensive especially after dropping big money on the tent. :annoyed: So, I decided to make my own. Problem is I don't have a ton of metal fabrication tools or experience. So here's how the average Joe can weld up a great product:

    Tools used:
    1. Cheap-ish 110 volt wire feed welder
    2. angle grinder
    3. wood working circular saw with a metal cutting blade
    4. Drill w/ bits
    5. tape measure, misc hand tools

    I started by cutting some scrap angle iron to length and cutting some groves that will allow bolts to slide in and bolt to the factory tie down tracks on the truck.
    IMG_0554.jpg

    Next up was figuring out the angles and where to cut the scrap pipe I used for the hoops. I drew the shape I wanted on the garage floor first. Then I used some math and a fair amount of trial and error on a piece of thin tin that I could quickly transfer onto several sections of pipe. After cutting my layout on the tin, I used Zip Ties to hold in on each pipe, so I could paint the angles.
    IMG_0555.jpg
    IMG_0553.jpg
    IMG_0556.jpg
    IMG_0557.jpg

    Next I cut it all out, bent it, and tested each section on the garage floor layout.
    IMG_0558.jpg
    IMG_0559.jpg


    Well, I just got interrupted, so I have to finish this later on this evening...
     
    Killswitch1 and Crom like this.
  7. Aug 25, 2015 at 2:26 PM
    #67
    crazy joker

    crazy joker [OP] Well-Known Member

    Joined:
    Oct 11, 2012
    Member:
    #88787
    Messages:
    1,455
    Gender:
    Male
    First Name:
    Jesse
    Charlotte area, NC
    Vehicle:
    2014 DCLB sport 4x4
    Real men just call it camping
    ...part 2 :D.

    After the hoops were all cut and bent, it was time to see if it would work with the "tool" box and the kayak.
    IMG_0560.jpg

    It all checked out, so I welded it all up, added some scrap Uni-strut to tie it all together, and painted it.
    IMG_0584.jpg
    IMG_0572.jpg

    I still plan to make some improvements to it over time...

    It's not perfect, but it works great. I hope this gives someone else without a lot of fabrication background the confidence to take something like this on.
     
    Last edited: Jul 10, 2017
    RogueTRD, Killswitch1 and Crom like this.
  8. Aug 25, 2015 at 2:30 PM
    #68
    KB Voodoo

    KB Voodoo Well-Known Member

    Joined:
    Dec 20, 2012
    Member:
    #93425
    Messages:
    9,850
    Gender:
    Male
    First Name:
    Chad
    Glenwood, NY
    www.kbvoodoo.com
    Excellent start. Looks like you've got some skills.
     
  9. Aug 25, 2015 at 3:25 PM
    #69
    crazy joker

    crazy joker [OP] Well-Known Member

    Joined:
    Oct 11, 2012
    Member:
    #88787
    Messages:
    1,455
    Gender:
    Male
    First Name:
    Jesse
    Charlotte area, NC
    Vehicle:
    2014 DCLB sport 4x4
    Real men just call it camping
    Thanks! I had done this back in May but just now doing the write up.
     
  10. Aug 25, 2015 at 3:31 PM
    #70
    Crom

    Crom Super-Deluxe Member

    Joined:
    Jun 22, 2009
    Member:
    #18782
    Messages:
    9,634
    Gender:
    Male
    First Name:
    Nick
    San Diego, CA
    Vehicle:
    2009 4x4 DCSB Camp Supreme
    Millions
    Look forward to your finished writeup, very helpful for someone like me looking to learn how to fab. metal projects. Thanks. :thumbsup:
     
  11. Aug 25, 2015 at 3:44 PM
    #71
    crazy joker

    crazy joker [OP] Well-Known Member

    Joined:
    Oct 11, 2012
    Member:
    #88787
    Messages:
    1,455
    Gender:
    Male
    First Name:
    Jesse
    Charlotte area, NC
    Vehicle:
    2014 DCLB sport 4x4
    Real men just call it camping
    Finished write up!
     
    Crom likes this.
  12. Aug 25, 2015 at 5:46 PM
    #72
    Bsheriff11

    Bsheriff11 Remember Your ABC's. Always. Be. Casual.

    Joined:
    Apr 6, 2013
    Member:
    #101499
    Messages:
    5,363
    Gender:
    Male
    First Name:
    Brandon
    Virginia livin', South Carolina raised
    Vehicle:
    2000 Limited T4R
    Click My Sig Homie
    Nice job man!
     
  13. Aug 25, 2015 at 5:50 PM
    #73
    KB Voodoo

    KB Voodoo Well-Known Member

    Joined:
    Dec 20, 2012
    Member:
    #93425
    Messages:
    9,850
    Gender:
    Male
    First Name:
    Chad
    Glenwood, NY
    www.kbvoodoo.com
    I work with fabricators, full time, professional fabricators, who couldn't build this if somebody had a gun to their head.
     
    RogueTRD and Crom like this.
  14. Aug 25, 2015 at 6:08 PM
    #74
    crazy joker

    crazy joker [OP] Well-Known Member

    Joined:
    Oct 11, 2012
    Member:
    #88787
    Messages:
    1,455
    Gender:
    Male
    First Name:
    Jesse
    Charlotte area, NC
    Vehicle:
    2014 DCLB sport 4x4
    Real men just call it camping
    Thank you!

    Thanks! It wasn't really that difficult though. I didn't really see it as a big project, just a series of small projects. Working in construction probably helped some with figuring out the angles and such, but it really wasn't too complicated.
     
  15. Aug 25, 2015 at 6:09 PM
    #75
    KB Voodoo

    KB Voodoo Well-Known Member

    Joined:
    Dec 20, 2012
    Member:
    #93425
    Messages:
    9,850
    Gender:
    Male
    First Name:
    Chad
    Glenwood, NY
    www.kbvoodoo.com
    Want a job?
     
    Nominal, Crom, Smiley52 and 1 other person like this.
  16. Aug 27, 2015 at 3:53 PM
    #76
    crazy joker

    crazy joker [OP] Well-Known Member

    Joined:
    Oct 11, 2012
    Member:
    #88787
    Messages:
    1,455
    Gender:
    Male
    First Name:
    Jesse
    Charlotte area, NC
    Vehicle:
    2014 DCLB sport 4x4
    Real men just call it camping
    Well, I had a few beers after work today and figured I'd drag out the Sawzall and welder. @EddyRRT made me an awesome bumper that would fit the truck beautifully if I had left the plastic fender flares in place. But I will be leaving them off. I hated to cut into such a great product but here's what I did:
    Before:
    image.jpg

    After:
    image.jpg
    It looks so much better now, but more importantly, the bumper is not hanging out there to hook onto a tree if I slide into one on our slick soil.

    The pics also show how I plugged the fender holes (carrage bolts painted white) and where I chose to put my rear differential breather mod (first pic behind tail light).
     
    Crom likes this.
  17. Sep 4, 2015 at 6:42 AM
    #77
    crazy joker

    crazy joker [OP] Well-Known Member

    Joined:
    Oct 11, 2012
    Member:
    #88787
    Messages:
    1,455
    Gender:
    Male
    First Name:
    Jesse
    Charlotte area, NC
    Vehicle:
    2014 DCLB sport 4x4
    Real men just call it camping
    Ordered up a set ST Maxx (255/ 80/ 17) today! They say they'll be in one week from today. I kinda feel like I've cheated on BFG though, because I've bought about 5 sets of them over the years. The ST's look like they'll be a better fit for my needs and a little cheaper.

    Luckily the F150 needs tires soon, so I could justify this. It will get the "hand me down" tires off the Tacoma.
     
    Crom likes this.
  18. Sep 21, 2015 at 6:15 PM
    #78
    NorthwestCruiser

    NorthwestCruiser Well-Known Member

    Joined:
    Nov 20, 2013
    Member:
    #117000
    Messages:
    13,081
    Gender:
    Male
    First Name:
    Brian
    Snohomish, WA
    Vehicle:
    1996 Land Cruiser
    Custom 3 link, 40's etc..
    Trucks looking good! How is using the annex with it being that low to the ground? Still easy to get in/out?
     
  19. Sep 21, 2015 at 6:37 PM
    #79
    crazy joker

    crazy joker [OP] Well-Known Member

    Joined:
    Oct 11, 2012
    Member:
    #88787
    Messages:
    1,455
    Gender:
    Male
    First Name:
    Jesse
    Charlotte area, NC
    Vehicle:
    2014 DCLB sport 4x4
    Real men just call it camping
    Thanks! I don't use the annex very often. I've found that parking on a slope with the rear wheel (annex side) on a rock or piece of wood helps a lot with the annex head room.
     
  20. Sep 21, 2015 at 9:16 PM
    #80
    NorthwestCruiser

    NorthwestCruiser Well-Known Member

    Joined:
    Nov 20, 2013
    Member:
    #117000
    Messages:
    13,081
    Gender:
    Male
    First Name:
    Brian
    Snohomish, WA
    Vehicle:
    1996 Land Cruiser
    Custom 3 link, 40's etc..
    Oh okay. The only time I use my annex is when it's freezing cold out (put the heater down below) or when my lady comes along. I'm going to a bed rack to lower my rtt set up so just wondered
     

Products Discussed in

To Top