1. Welcome to Tacoma World!

    You are currently viewing as a guest! To get full-access, you need to register for a FREE account.

    As a registered member, you’ll be able to:
    • Participate in all Tacoma discussion topics
    • Communicate privately with other Tacoma owners from around the world
    • Post your own photos in our Members Gallery
    • Access all special features of the site

Suspension Refresh 2012 Prerunner

Discussion in '2nd Gen. Tacomas (2005-2015)' started by Caddmannq, Jul 20, 2021.

  1. Jul 20, 2021 at 5:40 PM
    #1
    Caddmannq

    Caddmannq [OP] MotoNerd

    Joined:
    Sep 1, 2008
    Member:
    #8917
    Messages:
    748
    Gender:
    Male
    California
    Vehicle:
    2012 PreRunner TRD Sport DC LB
    Undercover toneau
    How I trashed my front suspension:

    5100s=mild lift + many trips on long, steep, rough boat ramp.

    I need to lower the front end on this truck a little bit.

    Anyhow I have changed all the tie rods and now I am starting on the ball joints, having exchanged the right front lower.

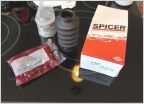
    To do it I bought this $90 Maddox brand press kit from Harbor freight, made for big cars & 1/2 ton pickup trucks. You get a clamp and a blow mold case you get several spacers and cups made from tempered steel, polished and blued nicely as any revolver.
    C8CEC3C3-9DED-4584-87EC-49EC1D731AE5.jpg
    I watched some guy on YouTube do a Taco lower with this kit and he said it worked OK. Maybe there was a change in the ball joints midyear 2012? Maybe the kit changed? Anyhow, It didn’t fit mine at all.

    So to make this kit work I took a sleeve that was 1/8” too small in diameter and split it With an abrasive cut off wheel in a pneumatic die grinder.
    EE2F1982-127D-42C3-B57F-C9CC218D99C1.jpg
    Then I spread it open and put it over the ball joint, where it held very snuggly.

    Warning if you do this:
    This thing is strong spring steel and when you spread it you must be extremely careful it does not shoot across the garage and kill somebody. I only had to spread it about 1/8” dia but it took some effort.

    As I was pressing the ball joint, I put a hose clamp around the split sleeve (just for handling purposes) but once it’s assembled everything was rocksolid.

    There it is all pressed apart. (I could’ve done this on the truck but it is much more comfortable to take the arm off and do this in the air-conditioned comfort of my garage.)

    9E6CCC3B-2E5C-4E4F-9AD5-7D336E98CF2D.jpg

    Of course I applied a 42” cheater bar with a three-quarter drive socket and an 8 pound sledge hammer. You gotta shock this monkey.
    F055B81C-379B-405F-8BE6-3AB268881E17.jpg
    The idea of a C-clamp press is that you apply enough force to Flex the press slightly, then you smack it on the end with a hammer to jar everything.

    In the past I used a small hydraulic jack and a homemade open frame press to do these (on OT cars) but the parts from it somehow disappeared into my collection of bits. I also was using odd pipe fittings, So it’s nice to have a set of hardened steel tools.

    Ultimately, the first one was successful, though being the first one it took a little time to figure out the setup.

    I can use the same split sleeve to do the upper ball joint, & it fits perfectly. The new ball joints are NAPAs from Taiwan and they are a little bit larger in diameter than the oem Mexican Tacoma ball joints.
    Anyhow I did a test set up with the new ball joint and I should have no problem pressing the upper one in and out of the arm.

    This is assuming I will have enough clearance for this press under the fender well.

    I do not want to change the upper control arms because you have to bend the bodywork on this vehicle and displace the Freon tubes, pull the battery, and Muck about with the battery box support structure.

    I’ll save that task in case I ever decide to buy aftermarket control arms.
     
    TnShooter likes this.
  2. Jul 20, 2021 at 7:59 PM
    #2
    Jimmyh

    Jimmyh Well-Known Member

    Joined:
    May 16, 2012
    Member:
    #78991
    Messages:
    14,291
    Gender:
    Male
    SC
    Vehicle:
    2012 Prerunner SR5
    I would try freezing the ball joint before installing it. It will go in much easier. Esp if the control arm is a little warm.
     
    Caddmannq[OP] likes this.
  3. Jul 21, 2021 at 11:20 PM
    #3
    Caddmannq

    Caddmannq [OP] MotoNerd

    Joined:
    Sep 1, 2008
    Member:
    #8917
    Messages:
    748
    Gender:
    Male
    California
    Vehicle:
    2012 PreRunner TRD Sport DC LB
    Undercover toneau
    Thank you. I didn’t bother to chill the first ball, which was a mistake.

    But because I can’t convince myself to remove the upper arms, I will do them on the truck.

    I did heat the lower arm in the desert sun, while I had a cold one, then I hit that eye with a heat gun too. I didn’t want to torch it. The paint is still oem nice, & without rust. But I was real close to breaking out the torch at one point.

    Tonight I am freezing the other balls. They will shrink max of 0.002” as I can only reduce the temp 80F, but I can heat the eye much more. Maybe 250F above ambient. I can buy dry ice near here as welll. That might help another 0.0005”
     
    TnShooter likes this.

Products Discussed in

To Top