1. Welcome to Tacoma World!

    You are currently viewing as a guest! To get full-access, you need to register for a FREE account.

    As a registered member, you’ll be able to:
    • Participate in all Tacoma discussion topics
    • Communicate privately with other Tacoma owners from around the world
    • Post your own photos in our Members Gallery
    • Access all special features of the site

The ultimate headlight upgrade H4 (not LED or HID)

Discussion in '2nd Gen. Tacomas (2005-2015)' started by crashnburn80, Oct 27, 2015.

  1. Nov 21, 2021 at 3:09 PM
    #4121
    Pearson

    Pearson Well-Known Member

    Joined:
    Aug 21, 2021
    Member:
    #374865
    Messages:
    736
    Gender:
    Male
    First Name:
    Elliott
    Lexington Texas
    Vehicle:
    Black 2012 2.7L Prerunner

    I ordered 4 of the P43T, 62204SBP 472SBP H4 12V 200/120CP 100/90W Super Brights from the link in C&B's mod thread, at like $5.95ea. w/ free shipping. They are marked made in Germany.

    I was blown away to have them in my mailbox like 2 days later. I didn't even think to see where they shipped from tough, but the supplier was bulb America. I'm guessing that they distribute from the nearest hub to the ship-to address. In my case, I would guess that would be Austin or Houston. It's kinda like the peace of mind from buying from the dealer or known distributer rule thing and with shipping and prices that good there is no reason to risk FLEBAY.
     
    This site contains affiliate links for which the site may be compensated.
  2. Nov 21, 2021 at 8:58 PM
    #4122
    Pearson

    Pearson Well-Known Member

    Joined:
    Aug 21, 2021
    Member:
    #374865
    Messages:
    736
    Gender:
    Male
    First Name:
    Elliott
    Lexington Texas
    Vehicle:
    Black 2012 2.7L Prerunner
    While on the subject of new OEM Headlight Housing and mods to improve their function and durability. I was in a dent doctor-type shop last Friday. The girl Mary, really seemed to know her way around the shop. We actually talked for a good while and the conversation shifted to headlight housings and how to restore and preserve them. She showed me a set that she had restored and added what she called a high-quality clear protective wrap material to after their restoration.

    My question here is, is it a good idea to add clear protective plastic film over the front-facing lens of halogen headlight housings? What would be the benefits vs. Negative aspects? On the surface, all I could think of as a possible risk would be thermal retention in the housings. I don't know exactly what the material is, but I do know it was designed to be a protection material on vehicles painted surfaces, etc... Informed opinions would be appreciated as I have a new set of OEM housings on their way and like the idea of the added protection if there are minimum negative considerations. For your consideration, I will be running Crash&Burn's full Ultimate Headlight mod with Osram's 12V Super Bright 100/90W H4's.
     
  3. Nov 21, 2021 at 9:07 PM
    #4123
    Toy_Runner

    Toy_Runner Well-Known Member

    Joined:
    Nov 19, 2019
    Member:
    #311172
    Messages:
    1,033
    Gender:
    Male
    Vehicle:
    99 4Runner SR5
    3" OME lift, heavy coils f/r 3/16" steel skids Modified Coastal Offroad diy bumper 5spd swap ('98 donor)
    Biggest thing would be how transparent it is. Even very clear materials, to the human eye, can trap/block/redirect significant amounts of light.

    Ultimately, one has to keep in mind that polishing the lens clear and then protecting the bare polycarbonate is only one part of the solution to having a functional headlamp. The reflector bowl can, and does get damaged by UV light, moisture, etc. A clear lens does no good if the reflector is visibly dimished in reflectivity, hazed/cloudy/fogged. Lens polishing isn't a cure-all, at some point even a lamp with a clear lens will need replaced.

    Arguably, that is a part of the OEMs "logic" for pushing for plastic lenses way back in the day. Once the lens is shot, the reflector is probably degraded enough that the headlamp assembly needs replaced entirely. Which lets them sell parts, of course (although that's not a significant reason or concern for them).
     
    Pearson likes this.
  4. Nov 22, 2021 at 5:34 AM
    #4124
    TacoFergie

    TacoFergie Well-Known Member

    Joined:
    Dec 21, 2015
    Member:
    #172832
    Messages:
    1,302
    Gender:
    Male
    First Name:
    Chris
    Iowa
    I agree with the assessment of @Toy_Runner.

    Additionally, it is wise with new headlights to use a high quality sealant or ceramic coating that has UV protection and reapply as necessary. CK Quartz (and others) makes professional grade coatings at reasonable prices, there are arguably better but require subscription and in house training. Stay clear of Chemical Guys, their quality isn't what it was 5+ years ago. While they do have some good products, as whole they aren't up to par with other brands anymore. I would NOT recommend polishing NEW headlights. You do not want to make the factory UV coating any thinner than it already is. Before applying any type of sealant or coating to the headlights, use a solution of 50/50 Isopropyl Alcohol and Distilled Water with a very soft microfiber to get any other greases or oils off the surface. I stay away from the films as I haven't found any that claim to be optically clear and have UV blocking characteristics that can be used on the exterior. Though I admit I haven't searched much either. My opinion is based on what I have seen of rock protection films over time fading and cracking, but they have come along a way in even the last few years.

    When I restore headlights I wet sand the factory protective coating from the lens wtih 320 grit sand paper, then 400 grit, 600 grit, 800 grit and I use SprayMax 2K Clear Glamour clear coat. This is a 2 part clear coat that has a hardener you add by pressing a button on the bottom of the can to puncture an internal reservoir, once it is added you have 24hrs to use it. It is comparable to what is used on your paint. DO NOT confuse it with products like Rustoleum 2X or others, they are a simple 1 part clear coat that is not as durable or as much UV protection. I stop at 800 grit as it allows for more mechanical adhesion than 1000 grit that is recommended by some. I have not noticed any visible differences in clarity in the end product between 800 and 1000 grit after clear coat is complete. Mechanical adhesion is important since you cannot use a plastic adhesion promoter. When you use a whole can for both headlights you will have a very thick layer of clear coat that will likely outlast the clear coat on the vehicle. I do not know if it is as optically clear as the factory poly carbonate lens and protective layer, maybe @crashnburn80 would know this. But for the price and longevity (for all intents and purposes it is a permanent fix) I have to say it is the best way to restore a headlight lens without replacing them if the lens is not showing any cracking. I would not do this to NEW headlights as a preventative measure. For NEW headlights I would use things mentioned in the paragraph above.

    If you want anymore details on products or processes, feel free to ask! Chances are you aren't the only with these questions and it helps everyone else that may not know how to ask the question or does not know the options to begin with.
     
  5. Nov 22, 2021 at 7:33 AM
    #4125
    NBourque

    NBourque Well-Known Member

    Joined:
    Nov 6, 2011
    Member:
    #66564
    Messages:
    555
    Gender:
    Male
    First Name:
    Nick
    Maine
    Vehicle:
    ‘21 PRO
    Do you use a little water when sanding? I may try your method next spring. I used the meguiars kit this spring. It was ok but I didn’t get the nice clear finish from the clear coat spray that was included in the kit.
     
  6. Nov 22, 2021 at 8:49 AM
    #4126
    TacoFergie

    TacoFergie Well-Known Member

    Joined:
    Dec 21, 2015
    Member:
    #172832
    Messages:
    1,302
    Gender:
    Male
    First Name:
    Chris
    Iowa
    Yup. In a bowl with with water and 1-2 drops of Dawn blue dish soap to soak the sand paper in and clear the sand paper of debris periodically while sanding. You can also fill a spray bottle with the same mixture to help keep everything wet while sanding if needed. Do not use more than a couple drops of Dawn. You don't want it to be soapy, you just want it for a little additional lubrication and a slight bit of cleaning ability.

    While stepping up in finer sand paper grades you want to ensure you have removed all coarser sanding marks from the previous grit. The most time consuming part of sanding is to make sure the clear coat is completely removed, but usually after the second pass you are good. After each sand paper grade, dry the surface to inspect and make sure you have even sanding over the whole surface. If it is uniform, move on to the next finer grit. Use a foam sanding block or a dense sponge so you have even pressure over the sand paper, you do not want to use your finger tips as it will not apply even pressure and can cause high and low spots. Also, find Automotive Grade sand paper, it is designed to be used wet and is a more uniform grit surface whereas all-purpose sand paper is not always able to be used wet.

    When you dry it off and prep for clear coat, use either Automotive Wax and Grease remover or Isopropyl Alcohol to clean the surface. It will look like there is no way will possibly clear up, don't be afraid! The first coat of clear coat will be a thin "tack" coat. Once you start layering it it will clear up more an more, I usually get 5 coats on each headlight before the can is close to empty. Don't worry if you get a run or have some orange peel look. After it is all dry it is a good idea to use some 2000 grit to wet sand it nice and smooth. After wet sanding use some polishing compound and a drill mounted polishing pad to get it crystal clear.

    All in all it costs about $60-$70 for all materials assuming you start with nothing.
     
  7. Nov 24, 2021 at 10:43 PM
    #4127
    crashnburn80

    crashnburn80 [OP] Vehicle Design Engineer

    Joined:
    Jun 6, 2015
    Member:
    #156893
    Messages:
    14,751
    Gender:
    Male
    Kirkland, WA
    Vehicle:
    2003 DCSB TRD OR
    Generally speaking, I am not a fan of these products. Any additional layers, even clear, reduce light output. Even good coatings are likely going to have some diffusion properties, reducing focus and output intensity while increasing glare. If left on too long, these coatings can also leave a bad difficult to remove residue on the surface of the headlight, I believe there have been some postings of that in this thread. You then may need to resort to abrasive cleaners to get the residue off, which is the entire process the product was supposed to be protecting you from as an abrasive cleaner will require a headlight restoration. You could proactively change out the coatings regularly in an effort to reduce that possibility, though I'm also not sure how well they will age at the elevated headlight temps. I certainly wouldn't be placing any on new OEM headlights. The only products I would consider for harsh UV environments are regularly applied maintenance type UV-blocking non-abrasive polishes/coatings. They will not harm the headlight, will eventually naturally wear off just like wax on the truck and protect the headlights without affecting the OEM UV protective coating.
     
  8. Nov 26, 2021 at 3:24 PM
    #4128
    Pearson

    Pearson Well-Known Member

    Joined:
    Aug 21, 2021
    Member:
    #374865
    Messages:
    736
    Gender:
    Male
    First Name:
    Elliott
    Lexington Texas
    Vehicle:
    Black 2012 2.7L Prerunner

    Can you recommend brands or actual product names or part numbers? There's a mechanic on YouTube who goes by the name of Scotty who was talking about just such a coating not long back. He said he had applied it regularly to his wife's new OEM housings and that they still looked new years later. I always used and liked Plexxas on my motorcycle helmet face shield and goggles. Is it the sort of coating you are referring to?
     
  9. Nov 26, 2021 at 3:31 PM
    #4129
    crashnburn80

    crashnburn80 [OP] Vehicle Design Engineer

    Joined:
    Jun 6, 2015
    Member:
    #156893
    Messages:
    14,751
    Gender:
    Male
    Kirkland, WA
    Vehicle:
    2003 DCSB TRD OR
    I have no data backed personal experience to compare products and recommend something specific over another brand, but headlight protectants are available from Meguiars, Turtle Wax, Chemical Guys and many others
     
    Pearson[QUOTED] likes this.
  10. Nov 26, 2021 at 5:11 PM
    #4130
    Too Stroked

    Too Stroked Well-Known Member

    Joined:
    Jan 24, 2017
    Member:
    #208501
    Messages:
    3,897
    Gender:
    Male
    First Name:
    Tom
    South shore of Lake Ontario
    Vehicle:
    2021 4Runner SR5 Premium
    Speaking as one who's detailed vehicles for over 25 years, I might be able to handle this one. Virtually any decent wax, polymer sealant or ceramic coating - properly applied and maintained - will do a pretty decent job of protecting your headlights. For instance, when I recently sold my 2014 Tacoma, the headlights were perfect. Zero oxidation or fogging. That truck received Menzerna / Jescar Power Lock 2-3 times a year for the first 3 years. After that, I went with Carpro CQuartz UK ceramic coating for the rest of its time with me.

    The biggest reason so many headlights are so badly oxidized is that virtually nobody takes care of them as I have mentioned above. It really doesn't take much effort at all to keep your headlights in like new condition. If you want my favorite products in the three categories I mentioned above, see below. And please remember, these are just my personal favorites. There are plenty of other good products out there. Just don't buy the "miracle" products shown on TV. My favorites:

    Wax: Collonite 845 or 476S
    Polymer Sealant: Jescar Power Lock
    Ceramic Coating: Carpro CQuartz UK 3.0
     
  11. Nov 27, 2021 at 4:52 PM
    #4131
    TacoFergie

    TacoFergie Well-Known Member

    Joined:
    Dec 21, 2015
    Member:
    #172832
    Messages:
    1,302
    Gender:
    Male
    First Name:
    Chris
    Iowa
    I agree 100%! Jescar Power Lock is great stuff and extremely user friendly! It is pretty durable as well, I would say 4-6 months isn’t unreasonable to expect if prep is done right and of course varies upon conditions. Carpro makes great products coatings that have a lot of UV blocking capability, especially the UK coatings.

    Some things to keep in mind with headlights while prepping, specifically regarding headlights. Try not to use abrasives or harsh chemicals. A “fine” grade clay with a good lubricant is usually more than enough. I like Optimum No Rinse and American Detail Garage Wipeout as lubricating solutions for clay bars. I have had some plastics be affected by Iron Decon (carpro ironx and Megs professional iron decon) chemicals. I don’t know how it affects light assembly coatings but iron decon chemicals can quickly degrade sealants and coatings. Maybe @Too Stroked knows more on the chemicals.

    By no means am I a “professional” Detailer. But I am very detail orientated and it’s another subject I dive far too deep into. It’s an unreasonable habit, but that’s what makes me who I am. Lol
     
  12. Nov 27, 2021 at 5:34 PM
    #4132
    Pearson

    Pearson Well-Known Member

    Joined:
    Aug 21, 2021
    Member:
    #374865
    Messages:
    736
    Gender:
    Male
    First Name:
    Elliott
    Lexington Texas
    Vehicle:
    Black 2012 2.7L Prerunner
    I know how you feel, and your advice is much appreciated.
     
    TacoFergie[QUOTED] likes this.
  13. Nov 27, 2021 at 5:40 PM
    #4133
    Too Stroked

    Too Stroked Well-Known Member

    Joined:
    Jan 24, 2017
    Member:
    #208501
    Messages:
    3,897
    Gender:
    Male
    First Name:
    Tom
    South shore of Lake Ontario
    Vehicle:
    2021 4Runner SR5 Premium
    Yes, the iron removers can damage certain parts of a vehicle. Remember, they're all pretty much a mild acid so as to dissolve the iron particles. The biggest area I've seen them do damage though is polished aluminum wheels. They can etch the surface of them pretty quickly.

    As for damaging coatings, since I only use those products prior to polishing and coating, I don't have any experience with how they might affect a surface coating. I'm pretty sure they're not the best thing for them though.
     
    Norton and TacoFergie[QUOTED] like this.
  14. Nov 27, 2021 at 6:20 PM
    #4134
    TacoFergie

    TacoFergie Well-Known Member

    Joined:
    Dec 21, 2015
    Member:
    #172832
    Messages:
    1,302
    Gender:
    Male
    First Name:
    Chris
    Iowa
    That’s a good point about iron decon being a mild acid, I guess I never really thought about it like that. That would explain its horrendous smell!

    Absolutly! I was restoring some old aluminum wheels that were in pretty bad shape and I used the Megs Pro Iron Decon to break down baked on brake dust. That stuff doesn’t take long to start etching the areas the paint was previously missing from!! Luckily I didn’t care since I was restoring them anyways though.

    The only reference I have to Iron Decon chemicals striping away coatings is YouTube videos. Some people try to compare sealants and coatings durability by seeing what chemicals will degrade them the fastest. By no means is it scientific, but usually Iron Decon chemicals are one of the most harsh without going to full acid. Most quality sealants and coatings hold up pretty well against common degreasers and all-purpose cleaners.
     
  15. Nov 29, 2021 at 5:17 PM
    #4135
    Toy_Runner

    Toy_Runner Well-Known Member

    Joined:
    Nov 19, 2019
    Member:
    #311172
    Messages:
    1,033
    Gender:
    Male
    Vehicle:
    99 4Runner SR5
    3" OME lift, heavy coils f/r 3/16" steel skids Modified Coastal Offroad diy bumper 5spd swap ('98 donor)
    If you intend to run 100w bulbs of any type, you need to "rewire the truck" with a relay harness, so you don't "melt the wiring harness," and "risk setting the truck on fire."

    Also, per Crash's testing, the Osram rallye 100/90w bulbs (which can be had for about $6/each) are the best performing high wattage option.

    Hopefully that clearcoat has some UV stabilisers in it, or it will fail quickly. A can of 2k clear, or a UV curing product like "LiteRight" would be a much better option.
     
  16. Nov 29, 2021 at 6:02 PM
    #4136
    crashnburn80

    crashnburn80 [OP] Vehicle Design Engineer

    Joined:
    Jun 6, 2015
    Member:
    #156893
    Messages:
    14,751
    Gender:
    Male
    Kirkland, WA
    Vehicle:
    2003 DCSB TRD OR
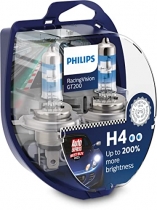
    No need for the wiring harness if you stick to the stock wattage performance bulbs, covered further down in the original post. Philips Racing Vision GT200 (400 hr life) or Tungsram Xenon. They likely will last a full year at most if running all the time. Certainly worth the improvement IMO.
     
    eherlihy[QUOTED] likes this.
  17. Nov 30, 2021 at 5:35 AM
    #4137
    TacoFergie

    TacoFergie Well-Known Member

    Joined:
    Dec 21, 2015
    Member:
    #172832
    Messages:
    1,302
    Gender:
    Male
    First Name:
    Chris
    Iowa
    While that clear coat is not ideal, it's probably better than before. Rustoleum lists 200F as the max temp, which you likely won't get to but indicates that consistent higher temps will likely cause issues to the paint. Same with the prep process. Sanding is the best practice to achieve good adhesion, don't be surprised if the clear coat peels or flakes due to this. I'm not trying to be a Debbie Downer here or say you f-ed up really bad, just trying to give you a heads up. Luckily it can be redone if caught before the plastic is damaged by the sun.

    If you want to get rid of the orange peel/texture you can wet sand with 2000 grit sand paper, get a cheap 3" foam drill buffing kit and some decent polish fine polish, no need to use a heavy compound (Meguiars and Griots are a couple usually available locally and reasonably priced) to smooth out the finish. Just use light pressure, let the polisher/compound do the work, keep moving slowly and you should be fine. The textured finish will scatter light to some extent and for reference will act like textured glass, just not as extreme.
     
  18. Nov 30, 2021 at 6:19 AM
    #4138
    klavender1

    klavender1 Well-Known Member

    Joined:
    Sep 8, 2015
    Member:
    #163705
    Messages:
    2,639
    Columbia/Lugoff, South Carolina
    Vehicle:
    2005 GX 470
    The magic eraser is basically just really fine sandpaper. But it does work for a lot of things!
     
  19. Nov 30, 2021 at 7:38 AM
    #4139
    Toy_Runner

    Toy_Runner Well-Known Member

    Joined:
    Nov 19, 2019
    Member:
    #311172
    Messages:
    1,033
    Gender:
    Male
    Vehicle:
    99 4Runner SR5
    3" OME lift, heavy coils f/r 3/16" steel skids Modified Coastal Offroad diy bumper 5spd swap ('98 donor)
    If you're going to the hassle and expense of replacing the plastic plugs, you should skip that step and just build your own relay harness, using the original driverside plug as your trigger. The entire point of a relay harness is to maximize the performance of a halogen bulb, regardless of wattage. Starving a high wattage bulb is just going to reduce its output and put unnecessary strain on your original wiring harness, connectors *And the Switch on the stalk.* Why bother going for a high wattage bulb if you're not going to try to make use of it. At that point a half decent stock wattage bulb is likely to perform better.

    That's one aspect you are forgetting about in this equation.
     
    crashnburn80[OP] and TacoFergie like this.
  20. Nov 30, 2021 at 8:22 AM
    #4140
    crashnburn80

    crashnburn80 [OP] Vehicle Design Engineer

    Joined:
    Jun 6, 2015
    Member:
    #156893
    Messages:
    14,751
    Gender:
    Male
    Kirkland, WA
    Vehicle:
    2003 DCSB TRD OR
    Swapping to a ceramic connector fixes that failure point. However performance will be poor due to voltage drop, it isn’t going to be an upgrade. Halogens are extremely sensitive to voltage and experience exponential gains/losses to the power of 3.4 with changes in voltage. Without the heavy gauge wiring your going to experience voltage drop pulling 100w through the factory harness causing an exponential loss in output on the voltage difference. Vs higher voltage than stock to the bulbs to boost performance for exponential gains based on voltage difference. Many others in this thread have gone down this same path of trying high wattage bulbs with no harness upgrade and found the results extremely disappointing, thinking this mod didn’t really work. Then adding the harness and realizing they were just missing a key component in getting the true performance out of a high wattage bulb.
     
    06tacomafan, Pearson and Toy_Runner like this.

Products Discussed in

To Top