

-
Welcome to Tacoma World!
You are currently viewing as a guest! To get full-access, you need to register for a FREE account.
As a registered member, you’ll be able to:- Participate in all Tacoma discussion topics
- Communicate privately with other Tacoma owners from around the world
- Post your own photos in our Members Gallery
- Access all special features of the site
 Kayak Hauling
 Pcv catch can
 OEM Blackout Emblem PN's?
 Aftermarket wireless charger replacement
 Front Diff Breather oil leak
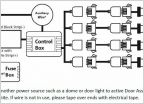 Is there a fuse thats only hot when headlights/dashlights on
Weather Tech Mud Guards for the '16 Installed
Discussion in '3rd Gen. Tacomas (2016-2023)' started by Sir James, Dec 24, 2015.
Page 1 of 2
Page 1 of 2


