1. Welcome to Tacoma World!

    You are currently viewing as a guest! To get full-access, you need to register for a FREE account.

    As a registered member, you’ll be able to:
    • Participate in all Tacoma discussion topics
    • Communicate privately with other Tacoma owners from around the world
    • Post your own photos in our Members Gallery
    • Access all special features of the site

Zach's 2013 DCSB Build

Discussion in '2nd Gen. Builds (2005-2015)' started by zscott, Nov 18, 2013.

  1. Jan 8, 2016 at 9:07 AM
    #561
    Cohbsteq

    Cohbsteq Hood Rat

    Joined:
    Oct 27, 2013
    Member:
    #115350
    Messages:
    4,316
    Gender:
    Male
    First Name:
    Jacob
    SL,UT
    Vehicle:
    02 Supercharged 4x4
    Pretty much stock with some crap welded to it.
    what did u do with your old tire swing out? :D
     
  2. Jan 8, 2016 at 9:10 AM
    #562
    zscott

    zscott [OP] Well-Known Member Vendor

    Joined:
    Jul 16, 2013
    Member:
    #108365
    Messages:
    3,742
    Gender:
    Male
    First Name:
    Zach
    Utah
    Vehicle:
    13 DCSB Off-Road 4x4
    The swngout was cut up and used the steel on little odds and ends projects. The spindle I cut off the bumper and tossed. The latch is still in my garage somewhere waiting to be used on another project.
     
  3. Jan 8, 2016 at 9:31 AM
    #563
    Cohbsteq

    Cohbsteq Hood Rat

    Joined:
    Oct 27, 2013
    Member:
    #115350
    Messages:
    4,316
    Gender:
    Male
    First Name:
    Jacob
    SL,UT
    Vehicle:
    02 Supercharged 4x4
    Pretty much stock with some crap welded to it.
    ahh lame man.
     
  4. Jan 8, 2016 at 9:36 AM
    #564
    Crom

    Crom Super-Deluxe Member

    Joined:
    Jun 22, 2009
    Member:
    #18782
    Messages:
    9,634
    Gender:
    Male
    First Name:
    Nick
    San Diego, CA
    Vehicle:
    2009 4x4 DCSB Camp Supreme
    Millions
    Zach, I had the same problem with the spare hitting the diff housing under compression. The solution is to relocate the spare tire hanger back about 1" Problem totally solved.

    I did a writeup with pics in my build thread here.


    Also, make sure you read this post here, if your interested in the mod.
     
  5. Jan 8, 2016 at 9:49 AM
    #565
    zscott

    zscott [OP] Well-Known Member Vendor

    Joined:
    Jul 16, 2013
    Member:
    #108365
    Messages:
    3,742
    Gender:
    Male
    First Name:
    Zach
    Utah
    Vehicle:
    13 DCSB Off-Road 4x4
    I saw that in your build thread and may end up going that route. Even then though I don't really want to chop the exhaust and it is really close to the tire.
     
  6. Jan 8, 2016 at 9:54 AM
    #566
    Crom

    Crom Super-Deluxe Member

    Joined:
    Jun 22, 2009
    Member:
    #18782
    Messages:
    9,634
    Gender:
    Male
    First Name:
    Nick
    San Diego, CA
    Vehicle:
    2009 4x4 DCSB Camp Supreme
    Millions
    Chopping the exhaust is not required, at least I don't think so, but honestly can't remember at this point.. I have mine trimmed after the last hanger, contrary to most who chop it after the axle downturn. I wanted to retain the last hanger.

    Anyways, the Toyo is squeezed in between the drivers side frame shacke hanger and the last exhaust hanger. IMO, this is a good thing, helps stabilize the 85lb spare tire. :) I did pound the hanger a little bit with a hammer, but I don't think it was necessary or even that helpful. The tire is a tight fit, but it works, and after numerous off road trips, there are no downsides as far as I can tell. The tire and exhaust clear by over 1", and no issues with heat as far as I can tell.
     
  7. Jan 8, 2016 at 10:18 AM
    #567
    zscott

    zscott [OP] Well-Known Member Vendor

    Joined:
    Jul 16, 2013
    Member:
    #108365
    Messages:
    3,742
    Gender:
    Male
    First Name:
    Zach
    Utah
    Vehicle:
    13 DCSB Off-Road 4x4
    I will have to see how much more clearance I get when I move the tire back. I don't have the exhaust chopped now but on that last hanger it is almost rubbing on the tire as is the hanger on the other side. I haven't noticed any damage so far but I would hate to be in the middle of nowhere and go the get my spare out only to find that it has been damaged from one or more of the obstructions.

    I am sure your Toyo is larger than my ST Maxx though so maybe moving it back will help. I may just chop out all the stock stuff back there and weld in a new crossmember with the tire carrier built in.
     
  8. Jan 8, 2016 at 11:02 AM
    #568
    ckeene9

    ckeene9 Well-Known Member

    Joined:
    Sep 20, 2012
    Member:
    #87325
    Messages:
    10,848
    Gender:
    Male
    Chesterfield, VA
    Vehicle:
    '12 DCSB Supercharged 4x4 TRD Sport
    See Build Thread
    What is the purpose of the clevis and spring assembly in that configuration?
     
  9. Jan 8, 2016 at 11:04 AM
    #569
    zscott

    zscott [OP] Well-Known Member Vendor

    Joined:
    Jul 16, 2013
    Member:
    #108365
    Messages:
    3,742
    Gender:
    Male
    First Name:
    Zach
    Utah
    Vehicle:
    13 DCSB Off-Road 4x4
    Clevis is to give you more adjustment with the limit straps for when they stretch, or you measure wrong to begin with. The spring, with keep tension on the clevis from the bottom so it isnt sliding up and down in the sleeve mounted to the frame.
     
  10. Jan 8, 2016 at 11:44 AM
    #570
    ckeene9

    ckeene9 Well-Known Member

    Joined:
    Sep 20, 2012
    Member:
    #87325
    Messages:
    10,848
    Gender:
    Male
    Chesterfield, VA
    Vehicle:
    '12 DCSB Supercharged 4x4 TRD Sport
    See Build Thread
    Thanks, I've seen it with the spring on top of the tube but I guess both ways work.
     
  11. Jan 8, 2016 at 12:00 PM
    #571
    SconnieHailer

    SconnieHailer PutterClutch

    Joined:
    Aug 26, 2012
    Member:
    #85590
    Messages:
    9,765
    Gender:
    Male
    First Name:
    Marc
    West Central Wisconsin
    Vehicle:
    2012 TRD Off Road Double Cab V6 6Speed
    Spring is no good on top of the mount cuz the weight of the unload when the strap tightens will smash that spring into a worthless mangled mess. The spring under the mount is to keep the clevis from jingling and sliding up like Zach said
     
    ckeene9[QUOTED] likes this.
  12. Jan 8, 2016 at 12:45 PM
    #572
    zscott

    zscott [OP] Well-Known Member Vendor

    Joined:
    Jul 16, 2013
    Member:
    #108365
    Messages:
    3,742
    Gender:
    Male
    First Name:
    Zach
    Utah
    Vehicle:
    13 DCSB Off-Road 4x4
    Got my full size spare mounted on another gunmetal F5 today. Now to figure out where to put it.
     
    ChandlerDOOM likes this.
  13. Jan 8, 2016 at 12:56 PM
    #573
    zscott

    zscott [OP] Well-Known Member Vendor

    Joined:
    Jul 16, 2013
    Member:
    #108365
    Messages:
    3,742
    Gender:
    Male
    First Name:
    Zach
    Utah
    Vehicle:
    13 DCSB Off-Road 4x4
    I have a dangerous plan to chop my bedslide up... Right now the platform of it is 39" wide. I could fit a 41" wide platform easily. The frame is only about 20" wide so about 10" on each side of the frame is just cantilevered. The platform is wood and works well but leaves some to be desired. The cantilevered parts easily sag under weight which had given me the idea to repalce it with an aluminum platform with press brake formed sides to add rigidity.

    For the bed setup I am considering I could chop the platform to a narrower width and have the bedslide operate on one half of the bed. The other half would then have clearance to mount the spare tire upright like the Total Chaos tacoma is. If I don't like the setup that way, I can return it to original by building my aluminum platform and returning the bedslide to normal.

    Under the bed would be ideal for the tire but I just can't bring myself to tucking the nice shiny F5 under the bed to be molested by the elements.
     
    ChadsPride likes this.
  14. Jan 10, 2016 at 9:42 PM
    #574
    zscott

    zscott [OP] Well-Known Member Vendor

    Joined:
    Jul 16, 2013
    Member:
    #108365
    Messages:
    3,742
    Gender:
    Male
    First Name:
    Zach
    Utah
    Vehicle:
    13 DCSB Off-Road 4x4
    Had a fun time this weekend snowmobiling. Had a mishap with the truck too. On the way out to lodge we stayed at there is a pretty rough washboard road that is covered in snow. Not big bumps but lots of little stuff. I was pushing the truck pretty hard to test out the new front suspension going out there :mudding: and about halfway out I noticed a rattle. We snowmobiled the next day and in the afternoon I tightened everything up in the front to make sure nothing was backing out since the new suspension install. Everything looked good so I took it for a test drive. No rattle, everything seemed good.

    This morning we left and headed out, had a few small rattles but nothing major so I figured it was just the washboard. Well just before we hit the highway again I press on the brakes and there is nothing there. I push harder and harder and finally something grabs and I can get stop. Pulled over and am looking around only to find that the driver side front caliper is completely disconnected from the spindle and the hard brake line is broken off. :eek:

    Still now I have no idea how it happened. The bolts were nowhere to be found. Checked the torque the night before, other side is completely tight, no other signs of anything. So I took the wheel off, removed the caliper and drove 2 hours home with just the rear brakes :oops: . Got home and was able to find some bolts and a brake line from the auto parts store. Installed everything and bled the brake lines and all is good now. Its a miracle the master cylinder didn't drain and even more so that I was able to find the correct bolts to reattach the caliper to the knuckle.

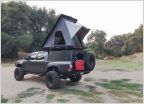
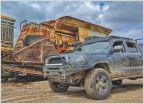
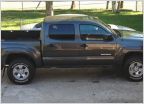
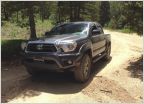
    Anyhow, another lesson in auto mechanics and an otherwise fun weekend. Here are a few shots of the truck!

    profile.jpg
    front.jpg
    34.jpg
    top.jpg
     
  15. Jan 11, 2016 at 5:26 AM
    #575
    Acerwin

    Acerwin The unNORM NORM

    Joined:
    Nov 20, 2014
    Member:
    #142732
    Messages:
    32,623
    Gender:
    Male
    First Name:
    Andrew
    South Carolina
    Vehicle:
    Toyota Tundra
    What you doing for a fuse block? I've looked at you mods list but I didn't see anything that I knew was one.
     
  16. Jan 11, 2016 at 6:39 AM
    #576
    zscott

    zscott [OP] Well-Known Member Vendor

    Joined:
    Jul 16, 2013
    Member:
    #108365
    Messages:
    3,742
    Gender:
    Male
    First Name:
    Zach
    Utah
    Vehicle:
    13 DCSB Off-Road 4x4
    I ha two blue sea blocks. They are kind of in a state of crisis right now since I moved some things around but I should have them cleaned up soon.
     
    Acerwin[QUOTED] likes this.
  17. Jan 11, 2016 at 6:41 AM
    #577
    Acerwin

    Acerwin The unNORM NORM

    Joined:
    Nov 20, 2014
    Member:
    #142732
    Messages:
    32,623
    Gender:
    Male
    First Name:
    Andrew
    South Carolina
    Vehicle:
    Toyota Tundra
    Thanks! I'm trying to figure out what to do
     
  18. Jan 11, 2016 at 6:51 AM
    #578
    zscott

    zscott [OP] Well-Known Member Vendor

    Joined:
    Jul 16, 2013
    Member:
    #108365
    Messages:
    3,742
    Gender:
    Male
    First Name:
    Zach
    Utah
    Vehicle:
    13 DCSB Off-Road 4x4
    Blue sea is simple and effective. Not the "best" option but price, functionality, and ease of install all line up nice. I needed something with lots of capacity for all my auxiliary stuff.

    Roof lightbar
    Bumper lightbar
    Camp lights
    Secondary Power inverter
    In cab usb, 12v, and 120v outlets in back seat
    Water pump in the bed
    12v plug in the bed
    Bed lights
    Ditch lights


    I plan to do:
    Back up lights
    Rock lights
     
    ChadsPride and Acerwin like this.
  19. Jan 12, 2016 at 7:51 AM
    #579
    zscott

    zscott [OP] Well-Known Member Vendor

    Joined:
    Jul 16, 2013
    Member:
    #108365
    Messages:
    3,742
    Gender:
    Male
    First Name:
    Zach
    Utah
    Vehicle:
    13 DCSB Off-Road 4x4
    So while I had the caliper off due to little incident over the weekend I noticed the brake pads were getting low. Because the caliper on the driver side was unbolted for an unknown amount of time on the road out the other day it scored up the rotor significantly so I decided to just replace the rotors and pads. Quick job and I had it done in about an hour for both sides.

    No for the problem that I am about sick and tired of. Anyone else have issues with the dust guards for the rotors on the front brakes. Mine have rubbed every once in awhile since I bought the truck. With the new spindle gussets and suspension it was more frequently. Just before I lost the caliper the other day I had them to the point where they weren't rubbing at all. Now, new rotors and they are rubbing like crazy. Spent almost and hour bending them and trying to get them to not rub, little improvement this morning but still rubs. Going back at them with a big hammer tonight.
     
  20. Jan 12, 2016 at 9:16 AM
    #580
    Crom

    Crom Super-Deluxe Member

    Joined:
    Jun 22, 2009
    Member:
    #18782
    Messages:
    9,634
    Gender:
    Male
    First Name:
    Nick
    San Diego, CA
    Vehicle:
    2009 4x4 DCSB Camp Supreme
    Millions
    HO LEE CHIT!!! That's insane! When braking with an open line like that, I would expect fluid to just squirt out, and brakes to be mostly non functional. Especially considering you have an off road model truck. It would be great if there was a way to cap an open hardline for emergency repairs. On my last few trips last year I've been packing 32oz DOT 4 brake fluid, just in case I got a leak and need to resupply to get back to pavement.

    That's pretty insane what happened to you. Wow! And plus one on being prepared and able to deal with it. That's pretty great. :thumbsup:

    Truck looks good!

    I has no issues with the dust guard. Mine made a horrible noise once (35 miles from pavement, scared me bad) when I went through a mountain stream when it was 107*F outside.
     
To Top