

-
Welcome to Tacoma World!
You are currently viewing as a guest! To get full-access, you need to register for a FREE account.
As a registered member, you’ll be able to:- Participate in all Tacoma discussion topics
- Communicate privately with other Tacoma owners from around the world
- Post your own photos in our Members Gallery
- Access all special features of the site
 Reflective 4x4 emblem on rear mud flaps
 Drive Shafts: Two Types of Grease?
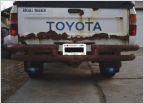
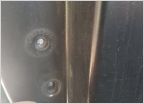 Broken Bolts in Taillight Assembly
 Sound System Upgrade
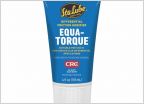 Low Rear Diff fluid symptoms?
 New to me 2015
09 Access Cab Revival Project
Discussion in '2nd Gen. Tacomas (2005-2015)' started by Kailey Jo, Aug 19, 2011.


