

-
Welcome to Tacoma World!
You are currently viewing as a guest! To get full-access, you need to register for a FREE account.
As a registered member, you’ll be able to:- Participate in all Tacoma discussion topics
- Communicate privately with other Tacoma owners from around the world
- Post your own photos in our Members Gallery
- Access all special features of the site
 Information on toyota bed mats
 Block Heater Install (My Experience, 2012 TRD Sport)
 Under the hood On Board Air
 Rear LED lighting options?
 Alignment Cam Sham
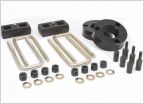 Opinions on Lift
How-to disable auto-dim on Gentex mirror when in reverse
Discussion in '2nd Gen. Tacomas (2005-2015)' started by cmbondo, Nov 17, 2014.


