1. Welcome to Tacoma World!

    You are currently viewing as a guest! To get full-access, you need to register for a FREE account.

    As a registered member, you’ll be able to:
    • Participate in all Tacoma discussion topics
    • Communicate privately with other Tacoma owners from around the world
    • Post your own photos in our Members Gallery
    • Access all special features of the site

TacoSTIG: PNW MT Build

Discussion in '2nd Gen. Builds (2005-2015)' started by TacoSTIG, Jan 19, 2015.

  1. May 29, 2016 at 4:19 PM
    #721
    TacoSTIG

    TacoSTIG [OP] Untamed Member

    Joined:
    Jun 22, 2014
    Member:
    #132473
    Messages:
    1,141
    Gender:
    Male
    First Name:
    Jeremy
    WA, Issaquah
    Vehicle:
    2005 AC, TRD OR
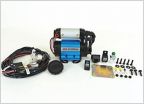
    And... another project that's been taking shape in the living room.

    1. ARB Dual Compressor
    2. ARB Locker Solonoid
    3. ARB Locker Manifold
    4. ARB Hose kit
    5. Powertank HD digital inflator w/6' lead.
    6. Slee Offroad Compressor Mount Kit

     
    Pirhett, Nate87 and utroda like this.
  2. May 29, 2016 at 4:25 PM
    #722
    NorthwestCruiser

    NorthwestCruiser Well-Known Member

    Joined:
    Nov 20, 2013
    Member:
    #117000
    Messages:
    13,081
    Gender:
    Male
    First Name:
    Brian
    Snohomish, WA
    Vehicle:
    1996 Land Cruiser
    Custom 3 link, 40's etc..
    You still haven't wired up your front locker??
     
  3. May 29, 2016 at 4:53 PM
    #723
    velillen

    velillen Well-Known Member

    Joined:
    Dec 14, 2013
    Member:
    #118589
    Messages:
    5,922
    Gender:
    Male
    First Name:
    Nick
    Wyoming
    Vehicle:
    2011 Access Cab 4x4
    I just went out and checked it and its down to 50% (well hard ot say exactly the 50% light is on). Thats with it just sitting in there for a few months.

    Its easy to charge since it uses the same cable as my phone its just a matter of remembering to do it. But i usually do it when going out camping/wheeling.
     
    TacoSTIG[QUOTED][OP] likes this.
  4. May 29, 2016 at 4:59 PM
    #724
    TacoSTIG

    TacoSTIG [OP] Untamed Member

    Joined:
    Jun 22, 2014
    Member:
    #132473
    Messages:
    1,141
    Gender:
    Male
    First Name:
    Jeremy
    WA, Issaquah
    Vehicle:
    2005 AC, TRD OR
    Haha first things first, I'm still roadblocked by establishing a solid wiring system for the compressor and well, everything.

    That said... :spy:

    Layout planning...
     
  5. May 29, 2016 at 5:06 PM
    #725
    Acerwin

    Acerwin The unNORM NORM

    Joined:
    Nov 20, 2014
    Member:
    #142732
    Messages:
    32,623
    Gender:
    Male
    First Name:
    Andrew
    South Carolina
    Vehicle:
    Toyota Tundra
    Can't wait to see this...mine should be ordered here soon
     
    TacoSTIG[QUOTED][OP] likes this.
  6. May 29, 2016 at 5:12 PM
    #726
    TacoSTIG

    TacoSTIG [OP] Untamed Member

    Joined:
    Jun 22, 2014
    Member:
    #132473
    Messages:
    1,141
    Gender:
    Male
    First Name:
    Jeremy
    WA, Issaquah
    Vehicle:
    2005 AC, TRD OR
    :yes:
     
    Acerwin[QUOTED] likes this.
  7. May 30, 2016 at 12:33 AM
    #727
    TacoSTIG

    TacoSTIG [OP] Untamed Member

    Joined:
    Jun 22, 2014
    Member:
    #132473
    Messages:
    1,141
    Gender:
    Male
    First Name:
    Jeremy
    WA, Issaquah
    Vehicle:
    2005 AC, TRD OR
    Switch-Pro mounting: Location 1

    Where to put those buttons?! I wanted them to be easy to reach, visible, and most of all I wanted them to look as stock as possible. So! I decided to use the factory location and was able to turn three button blanks into eight.


    I measured, eyeballed, and measured again,


    Then the rotary tool came out,


    Blanks cut out,


    Then the files came out,


    Almost there,


    Closer...


    After some slow work with a bit of sandpaper it fit like a glove.


    The painful part:
    After these photos were taken I had to cut the left mounting ear off the switch-pro unit. (above) As you can see it sticks out too far and is in the way of the mirror controller, I initially considered relocating it... but decided against it and made the cut.

    Mounting:
    The unit fits very tight without anything but I decided to future proof it by going overkill. I epoxied one of the supplied mounting nuts to the plastic panel. Then ran a bolt through the remaining mounting ear with a washer.

    Looking forward to put it in the truck tomorrow, more pics to come.
     
    Last edited: May 30, 2016
  8. May 30, 2016 at 8:17 AM
    #728
    XPOTRPR

    XPOTRPR CNC Programmer/Machinist

    Joined:
    May 29, 2011
    Member:
    #57449
    Messages:
    31,136
    Gender:
    Male
    First Name:
    Josh
    Chandler, AZ
    Vehicle:
    [2009 Supercharged Adventuretruck] & [1986 22r Minitruck]
    > BUILD LINKS >
    dude that came out awesome!!! no need for the flush mount now!! lol im jealous :bowdown:
     
    TacoSTIG[OP] likes this.
  9. May 30, 2016 at 11:27 AM
    #729
    TacoSTIG

    TacoSTIG [OP] Untamed Member

    Joined:
    Jun 22, 2014
    Member:
    #132473
    Messages:
    1,141
    Gender:
    Male
    First Name:
    Jeremy
    WA, Issaquah
    Vehicle:
    2005 AC, TRD OR
    Thanks man, I'm really happy with how it turned out. Wasn't fun hacking the side off the switch unit but it was worth it. I'm still surprised I've yet to see anyone else go this route. Now to figure out where to mount the second one.

    The sun came out which is rare around here so it's time to get off my duff root and finish mounting the Prinsu!
     
  10. May 30, 2016 at 11:02 PM
    #730
    TacoSTIG

    TacoSTIG [OP] Untamed Member

    Joined:
    Jun 22, 2014
    Member:
    #132473
    Messages:
    1,141
    Gender:
    Male
    First Name:
    Jeremy
    WA, Issaquah
    Vehicle:
    2005 AC, TRD OR
    Went to re-install the interior plastic today and ran into another small issue.

    These two rectangular sections needed to be trimmed off.


    With those out of the way, it fits perfectly snug.
     
  11. May 30, 2016 at 11:11 PM
    #731
    TacoSTIG

    TacoSTIG [OP] Untamed Member

    Joined:
    Jun 22, 2014
    Member:
    #132473
    Messages:
    1,141
    Gender:
    Male
    First Name:
    Jeremy
    WA, Issaquah
    Vehicle:
    2005 AC, TRD OR
    Picked these Relentless Fabrication quickfist mounts up from @Pyrite Mica last week. Decided having a rouge axe and shovel kicking around the bed wasn't the smartest idea. Thanks again Steve!

     
    Pirhett and PNW/TRD Steve like this.
  12. May 31, 2016 at 12:41 AM
    #732
    TacoSTIG

    TacoSTIG [OP] Untamed Member

    Joined:
    Jun 22, 2014
    Member:
    #132473
    Messages:
    1,141
    Gender:
    Male
    First Name:
    Jeremy
    WA, Issaquah
    Vehicle:
    2005 AC, TRD OR
    Prinsu Install: Part 1
    https://www.tacomaworld.com/threads/tacostig-pnw-mt-build.359720/page-36#post-12549612

    Prinsu Install: Part 2
    After a rough failed first attempt I wasn't too optimistic that round two would be any easier.

    To fix the issues encountered in Part 1 it was necessary to remove the headliner... one thing led to another, and all the panels ended up coming out.
    (It's not necessary to remove it all but I decided to take advantage of the situation for another project)

    (reinstalled the visors, oh shit handles, and ram mount for temporary use being that the interior will be out for a few weeks)

    With the interior removed it was easy to address the three stubborn plusnut installs on the driver side. The broken bolt was easily threaded out using some vice grips from inside, as well as holding the other free spinning plusnut to enable removal of my makeshift tool/bolt.

    This is one of them from the center section on the rack that mounts right over door latch hook. When compressing the plusnut on an uneven surface it does the inevitable. I had this happen to both sides but was able to solve it with some light work with a rotary tool.


    With fresh hardware from Zack and the proper tool I was ready to get back on track!


    Removing the headliner dumped metal shavings from my first pass everywhere, with it out now I approached this issue with a plastic bag and magnets.


    Another thing that makes any drilling into metal job cleaner and easier on your drill bits is the use of cutting fluid. I prefer the foam because it sticks to everything, including vertical surfaces, and even overhead.


    Everything was going great, almost too easy I said to myself... of course moments later things took a turn. A cross threaded plusnut and another sheered bolt! I'm still unsure how I'm doing this, this isn't my first rodeo in diy land, heck I used to be a grease monkey wrenching on sports cars, but I digress. I had plenty of extra bolts and plusnuts this round with time on my side. Plus, my awesome lady was at my side to offer a hand while I wrenched from above. With positive thoughts, and a fresh cup of coffee, we finished all 12.


    I already covered the weatherstripping work in Part 1 so lets skip ahead! All that's left is to install the air dam edge seal, and do something about that 40" gap...
     
    Last edited: May 31, 2016
  13. May 31, 2016 at 12:49 AM
    #733
    TacoSTIG

    TacoSTIG [OP] Untamed Member

    Joined:
    Jun 22, 2014
    Member:
    #132473
    Messages:
    1,141
    Gender:
    Male
    First Name:
    Jeremy
    WA, Issaquah
    Vehicle:
    2005 AC, TRD OR
    Found something in the living room to fill that 40" void in the wind deflector.
     
    Last edited: May 31, 2016
  14. May 31, 2016 at 10:26 AM
    #734
    SonnyBones

    SonnyBones I VOID WARRANTIES

    Joined:
    Nov 21, 2015
    Member:
    #170342
    Messages:
    833
    Gender:
    Male
    First Name:
    Jeffery
    Vehicle:
    2015 TACOMA ACCESS CAB
    All this hard work will soon pay off!! Truck is gonna look even better dude.
     
    TacoSTIG[OP] likes this.
  15. May 31, 2016 at 10:34 AM
    #735
    XPOTRPR

    XPOTRPR CNC Programmer/Machinist

    Joined:
    May 29, 2011
    Member:
    #57449
    Messages:
    31,136
    Gender:
    Male
    First Name:
    Josh
    Chandler, AZ
    Vehicle:
    [2009 Supercharged Adventuretruck] & [1986 22r Minitruck]
    > BUILD LINKS >
    put in some work!! looks good man!
     
    TacoSTIG[OP] likes this.
  16. May 31, 2016 at 12:22 PM
    #736
    TacoSTIG

    TacoSTIG [OP] Untamed Member

    Joined:
    Jun 22, 2014
    Member:
    #132473
    Messages:
    1,141
    Gender:
    Male
    First Name:
    Jeremy
    WA, Issaquah
    Vehicle:
    2005 AC, TRD OR
    That's what I keep telling myself, finally have some good momentum with a pretty aggressive hit list. Looking forward to spend less time wrenching and more time on the trail. Soon!

    Thanks man!
    :cheers:
     
  17. May 31, 2016 at 12:38 PM
    #737
    Acerwin

    Acerwin The unNORM NORM

    Joined:
    Nov 20, 2014
    Member:
    #142732
    Messages:
    32,623
    Gender:
    Male
    First Name:
    Andrew
    South Carolina
    Vehicle:
    Toyota Tundra
    Snorkel time now :D
     
    TacoSTIG[OP] likes this.
  18. May 31, 2016 at 12:51 PM
    #738
    TacoSTIG

    TacoSTIG [OP] Untamed Member

    Joined:
    Jun 22, 2014
    Member:
    #132473
    Messages:
    1,141
    Gender:
    Male
    First Name:
    Jeremy
    WA, Issaquah
    Vehicle:
    2005 AC, TRD OR
    :lalala:


    Actually.... I've been thinking more about it and think I figured out what I'm going to do. But, that project is low on the hit list.
     
    Acerwin[QUOTED] likes this.
  19. May 31, 2016 at 12:52 PM
    #739
    2ndGenJonny

    2ndGenJonny Well-Known Member Vendor

    Joined:
    Jan 3, 2013
    Member:
    #94306
    Messages:
    18,457
    Gender:
    Male
    First Name:
    Jon
    Gilbert, AZ

    So you're doing a SC? :)
     
  20. May 31, 2016 at 12:59 PM
    #740
    TacoSTIG

    TacoSTIG [OP] Untamed Member

    Joined:
    Jun 22, 2014
    Member:
    #132473
    Messages:
    1,141
    Gender:
    Male
    First Name:
    Jeremy
    WA, Issaquah
    Vehicle:
    2005 AC, TRD OR
    It's in the cards... but sticks and knobs come first. :turtleride:
     
    XPOTRPR and 2ndGenJonny[QUOTED] like this.
To Top