

-
Welcome to Tacoma World!
You are currently viewing as a guest! To get full-access, you need to register for a FREE account.
As a registered member, you’ll be able to:- Participate in all Tacoma discussion topics
- Communicate privately with other Tacoma owners from around the world
- Post your own photos in our Members Gallery
- Access all special features of the site
 Blowing Fuse
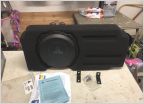 Subwoofer in 2017 TRD Sport?
 Back Up Light Installation Link and BS Thread
 SwitchPro SP-9100 overhead console mount for 3rd generation
Off Road Lights On with High Beams w/ Toggle Switch
Discussion in '3rd Gen. Tacomas (2016-2023)' started by Frogsauce, Jan 7, 2017.
