1. Welcome to Tacoma World!

    You are currently viewing as a guest! To get full-access, you need to register for a FREE account.

    As a registered member, you’ll be able to:
    • Participate in all Tacoma discussion topics
    • Communicate privately with other Tacoma owners from around the world
    • Post your own photos in our Members Gallery
    • Access all special features of the site

Show off your aux fuse panels.

Discussion in 'Lighting' started by Newlife, Dec 29, 2013.

  1. May 12, 2015 at 8:24 PM
    #101
    mistermanny

    mistermanny Well-Known Member

    Joined:
    Feb 25, 2015
    Member:
    #149565
    Messages:
    270
    Gender:
    Male
    Jalisco, Mexico
    Vehicle:
    05 AC 4x4 2.7 5spd
    OME 883/Nitros
    JustinL and VE7OSR like this.
  2. May 17, 2015 at 8:36 PM
    #102
    JustinL

    JustinL Well-Known Member

    Joined:
    Jan 31, 2011
    Member:
    #50299
    Messages:
    3,756
    Gender:
    Male
    First Name:
    Justin
    Berlin, CT
    Vehicle:
    2009 TRD OffRoad DCSB Pyrite Mica
    2012 Conversion
    Manny that's awesome
     
  3. May 17, 2015 at 9:27 PM
    #103
    samiam

    samiam Always here, never there

    Joined:
    Apr 7, 2011
    Member:
    #54533
    Messages:
    3,151
    Gender:
    Male
    First Name:
    Sam
    Stinky Vegas
    Vehicle:
    2008 TRD OR DCSB 4.0 6MT 1E7 Alu Cab
    Workin' on Workin' on it
    lynyrd3 likes this.
  4. May 17, 2015 at 9:29 PM
    #104
    Manwithoutaplan

    Manwithoutaplan the full Monty

    Joined:
    Jan 30, 2008
    Member:
    #4500
    Messages:
    54,602
    Gender:
    Male
    ID
    Vehicle:
    07 Tacoma Speedway Blue Trd 4x4
    -Nitro 4.56 gears - Arb Front and Rear lockers. -Rear Swing out bumper Curiosity of ( Dept .94) https://www.facebook.com/Dept94 -Tinted, -ProComp 6 inch lift with Icon Coil overs and Bilstein's 7100Resi -315/70/17 - 17x8 in Pro Comp Matte black rims 4.5 bs -East Coast Gear Supply Sliders -ALL Pro EXP LEaf pack -Camburg UCA's -CAB mount CHOP
  5. May 17, 2015 at 9:37 PM
    #105
    samiam

    samiam Always here, never there

    Joined:
    Apr 7, 2011
    Member:
    #54533
    Messages:
    3,151
    Gender:
    Male
    First Name:
    Sam
    Stinky Vegas
    Vehicle:
    2008 TRD OR DCSB 4.0 6MT 1E7 Alu Cab
    Workin' on Workin' on it
    Thanks
     
  6. May 23, 2015 at 3:15 PM
    #106
    mistermanny

    mistermanny Well-Known Member

    Joined:
    Feb 25, 2015
    Member:
    #149565
    Messages:
    270
    Gender:
    Male
    Jalisco, Mexico
    Vehicle:
    05 AC 4x4 2.7 5spd
    OME 883/Nitros
    Started making my auxiliary fuse box platform today.

    IMG_20150523_123502_zpsyfb4iydl_9d60589227c0c34cfffa4ff54244d819ac2d02b3.jpg


    Trimmed down to size..but the mounting end isn't tall enough, as I would like it to sit lower.
    Platform is made from a heavy duty steel shelf.

    IMG_20150523_131321_zpsqaf9zhzp_a4f674d4ccbc4fd75cabd03c500ff1828cac76aa.jpg


    A few spot welds and paint left to do, and call it good...I think :)
    May play around with mounting straight to the wheel well.

    IMG_20150523_141459_zpsp02f4cga_2da295fa71ad5e811addc942a93a7c79773ca6e6.jpg
     
    mic_sierra, Manfred and samiam like this.
  7. May 23, 2015 at 11:12 PM
    #107
    Yotamac

    Yotamac Well-Known Member Vendor

    Joined:
    Mar 30, 2013
    Member:
    #100909
    Messages:
    1,336
    Gender:
    Male
    First Name:
    Ze
    562- Cerritos, CA
    Vehicle:
    07 PreRunner
    Stuff, stuff and more stuff
    looking good!
     
  8. May 28, 2015 at 2:16 PM
    #108
    mistermanny

    mistermanny Well-Known Member

    Joined:
    Feb 25, 2015
    Member:
    #149565
    Messages:
    270
    Gender:
    Male
    Jalisco, Mexico
    Vehicle:
    05 AC 4x4 2.7 5spd
    OME 883/Nitros
    Thanks :)

    More progress on the auxiliary fuse box mount.

    20150528_132326_zpsserwylvw_9a9ee17ebd71cb93934697d1cec6cf7e02967309.jpg

    20150528_140150_zpsfhcriqsp_9150049e1312b262c7a46ccd7f291052e7c925d9.jpg


    Will weld both plates together (and paint), but this is the idea I was going for.

    20150528_140251_zpsvdeswcta_6fee113bf7c02254bae161014fd9b8250009e78d.jpg


    Need to verify fit on the truck (which is at the shop this week) for final fitting.
     
  9. May 28, 2015 at 4:58 PM
    #109
    weldo

    weldo Well-Known Member

    Joined:
    Oct 15, 2014
    Member:
    #140423
    Messages:
    1,337
    Gender:
    Male
    First Name:
    Mike
    Pittsburgh, pa
    Vehicle:
    2014 base ac 2.7 5-speed 4x4
    Hey, I have a question for you guys with blue sea boxes.

    Since any accessories can be grounded to the body or frame near the accessory itself, are you running individual accessory grounds all the way back to the "ground" section of the box solely for switching purposes?

    That is, the switch in the cab is wired into the ground portion of the circuit as opposed to the power or "load" portion of the circuit?

    Also, for blue sea 5026, what amperage circuit breaker is recommended, and is it a terrible idea to run without one?

    Thanks!
     
  10. May 28, 2015 at 5:22 PM
    #110
    JustinL

    JustinL Well-Known Member

    Joined:
    Jan 31, 2011
    Member:
    #50299
    Messages:
    3,756
    Gender:
    Male
    First Name:
    Justin
    Berlin, CT
    Vehicle:
    2009 TRD OffRoad DCSB Pyrite Mica
    2012 Conversion
    Mike that's a good point. I'm embarrassed to show my ground setup.
     
  11. May 28, 2015 at 5:46 PM
    #111
    samiam

    samiam Always here, never there

    Joined:
    Apr 7, 2011
    Member:
    #54533
    Messages:
    3,151
    Gender:
    Male
    First Name:
    Sam
    Stinky Vegas
    Vehicle:
    2008 TRD OR DCSB 4.0 6MT 1E7 Alu Cab
    Workin' on Workin' on it
    I don't run all of my grounds to the box. Only the few that I have under the hood.
     
  12. May 28, 2015 at 6:05 PM
    #112
    Yotamac

    Yotamac Well-Known Member Vendor

    Joined:
    Mar 30, 2013
    Member:
    #100909
    Messages:
    1,336
    Gender:
    Male
    First Name:
    Ze
    562- Cerritos, CA
    Vehicle:
    07 PreRunner
    Stuff, stuff and more stuff
    There is no reason to run the ground all the way back to the box or switch.
    The 5026 is rated at
    100A per block
    30A per circuit
     
  13. May 28, 2015 at 6:56 PM
    #113
    weldo

    weldo Well-Known Member

    Joined:
    Oct 15, 2014
    Member:
    #140423
    Messages:
    1,337
    Gender:
    Male
    First Name:
    Mike
    Pittsburgh, pa
    Vehicle:
    2014 base ac 2.7 5-speed 4x4
    So to wire in a switch, the "load" wire goes from the accessory to the switch in the cab then to the fuse box. The accessory is just grounded where convenient. Thus the "load" portion of the circuit is switched, right? I think I read somewhere that it doesn't really matter if you switch the load wire or ground wire. Just two different means to an end.

    Also, a 100 amp breaker is the best choice, or should I be conservative and go 80. I don't expect even half that much draw, all I got are some leds. I may go 80 just to be safe.

    Thanks fellas!
     
  14. May 28, 2015 at 8:17 PM
    #114
    Yotamac

    Yotamac Well-Known Member Vendor

    Joined:
    Mar 30, 2013
    Member:
    #100909
    Messages:
    1,336
    Gender:
    Male
    First Name:
    Ze
    562- Cerritos, CA
    Vehicle:
    07 PreRunner
    Stuff, stuff and more stuff

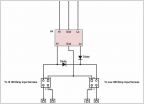
    You need a relay in there too... The load wire from the switch in the cab should go to a relay and the accessory will be powered from the relay. The fused power wire from the box will power your relay. Once you use a relay you will need to know which wires are hot. 100 is the max rated so your safe using 100 AMP breaker.
    Good luck on your install...
     
  15. May 29, 2015 at 3:21 AM
    #115
    weldo

    weldo Well-Known Member

    Joined:
    Oct 15, 2014
    Member:
    #140423
    Messages:
    1,337
    Gender:
    Male
    First Name:
    Mike
    Pittsburgh, pa
    Vehicle:
    2014 base ac 2.7 5-speed 4x4
    fan_relay_2.gif

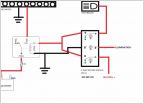
    So in this diagram, where would the fuse be? Also, in the diagram the accessory and pin 86 share a ground, but they don't necessarily have to be grounded to the same spot, right? For example, reverse lights can be grounded to the frame at the rear of the truck, and the relay can be grounded under the hood, at the battery or fuse block itself.

    Also I should state that I plan on wiring my lights so they can be on any time, even with ignition off.

    Thanks for your patience with my questions, I'm close to finally having a solid grip on basic 12v systems!
     
  16. May 29, 2015 at 6:24 AM
    #116
    VE7OSR

    VE7OSR нет войне

    Joined:
    Dec 12, 2011
    Member:
    #68608
    Messages:
    5,777
    Gender:
    Male
    First Name:
    Rob II
    Okanagan, Canada
    Vehicle:
    05 DCLB TRD Sport
    Armour: All-Pro Skid plates - IFS, transmission, and transfer case. Pelfreybilt rear standard plate bumper, Metal Tech Sliders w/ kickout and dimple die filler plates. Front Suspension: OME 885 + NitroCharger 9000 shocks + 1/2" spacers for a 3" lift. Superbumps replacing stock bumpstops. Camburg ball joint UCA SS braid brake lines Future: ADS Extended length, extended length UCA BJ to increase droop capability Rear Suspension: All-Pro Expedition rear leafs, Walker Evans 27" rear shocks, extended rear brake lines (Wheelers Offroad), U -bolt flip kit, rear Timbren bumpstops. Future: Hammer Hangers, Shock relocate, ADS 12" or 14" shock. Interior: Weatherteck floor liners - front, Wet Okoles- front, ScanGauge, LED interior & map lights. Power moonroof. Exterior: Raider Cobra canopy, retrofit headlight by Insight, LED bulbs all around, modified flasher unit for LEDs. Rear diff breather mod. Front diff vibe problem, driver's side needle bearing replaced with ECGS bushing. yet to install: HID Blazer Fog Retrofit, LED Flood & Spot, + switches, fuse panel. swaybar relocate blocks (build my own)
    Correct
    Fuse should be where the diagram is labelled +12V. Fuse rating should be slightly more than your intended load
    Eg 100W LED light bar / 12V = 8.2A; Fuse at 10A.
     
    Stryker420 likes this.
  17. May 29, 2015 at 12:50 PM
    #117
    weldo

    weldo Well-Known Member

    Joined:
    Oct 15, 2014
    Member:
    #140423
    Messages:
    1,337
    Gender:
    Male
    First Name:
    Mike
    Pittsburgh, pa
    Vehicle:
    2014 base ac 2.7 5-speed 4x4
    Thanks all, this has been most helpful! :bowdown:
     
    Stryker420 likes this.
  18. May 29, 2015 at 2:13 PM
    #118
    weldo

    weldo Well-Known Member

    Joined:
    Oct 15, 2014
    Member:
    #140423
    Messages:
    1,337
    Gender:
    Male
    First Name:
    Mike
    Pittsburgh, pa
    Vehicle:
    2014 base ac 2.7 5-speed 4x4
    Final review:

    2 wires come out from an led light bar (sounds like the start of a rude joke!). The ground wire runs to a convenient spot on the frame. The "load" wire runs to pin 87 of a relay. The light is now wired and done.

    Next a wire runs from pin 30 of the same relay to the "load" or "in" pin of a switch mounted in the cab.

    A third wire will run from the positive fuse block terminal also to the "load" or "in" pin of the switch. The 2 wires will share a single spade connector and connect to the same pin on the switch.

    A fourth wire will run from the "acc" or "out" pin of the switch to pin 85 of the relay.

    Finally a fifth wire will run from pin 86 of the relay to a convenient ground. This will most likely be at the fuse box itself, as the relays well be mounted on the same mounting plate as the box itself.

    I think that's correct.

    Final question:

    Even though it is not required to run all ground wires back to the fuse box, is it still good practice to do so? I remember hearing once that if you can ground everything to the negative battery terminal you will have the best possible ground, and if there is every a problem requiring you to troubleshoot your electrical system, you only have one ground to check because everything grounds to the same place. In the instance of an aux fuse block, the negative terminals are equally as good as the negative terminal on the battery itself. It's it worth the extra wire and work?
     
  19. May 29, 2015 at 2:18 PM
    #119
    weldo

    weldo Well-Known Member

    Joined:
    Oct 15, 2014
    Member:
    #140423
    Messages:
    1,337
    Gender:
    Male
    First Name:
    Mike
    Pittsburgh, pa
    Vehicle:
    2014 base ac 2.7 5-speed 4x4
    Wait, the wire from pin 30 of the relay would run to the fuse block terminal then another wire from the same fuse block terminal to the "load" pin of the switch.
     
  20. May 29, 2015 at 2:23 PM
    #120
    Up2NoGood

    Up2NoGood Well-Known Member

    Joined:
    Jun 23, 2014
    Member:
    #132511
    Messages:
    3,302
    Gender:
    Male
    First Name:
    Jaimes
    BC, Canada
    Vehicle:
    2014 TRD Sport DCLB
    You got it close what you need is:

    Ground of light bar grounded where convenient

    RELAY

    Pin 30 - connected to a fused power source
    Pin 85 - From switch output
    Pin 86 - Grounded where convenient
    Pin 87 - Connected to positive of light bar

    Will also need a positive lead running to the input side of your switch. If this is for a light bar would recommend a power source that is only live when the truck is on
     

Products Discussed in

To Top