

-
Welcome to Tacoma World!
You are currently viewing as a guest! To get full-access, you need to register for a FREE account.
As a registered member, you’ll be able to:- Participate in all Tacoma discussion topics
- Communicate privately with other Tacoma owners from around the world
- Post your own photos in our Members Gallery
- Access all special features of the site
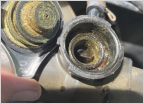 Quick opinions on coolant system sediment
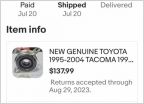 No more Autozone garbage
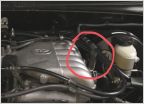 Name that part! (bonus points for part number)
 Fumoto Oil Drain Valve/Skid Plate-?
 Can anyone recommend some good aftermarket headlights for my 97?
 Successful 1350miles trip
First time brake line repair, not so smoothly.
Discussion in '1st Gen. Tacomas (1995-2004)' started by LaserTom, Oct 19, 2016.


