1. Welcome to Tacoma World!

    You are currently viewing as a guest! To get full-access, you need to register for a FREE account.

    As a registered member, you’ll be able to:
    • Participate in all Tacoma discussion topics
    • Communicate privately with other Tacoma owners from around the world
    • Post your own photos in our Members Gallery
    • Access all special features of the site

Project Snowball >>> keywords 4.88 4.88:1 gear install clam clamshell TrailMaster 90385-110 33501G

Discussion in '1st Gen. Tacomas (1995-2004)' started by Whitfield, Apr 4, 2015.

  1. Apr 4, 2015 at 7:15 PM
    #1
    Whitfield

    Whitfield [OP] Well-Known Member

    Joined:
    Mar 21, 2009
    Member:
    #14979
    Messages:
    314
    Gender:
    Male
    Central Virginia
    Vehicle:
    99 TRD X-cab on 35's / 96 X-cab on 33's
    Selling my 96 Tacoma to fund the FJ80 build up.
    1996 Toyota Tacoma SR-5 V6 4wd X-cab on 33x12.50-15's

    Project Snowball ~

    Snowball_ea4bb50f9c2afdb9e0ba0f51192104d02a925315.gif


    Because this cat is half dead and the further I get into it the more problems I'm finding ~ Troubles and $$$ are growing and I've yet to drive it.


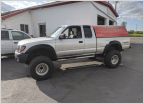
    I picked up a friend of a friend's son's 96 Tacoma (Broken) and take it on as a project. He said the only thing wrong with it was that the wheel had come off. It was currently at his wife's cousin's shop but they were struggling to get it back together. They had purchased and installed a new front wheel bearing into old knuckle but left wheel now had 3" of play. NEW Lower ball joint was welded onto the ORIGINAL broken knuckle WTF??? Seriously???

    Anyway no one wanted to touch it . . . was like the thing had cooties or something...

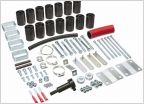
    Trail Master 6' lift ~ Ok maybe cooties would have been a blessing.


    But anyway....


    IMG_0963_5803ba488655fd419609fcc9296d120efccd59e6.jpg


    Most would blame that on the Trail Master kit ~ but reality is that previous mechanic did not Loc-tite the (4) bolts for the lower control arm. When they fell out the wheel departed. Ofcourse, this killed lots of other things ~ CV / Tierod / New Strut (For trail master lift) / Brake line / fender / door / Lower ball joint / Knuckle ect...


    Previous owners wife's cousin tried to revive it ~ New Lower ball joint welded onto the broken knuckle, New tierod, New brake line, new CV Axle Shaft, New Wheel bearing. They were off to a good start until they lost a few pieces from behind the bearing and upon reinstall had 3" of play in the left wheel. So I began with the purchase of a used knuckle. Which also required a NEW lower ball joint since the other new one was welded on.

    Somewhere around here I found that all the lug nuts and studs for the ORIGINAL left front were SAE standard thread. And the new knuckle /hub were factory Metric. Also discovered that the 3 other wheels lug nuts were spline drive and I did not get the spline drive tool with the truck. New set of lug nuts ordered. [​IMG]Now with the front wheel back on / brakes bled / steering connected I was almost ready to drive it 2-miles home and schedule an alignment for next day.


    20150215_161147_2269fdadecd4bdee3e14e976036280523d166a84.jpg


    20150215_161201_03ed29468ac014fe522f8c56e5ae6ed112817966.jpg
     
    Last edited: Apr 4, 2015
    ChadsPride likes this.
  2. Apr 4, 2015 at 7:15 PM
    #2
    Whitfield

    Whitfield [OP] Well-Known Member

    Joined:
    Mar 21, 2009
    Member:
    #14979
    Messages:
    314
    Gender:
    Male
    Central Virginia
    Vehicle:
    99 TRD X-cab on 35's / 96 X-cab on 33's
    Selling my 96 Tacoma to fund the FJ80 build up.
    The new strut for the trail master lift was held onto the top strut mount buy 2-3 threads (Lock nut no where near engaging). Trail Master no longer makes struts for this lift but that is Ok ~ I do. Not my first Taco Trail master dance party. Strut body and shaft chucked up in lathe for modification (pictured is the top of the strut shaft).

    20150223_110715_97bd05414f11f1ceb842cddceba50b15bd3cf783.jpg

    With that new strut good to go I made an attempt to drive it home. Rear end was growling and howling over the radio. Front end was grinding terribly. Dang ~ Seriously... Both ends...

    Front grinding was that I had left off the 1/8" aluminum wheel spacer (the reason they had installed longer SAE lug studs and nuts).
    [​IMG]
    I hate wheel spacers. it turns out that the aftermarket steel wheels did not clear the brake calipers. Well by the time I got home the left one almost cleared. With 30 min and a 4" Angle grinder both front calipers now cleared the front wheels and front grinding noise is fixed.

    Now on to the rear. Pinion bearings had a slight up and down play and a hipster worthy beard of gear oil. Rear drive shaft looked dry / no maintenance. Unbolting shaft rear U-joint felt funny (no play / just slight stiff spot). CV on drive shaft was very stiff and would not flop or even go back straight. It was like the ball had a spring loaded button that was holding it flopped over and would not let it return.

    New rear U-joint Installed / Old U-joint inspected revealed... HD 30 spline U-joint LOL. Bearing wear allowed tehm to cock sideways at a slight angle. This locked them from spinning and turned them into a bushing now sliding back and forth as opposed to rolling back and forth. The pins / bearings then cut divits into the U-joint shaft . . . PLEASE Grease / Service your drive shaft and U-joints regularly.


    1_ba0e0f6d919e8c19df94955e2772874e54ecdb34.jpg


    With some grease and exercise was able to work the CV shaft back into what I feel like is proper operation.

    First test drive it all feels sounds good ~ But this was just slow / around the block. Alignment is still bad.

    Driving to the alignment shop the next day the rear is howling again... Need to inspect further.

    Alignment shop fails the truck for alignment due to OE lower strut bushings being shot. Ugggh cant you just make the wheel point straight??? No! Meanwhile I had spent a large pile of cash on the truck chasing a front bumper. So in a pinch I installed a free set of OEM 200k mile take-off Bilstine struts from my Father-in-laws 96 Taco. Not leaking / Good bushings ~ Not what I want, but they will get me through alignment and buy me a few weeks.


    So back home I inspect the pinion further. Yes that is measurable up / down play... Drain the gear oil to find it low and mixed with water... Sweet ! ! NOT

    A fresh USED take out stock ratio rear is $350 - $550. New 4.88 Installed from East Coast Gear supply in Raleigh NC is not that much more. Yes this truck will see a trailer and I hope to crawl around the mountains of Virginia &* North Carolina with maybe a Uwharrie trip or two. I will instal the 4.88 front at a later date all hwy until it stops drinking from the $$$ well. Sorry No locker ~ Not yet anyway.

    20150315_162838_c58afe60a81e859e15a438c210a49cd6b2b09e86.jpg


    20150318_150809_eb634d12b1a4fe8fbe1030b976259551e716f6b3.jpg

    Installing the new rear lead to me finding the left drum covered in grease / gear oil... Not an uncommon Tacoma find. But what was uncommon was to find that the previous owner had reinstalled the axle with NO Axle seal. Hmmm That explains the mud water / gear oil / dead pinion / Trashed rear diff. So I ordered (2) new rear axle seals from Toyota.


    20150323_200728_db1e9ec0ebede4db678305c22c77519189ba9541.jpg

    Thorough Kerosene bath followed by brake clean spray cleaned most of the the gear oil up.


    On Installation I find out why there was no right axle seal... Housing seal fit got trashed on a previous axle bearing failure.

    Bottom looking up

    2_e66fcc6f805dd8d79ee6dc66b8bed6019fc91af9.jpg

    20150318_182531_b79aeb399833cc839a61f68bfb6c5f25c90a45a4.jpg


    Talking to machinist friends and a few Toyota dealer techs. There are 100 different ways to skin this cat / make the repair. I chose to run a smooth layer of JB weld around the ID of the axle housing seal fit. I then put (2) coast of car way on the seal OD. The intention is to make a mold of the original seal fit on the axle. The very last mm of the original seal fit was still intact so i was not too concerned with centering. Install the seal while the epoxy is still soft. After installation I then went back over the seal to axle joint with a smear of JB weld to fill any gaps and to keep it from popping out. If I ever need to change it i will sand off the light smear of JB weld and pop out the seal from the JB weld mold. . . Hopefully the wax will allow it to release clean leaving a perfect mold of the seal fit OD.

    Repair: (uggh ~ camera auto focused on the point of light on the far side of the housing)

    3_1_92e61ed5cbbafa655d2f17ee82de121dd9c58f3a.jpg


    Good side:

    2_1_913ab2f302fbdf3ee9abc396d8ec719e9f805bad.jpg


    Reassembled and test drive with new 4.88 Rear diff. Still has a slight rear drive line noise. I have now ordered new rear drive shaft center support bearing from Toyota. Hoping to install next week.

    Scheduled front end alignment on 4/6/15
     
    Last edited: Apr 5, 2015
  3. Apr 4, 2015 at 7:16 PM
    #3
    Whitfield

    Whitfield [OP] Well-Known Member

    Joined:
    Mar 21, 2009
    Member:
    #14979
    Messages:
    314
    Gender:
    Male
    Central Virginia
    Vehicle:
    99 TRD X-cab on 35's / 96 X-cab on 33's
    Selling my 96 Tacoma to fund the FJ80 build up.
    Meanwhile I bought an ARB bumper from this Guy (from Fayetteville NC).... Would like to find a build thread for his ride. His Tacoma was very well set up. I believe he mentioned he was lucky enough to commute to work off-road most of the time. When he said like new he was not kidding! Much better condition than I expected... Super nice guy and very easy to deal with. If I'm not mistaken he works for uncle sam righting wrongs around the globe.


    20150307_095919_f5fff9d637a993205d75e4dde35ad6fa0f0964a0.jpg


    20150307_095900_4fb5193af62f9e5e5bc763424a20f894c4d30b9c.jpg


    Tacoma%20ARB%20Bull%20Bar_93b8d4e01ade210fad05ed931cdf395faef355fc.jpg


    I figured I need to install the bumper before I get it aligned... and while I had the bumper off it seemed like a good time to work on the fender / door. But once removed I found a block of wood holding the headlight in alignment. Look like the truck had wacked a deer and deformed the Header panel around the drivers headlight. Headlight and grille are out of position but inner fender is still in good shape so it was defiantly something soft and semi low speed. . .

    First round on door / fender with hammer / dolly and 400 grit wet sand. Door opens and closes now.

    3_76d2c882290b297db79a789684c76bdd74b17576.jpg

    IMG_0963_5803ba488655fd419609fcc9296d120efccd59e6.jpg


    After Much more sheet metal work, + inner fender battery acid damage / rust restoration I was finally able to get the ARB bumper mounted in place. At this time I ordered new FACTORY TOYOTA battery hold down + New grille clips + New Hood prop rod mounting bushing + New Center drive shaft support bearing. The tin metal packing strap + zip ties for battery hold down was just not cutting it.

    The truck also DEMANDED a new battery too... Danged SNOW BALL f16facfb-e2f7-4f71-833d-736f43949a55_dc5998328de321a7975af75bd89e0f0fa0d7bd6a.gif


    1_1_a0bbe5e6f20ed90b5a51808bb7ccb271da7d9ae7.jpg
     
    Last edited: Apr 4, 2015
    MR2 likes this.
  4. Apr 4, 2015 at 7:16 PM
    #4
    Whitfield

    Whitfield [OP] Well-Known Member

    Joined:
    Mar 21, 2009
    Member:
    #14979
    Messages:
    314
    Gender:
    Male
    Central Virginia
    Vehicle:
    99 TRD X-cab on 35's / 96 X-cab on 33's
    Selling my 96 Tacoma to fund the FJ80 build up.
    Reverse
     
  5. Apr 4, 2015 at 7:17 PM
    #5
    Whitfield

    Whitfield [OP] Well-Known Member

    Joined:
    Mar 21, 2009
    Member:
    #14979
    Messages:
    314
    Gender:
    Male
    Central Virginia
    Vehicle:
    99 TRD X-cab on 35's / 96 X-cab on 33's
    Selling my 96 Tacoma to fund the FJ80 build up.
    Forward
     
  6. Apr 4, 2015 at 7:17 PM
    #6
    Whitfield

    Whitfield [OP] Well-Known Member

    Joined:
    Mar 21, 2009
    Member:
    #14979
    Messages:
    314
    Gender:
    Male
    Central Virginia
    Vehicle:
    99 TRD X-cab on 35's / 96 X-cab on 33's
    Selling my 96 Tacoma to fund the FJ80 build up.
    Neutral
     
  7. Apr 4, 2015 at 7:17 PM
    #7
    Whitfield

    Whitfield [OP] Well-Known Member

    Joined:
    Mar 21, 2009
    Member:
    #14979
    Messages:
    314
    Gender:
    Male
    Central Virginia
    Vehicle:
    99 TRD X-cab on 35's / 96 X-cab on 33's
    Selling my 96 Tacoma to fund the FJ80 build up.
  8. Apr 4, 2015 at 7:19 PM
    #8
    roehoe72

    roehoe72 Well-Known Member

    Joined:
    Jan 4, 2009
    Member:
    #12229
    Messages:
    472
    Gender:
    Male
    First Name:
    Dan
    Vacaville, CA
    Vehicle:
    04 dc prerunner v6 trd
    WELDED!? Hory shit batman! Must have been complete morons! Glad its back up! Always nice to see a revived taco!
     
  9. Oct 16, 2016 at 6:04 PM
    #9
    Whitfield

    Whitfield [OP] Well-Known Member

    Joined:
    Mar 21, 2009
    Member:
    #14979
    Messages:
    314
    Gender:
    Male
    Central Virginia
    Vehicle:
    99 TRD X-cab on 35's / 96 X-cab on 33's
    Selling my 96 Tacoma to fund the FJ80 build up.
    Time to install 4.88:1 up front. Trail Master 6" with 33 MT's ~ Rear got the 4.88's 2 years ago.


    01.jpg
     
    ChadsPride likes this.
  10. Oct 16, 2016 at 6:07 PM
    #10
    Whitfield

    Whitfield [OP] Well-Known Member

    Joined:
    Mar 21, 2009
    Member:
    #14979
    Messages:
    314
    Gender:
    Male
    Central Virginia
    Vehicle:
    99 TRD X-cab on 35's / 96 X-cab on 33's
    Selling my 96 Tacoma to fund the FJ80 build up.
    Dirty Pig ~

    02.jpg


    Clean Pig ~

    Stiff brushes + Purple stuff cleaner straight / rinse with water. Then fine clean with kerosene and paint brushes / Rinse with water. Foam Ear Plugs make great protectors for blind holes that you want to keep clean.

    03.jpg
     
    Last edited: Oct 16, 2016
    ChadsPride likes this.
  11. Oct 16, 2016 at 6:14 PM
    #11
    Whitfield

    Whitfield [OP] Well-Known Member

    Joined:
    Mar 21, 2009
    Member:
    #14979
    Messages:
    314
    Gender:
    Male
    Central Virginia
    Vehicle:
    99 TRD X-cab on 35's / 96 X-cab on 33's
    Selling my 96 Tacoma to fund the FJ80 build up.
    Boiled ring gear ~ Sounded like a strange ritual but i actually found it written in the factory Service manual. With out heating the ring gear it does not easily fit onto the carrier. Boiling is the best way to heat it evenly.


    05.jpg


    Checking back lash is done through the inspection hole and requires a HORIZONTAL TEST INDICATOR style dial caliper.

    04.jpg
     
    ChadsPride likes this.
  12. Oct 16, 2016 at 6:17 PM
    #12
    Wolftaco0503

    Wolftaco0503 Well-Known Member

    Joined:
    Oct 29, 2015
    Member:
    #168040
    Messages:
    16,236
    Gender:
    Male
    First Name:
    Adam
    Chicago
    Vehicle:
    2013 Super White LONG BED TRD SPORT 4x4
    Maglite mod Bottle Opener in bed Weathertech Mats Front & Back
    Previous owners wife's cousin tried to revive it


    20150215_161201_03ed29468ac014fe522f8c56e5ae6ed112817966.jpg[/QUOTE]

    Did your wife's cousin best friends daughter do anything?
     
    ChadsPride likes this.
  13. Oct 16, 2016 at 6:18 PM
    #13
    Whitfield

    Whitfield [OP] Well-Known Member

    Joined:
    Mar 21, 2009
    Member:
    #14979
    Messages:
    314
    Gender:
    Male
    Central Virginia
    Vehicle:
    99 TRD X-cab on 35's / 96 X-cab on 33's
    Selling my 96 Tacoma to fund the FJ80 build up.
    Drive side pattern. Good depth and a slight bit toe of center. Pinion will climb toward heal as torque is applied.

    07.jpg


    Coast side pattern ~ A little tight on the toe side but drive side is my primary aim.


    06.jpg
     
    ChadsPride likes this.
  14. Oct 16, 2016 at 6:20 PM
    #14
    Whitfield

    Whitfield [OP] Well-Known Member

    Joined:
    Mar 21, 2009
    Member:
    #14979
    Messages:
    314
    Gender:
    Male
    Central Virginia
    Vehicle:
    99 TRD X-cab on 35's / 96 X-cab on 33's
    Selling my 96 Tacoma to fund the FJ80 build up.
    Fresh FIPG

    08.jpg


    Cleanliness and preparation is the more difficult part of this job.
    09.jpg
     
    ChadsPride likes this.
  15. Oct 16, 2016 at 6:22 PM
    #15
    ChadsPride

    ChadsPride Tacoma Owner & Enthusiast

    Joined:
    Nov 26, 2014
    Member:
    #143119
    Messages:
    127,315
    Vehicle:
    Sponsored by TacomaWorld.com
  16. Oct 16, 2016 at 6:24 PM
    #16
    Whitfield

    Whitfield [OP] Well-Known Member

    Joined:
    Mar 21, 2009
    Member:
    #14979
    Messages:
    314
    Gender:
    Male
    Central Virginia
    Vehicle:
    99 TRD X-cab on 35's / 96 X-cab on 33's
    Selling my 96 Tacoma to fund the FJ80 build up.
    After cleaning the mating surface with a razor blade I then wipe it down with Acetone. Follow that up by block sanding with 400 grit and re-cleaning with Acetone.

    10.jpg

    A picture of my custom made pinion bearing press tool. Galvanized fence post / Polished ID with a dremmel tool and barrel sander.

    12.jpg
     
    MR2 and ChadsPride like this.
  17. Oct 16, 2016 at 6:35 PM
    #17
    Whitfield

    Whitfield [OP] Well-Known Member

    Joined:
    Mar 21, 2009
    Member:
    #14979
    Messages:
    314
    Gender:
    Male
    Central Virginia
    Vehicle:
    99 TRD X-cab on 35's / 96 X-cab on 33's
    Selling my 96 Tacoma to fund the FJ80 build up.
    My shim set up results were as follows. . .


    Original

    Drivers side carrier bearing shim .086

    Passenger Side Carrier bearing shim .1035

    Pinion bearing shim .0827


    After installation of East Coast gear Supply's 4.88's from Motive Gear.

    Drivers side carrier bearing shim .1035

    Passenger Side Carrier bearing shim .086

    Pinion bearing shim .088
     
    ChadsPride likes this.
  18. Oct 16, 2016 at 7:11 PM
    #18
    Whitfield

    Whitfield [OP] Well-Known Member

    Joined:
    Mar 21, 2009
    Member:
    #14979
    Messages:
    314
    Gender:
    Male
    Central Virginia
    Vehicle:
    99 TRD X-cab on 35's / 96 X-cab on 33's
    Selling my 96 Tacoma to fund the FJ80 build up.
    gearinstalls.com/clam1joe.htm ~ Great tech reference for those looking to give it a go. . .
     
    ChadsPride likes this.
  19. Oct 18, 2016 at 5:18 PM
    #19
    Whitfield

    Whitfield [OP] Well-Known Member

    Joined:
    Mar 21, 2009
    Member:
    #14979
    Messages:
    314
    Gender:
    Male
    Central Virginia
    Vehicle:
    99 TRD X-cab on 35's / 96 X-cab on 33's
    Selling my 96 Tacoma to fund the FJ80 build up.
    New NAPA SKF brand seals for my inner cv to axle housing. Kid behind the counter at my Toyota dealer said both sides took the same seal. W R O N G ! ! ! And they would have to order the wrong seal first to see if it was in fact wrong. Ugggh. . .

    I knocked the right side seal in too far and had to make a tool to back the seal out slightly.


    20161018_143502.jpg
     
    Last edited: Oct 18, 2016
    99SuperTaco4x4 and ChadsPride like this.
  20. Oct 22, 2016 at 3:18 PM
    #20
    1999RegCab

    1999RegCab Well-Known Member

    Joined:
    Apr 4, 2014
    Member:
    #127007
    Messages:
    1,522
    Gender:
    Male
    Cacti Land, AZ
    Vehicle:
    1999 Reg Cab, 2.7, 5 speed
    3-link SAS
    yup, "ZUK" is the man. Anything you need to know about Toyota axle/diff tech is the person to talk to.

    Great project so far. But man, this reminds me why I'm so glad I don't have to deal with that IFS stuff anymore. Those trail master drop bracket lists have a long history of drama. Does that company even exist anymore? If the actual reason of the failure was that the lower ball joint bolts were loose, that would have happened even to a truck in factory/stock form.

    You did a hell of a job cleaning that front diff BTW.
     

Products Discussed in

To Top