

-
Welcome to Tacoma World!
You are currently viewing as a guest! To get full-access, you need to register for a FREE account.
As a registered member, you’ll be able to:- Participate in all Tacoma discussion topics
- Communicate privately with other Tacoma owners from around the world
- Post your own photos in our Members Gallery
- Access all special features of the site
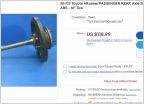 2001 trd elocker rear axle shafts
 2002 Toyota Tacoma (Bupkis) - JoeyIV's Build Thread
 New key fob
 Fluid gets all over driver's window when using windshield wiper fluid
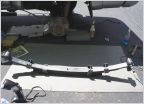 OME Rear Leaf Spring Question
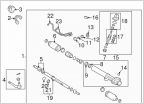 OEM steering rack rebuild s
Help! 3rz valve shim adjustment
Discussion in '1st Gen. Tacomas (1995-2004)' started by browntrout, Oct 26, 2016.


