1. Welcome to Tacoma World!

    You are currently viewing as a guest! To get full-access, you need to register for a FREE account.

    As a registered member, you’ll be able to:
    • Participate in all Tacoma discussion topics
    • Communicate privately with other Tacoma owners from around the world
    • Post your own photos in our Members Gallery
    • Access all special features of the site
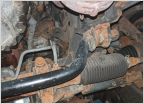
How to splice

Discussion in '1st Gen. Tacomas (1995-2004)' started by Neviane, May 1, 2018.

  1. May 1, 2018 at 1:21 PM
    #1
    Neviane

    Neviane [OP] Member

    Joined:
    Apr 24, 2018
    Member:
    #251595
    Messages:
    14
    Vehicle:
    2001 Toyota Tacoma
    How do I splice the bumper mounted turn signal connector to the wires? What color/gauge and what wires go to which wires. 2001 Toyota Tacoma

    20180428_144710.jpg
     
  2. May 1, 2018 at 1:30 PM
    #2
    BartMaster1234

    BartMaster1234 American Auto Horns

    Joined:
    Aug 21, 2016
    Member:
    #195197
    Messages:
    45,642
    Gender:
    Male
    First Name:
    Tyler
    San Francisco, California
    Vehicle:
    1998 PreRunner 4x4 2.7l Supercharged
    Flux Capacitor
    Show the rest of the aftermarket turn signal, Black should be ground but I don't know why there's two positive leads unless it's a switchback for running lights.
     
  3. May 1, 2018 at 1:59 PM
    #3
    nzbrock

    nzbrock Well-Known Member

    Joined:
    Jan 6, 2013
    Member:
    #94572
    Messages:
    3,056
    Gender:
    Male
    First Name:
    Noah
    San Marcos, TX
    Vehicle:
    99 TRD Prerunner 3RZ
    SAW 2.0 Coilovers Wheeler's 5 Leaf + 3 AAL Bilstein 5100s LCE long tube header Flowmaster Delta 50 Muffler FJ Trail Team Wheels 255/85/16 Cooper ST Maxx 4Runner overhead sunglass console 4Runner leather seats All LED lights Red/Clear Tail Light Tundra Brakes HID Projector Retrofits 4Runner Auto Up/Down Windows Bullet Liner Cargo tie down system E-locker axle swap w/4.56 Gears ARE MX Cap Prinsu Toprac Custom heated turn signal/puddle light mirrors Volant Intake Tube
    White-black is ground
    Green-yellow is 12v+

    You will have to figure out the wire colors on the aftermarket light
     
  4. May 1, 2018 at 2:19 PM
    #4
    spinyard

    spinyard Well-Known Member

    Joined:
    Apr 3, 2018
    Member:
    #249283
    Messages:
    202
    Black is ground, yellow it signal, & brown is running lights. Is the other side of the aftermarket light Black, green, brown?
     
  5. May 1, 2018 at 3:01 PM
    #5
    Sperrunner

    Sperrunner Respect the International Dibs Law

    Joined:
    Feb 23, 2018
    Member:
    #245334
    Messages:
    48,302
    Gender:
    Male
    First Name:
    Miguel
    Berkeley, Ca
    Vehicle:
    2023 Ford F250
    Wd40, zipties, duck tape, and my hopes and dreams
    I mean you can just tie the grounds together then just touch the other wires to the positive lead on the truck to see what one lights up the bulb....
    Then soder and heat shrink them together, maybe wrap some electrical tap around them afte is to just to make sure you keep the connection clean
     
  6. May 1, 2018 at 3:03 PM
    #6
    Wolftaco0503

    Wolftaco0503 Well-Known Member

    Joined:
    Oct 29, 2015
    Member:
    #168040
    Messages:
    16,237
    Gender:
    Male
    First Name:
    Adam
    Chicago
    Vehicle:
    2013 Super White LONG BED TRD SPORT 4x4
    Maglite mod Bottle Opener in bed Weathertech Mats Front & Back
    Red is hot
    Black is not
     
  7. May 1, 2018 at 3:21 PM
    #7
    Indy

    Indy Master of all I survey.

    Joined:
    Sep 15, 2013
    Member:
    #112518
    Messages:
    2,582
    Gender:
    Male
    Black to ground, yellow to left brown to running and green to right. 14ga wires, solder and heat shrink should give a splash proof connection. Crimp connectors will work, but tape the gaps. They make a crimp connector that doubles as heat shrink as well.
     
  8. May 1, 2018 at 3:28 PM
    #8
    Indy

    Indy Master of all I survey.

    Joined:
    Sep 15, 2013
    Member:
    #112518
    Messages:
    2,582
    Gender:
    Male
    A $5 dmm will tell you the rest.
     
  9. May 4, 2018 at 6:18 PM
    #9
    kgw

    kgw Well-Known Member

    Joined:
    Jul 9, 2012
    Member:
    #82260
    Messages:
    343
    Gender:
    Male
    First Name:
    kgw
    SoCal
    Vehicle:
    99 PreRunner
    140 amp alternator, Big 3 upgrade, Ultimate Headlight Mod, Trans Cooler
  10. Aug 29, 2018 at 4:16 PM
    #10
    FWAdam

    FWAdam Well-Known Member

    Joined:
    Sep 15, 2015
    Member:
    #164298
    Messages:
    201
    Gender:
    Male
    Indiana
    Vehicle:
    2001 Regular Cab Prerunner
    DIY Frame replacement New rear leaf springs (General Spring, stock height) Wheeler's greasable shackles Bilstein 5100 / 5125 Roll-on bedliner Poly bushings all around Leer topper Michelin Defender LTX M/S tires New drum brakes, rotors and pads, and Nickel-Copper brake lines Window tint Wheels painted black Interstate battery New spark plugs Chrome bumpers painted Bucket seats and console (soon) Emblems plasti-dipped (soon) 4x4 conversion (2017)
    Hey! I had the same issue as the OP. I ordered the replacement socket that had the 3 wires (same as OP) and some posi-twists to connect the socket wiring to the harness wiring. I have the black wire on the socket running to the white wire from the harness, and the yellow wire from the socket running to the green wire from the harness (only 2 plugs come from the harness). It worked when I first tried the signal, but the signal was still going super-fast as if a light was out (I checked, and none were).
    For good measure, I tried connecting the brown to the green, and no dice. So I went back to the green-yellow connection, and now it won't signal at all, rapidly or otherwise. And ideas for a newcomer like me on what I may need to examine more closely? All bulbs everywhere are good. Thanks.

    UPDATE: connecting both the black AND the brown wires from the pigtail to the white wire from the harness seems to have fixed it.
     
    Last edited: Aug 31, 2018
  11. Aug 2, 2023 at 2:41 PM
    #11
    TacoTuesday1

    TacoTuesday1 Well-Known Member

    Joined:
    Jun 19, 2019
    Member:
    #296781
    Messages:
    6,686
    Gender:
    Male
    SoCal
    what tools are you all using to shrink crimps

    [​IMG]
     
  12. Aug 2, 2023 at 4:48 PM
    #12
    TomYotaNH

    TomYotaNH Well-Known Member

    Joined:
    Jan 11, 2014
    Member:
    #120423
    Messages:
    139
    Gender:
    Male
    First Name:
    Tom
    Seacoast NH
    Vehicle:
    '16 Barcelona Red DoubleCab Limited
    Almost Stock - BedRug, Power Tailgate Lock, ….
     
  13. Aug 2, 2023 at 5:12 PM
    #13
    TacoTuesday1

    TacoTuesday1 Well-Known Member

    Joined:
    Jun 19, 2019
    Member:
    #296781
    Messages:
    6,686
    Gender:
    Male
    SoCal
    that’s what I have. Blasts the area melting everything else like my hand and switch the crimp is next to and requires an outlet not always accessible. Can’t be run off the bed.
     
  14. Aug 2, 2023 at 8:15 PM
    #14
    Bivouac

    Bivouac Well-Known Member

    Joined:
    Sep 5, 2021
    Member:
    #376253
    Messages:
    11,564
    Northern Lehigh Valley Pa
    Vehicle:
    2000 Tacoma 5 speed 3.4
    Remains to be seen I bought the tires and wheels the rest came along
    Blast from the past!

    All connections I solder and heat shrink to those larger then 8AWG for the most those get crimped on lugs.
     
    Taco critter likes this.
  15. Aug 2, 2023 at 8:23 PM
    #15
    Puppypunter

    Puppypunter Well-Known Member

    Joined:
    Jan 4, 2020
    Member:
    #315086
    Messages:
    2,424
    Gender:
    Male
    First Name:
    Johnny
    Vehicle:
    2019 Black SR
  16. Aug 2, 2023 at 11:27 PM
    #16
    TacoTuesday1

    TacoTuesday1 Well-Known Member

    Joined:
    Jun 19, 2019
    Member:
    #296781
    Messages:
    6,686
    Gender:
    Male
    SoCal
    thanks
    Always leaned towards Milwaukee working on cars having lots of their tools and already having batteries + charger

    probably gonna get a small butane pen style precision heater/torch
    As they have a curved shrink tube tip, are small for precision, mobile and refillable
    Tiny tool, and much cheaper
    Buddy also working on cars swears by his
     
  17. Aug 3, 2023 at 7:54 AM
    #17
    Puppypunter

    Puppypunter Well-Known Member

    Joined:
    Jan 4, 2020
    Member:
    #315086
    Messages:
    2,424
    Gender:
    Male
    First Name:
    Johnny
    Vehicle:
    2019 Black SR
    The butane ones are nice for the smaller stuff. But since you’re team red: https://www.homedepot.com/p/Milwauk...VQgh9Ch3-YA2aEAAYASAAEgLOL_D_BwE&gclsrc=aw.ds
     
  18. Aug 3, 2023 at 1:48 PM
    #18
    TacoTuesday1

    TacoTuesday1 Well-Known Member

    Joined:
    Jun 19, 2019
    Member:
    #296781
    Messages:
    6,686
    Gender:
    Male
    SoCal
    thanks
    I’ve had a heat gun
    Cordless only changes power cord
    Gonna try a butane one. Not only cheaper
    But assuming it has the same 600deg required
    Small case. Fits anywhere even doing underneath dash work. Without excessive heat flying everywhere on surrounding parts like a switch, my hand, etc
     
  19. Aug 3, 2023 at 8:14 PM
    #19
    Bivouac

    Bivouac Well-Known Member

    Joined:
    Sep 5, 2021
    Member:
    #376253
    Messages:
    11,564
    Northern Lehigh Valley Pa
    Vehicle:
    2000 Tacoma 5 speed 3.4
    Remains to be seen I bought the tires and wheels the rest came along
    I tried one of those butane small torches might have been the brand.

    Might have been 10 years ago or longer,

    I can hope they have improved the one I had was junk used it a few times it is around some place.
     

Products Discussed in

To Top