

-
Welcome to Tacoma World!
You are currently viewing as a guest! To get full-access, you need to register for a FREE account.
As a registered member, you’ll be able to:- Participate in all Tacoma discussion topics
- Communicate privately with other Tacoma owners from around the world
- Post your own photos in our Members Gallery
- Access all special features of the site
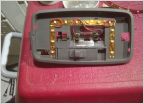 DIY 2012 LED Dome light
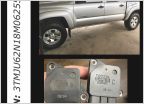 MAFS issue
 2008 Tacoma Inheritance
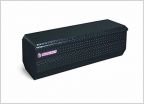 New weatherguard toolbox 644-5-01 644501
 Yakima spare tire mount help!
 Best Bed Extender?
hey guys, I could use some advice on headlight restoration.
Discussion in '2nd Gen. Tacomas (2005-2015)' started by Johnnytoppside, Jul 18, 2018.
Page 1 of 3
Page 1 of 3


