

-
Welcome to Tacoma World!
You are currently viewing as a guest! To get full-access, you need to register for a FREE account.
As a registered member, you’ll be able to:- Participate in all Tacoma discussion topics
- Communicate privately with other Tacoma owners from around the world
- Post your own photos in our Members Gallery
- Access all special features of the site
 Air compressors known to work well on 120v bed outlet
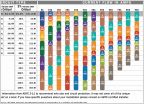 What gauge wire do I need for fridge circuit?
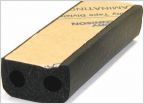 How to have a dry bed with a topper?
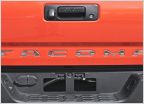 OEM Tailgate Lettering
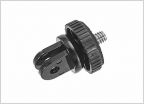 Noticed a Go Bro Bracket on my New Truck
 TRD Lift Package Kit. What Ride Height Should I Go With?
My GoPro mount dash cam solution
Discussion in '3rd Gen. Tacomas (2016-2023)' started by RunawayCow2, Oct 21, 2018.


