1. Welcome to Tacoma World!

    You are currently viewing as a guest! To get full-access, you need to register for a FREE account.

    As a registered member, you’ll be able to:
    • Participate in all Tacoma discussion topics
    • Communicate privately with other Tacoma owners from around the world
    • Post your own photos in our Members Gallery
    • Access all special features of the site

Air bump length

Discussion in 'Long Travel Suspension' started by Vitalzone, Sep 5, 2019.

  1. Sep 5, 2019 at 12:00 PM
    #1
    Vitalzone

    Vitalzone [OP] Well-Known Member

    Joined:
    Mar 26, 2016
    Member:
    #182410
    Messages:
    251
    Gender:
    Male
    Arizona
    Vehicle:
    2016 TRD OR 4x4 DCSB 6 spd manual
    -ADS coil overs with RR, and compression adjusters -ADS triple bypass rear shocks -Mcm UCAs -Deaver U402 stage 1 leaf packs -ADS bumps in the rear with Icon U bolt flip striker plates -Relentless Offroad U bolts -Wheeler superbumps in front -SCS 17" Ray 10s -285/75/17 BFG KM2s -Nitro 5.29 gears -Pelfteybilt armor front to back with HC rear bumper. T- case skid cut to fit Spec U exhaust. -RCI diff skid -Avid bed bars with basket holding spare. Poison Spyder 3-way strap. Hi-lift jack,and shovel mounted to basket. - SDHQ ditch light brackets with BD Squadron Pro spots. -BD Squadron Pro wide cornering in F. bumper. -BD S8 30" bar in F. bumper -Smittybilt 10k X20 winch -Factor 55 fairlead, and prolink -Switch pro 9100, with custom machined aluminum switch bezel. -BAMF grille insert -URD short throw shifter -URD Spec U exhaust cut over axle. Exhaust looks like it was fabricated by a blind child. -Suntek carbon XP 18% tint all around -ARB single compressor, mounted on Slee bracket. Lines to front, and rear bumper. -Rear diff breather mod,ran to bed cubby. -Ovtune 1.05 FOB 91 -Sprint-booster -Clutch accumalator delete mod -Hella Sharptone horns -Crown +4” extended brake lines, with modified factory brackets to fit lines. -Hypertech speedo calibrator -Custom pinstripes, and trail rash done by the beautiful AZ desert.
    I’m gearing up to install my DMZ sua kit on my 16. This is my first experience with an LT kit. I have everything I need with the exception of air bumps. I have 16” stroke fox shocks that will be mounted to a DMZ bedcage. I need to get some opinions on what length air bump to run. Seems like most people are running a 4” stroke with this kit. What are the pros/cons with a 2” vs 4” stroke?
     
  2. Sep 5, 2019 at 5:55 PM
    #2
    Dalandser

    Dalandser ¡Me Gustan Las Tacos-mas!

    Joined:
    Feb 19, 2015
    Member:
    #149090
    Messages:
    16,784
    First Name:
    Anthony
    Downey
    Vehicle:
    08 PreRunner Regular Cab / 98 4x4 Extra Cab
    Empty Wallet Mod
    Cycling the suspension and setting ride height will determine how much up travel you have and then depending on what type of shocks you go with, you might have bypass shocks that are tuneable in the last 4 inches of up travel. If you are trying to tune your shocks for maximum performance, the longer bump stops may not give you as easy of a time tuning them in that part of the travel. Most people with this setup have 2" since 16" total travel won't leave you with a whole lot of up travel without hitting your bumps with 4" bumps.
     
    Icon_Adrian likes this.
  3. Sep 7, 2019 at 1:27 PM
    #3
    Hawk373

    Hawk373 Well-Known Member

    Joined:
    Dec 10, 2013
    Member:
    #118276
    Messages:
    1,321
    Gender:
    Male
    Vehicle:
    2012 TRD Sport DCLB
    DMZ, ADS, King, JFR, SOS, ECGS, LSK
    I have 4” bumps adjusted down to 3” travel so I had the option to go up or down later. You can get 4” set at the height you like depending on who you by them from. I had 2.5” before this on SOA.
     
    12TRDTacoma likes this.
  4. Sep 7, 2019 at 9:01 PM
    #4
    upongame619

    upongame619 Well-Known Member

    Joined:
    Aug 2, 2018
    Member:
    #261420
    Messages:
    105
    Gender:
    Male
    First Name:
    Danny
    Vehicle:
    98 Taco
    Home built Mid Travel Front and rear, need help new to this
    I have 17.25" love to add that .25" lol of rear travel and run 4" locked off road rear bumps, I've never compressed them the whole way and have about 1.5" left which is good in case I ever take a huge hit
     
  5. Sep 8, 2019 at 1:19 AM
    #5
    Dalandser

    Dalandser ¡Me Gustan Las Tacos-mas!

    Joined:
    Feb 19, 2015
    Member:
    #149090
    Messages:
    16,784
    First Name:
    Anthony
    Downey
    Vehicle:
    08 PreRunner Regular Cab / 98 4x4 Extra Cab
    Empty Wallet Mod
    Couple of comments. If you’re setting bumps lower in anticipation of shortening a spacer to increase your bump zone, you’re also changing the bump height unless you have the baller kind that have threaded bodies and are height adjustable. While most people don’t hit stuff which causes them to go full stuff very often, if you do and the bump height was originally at the optimal point for keeping the springs going negative too much, now you’re going to be running them past the point you originally had picked as the best bump height. You’d have to cut the mounts and re-weld the cans to reset them if you shortened the spacer. I know most guys don’t bump out tons, but if you’re going to beat your truck, it’s good to dial in the bump position to keep the springs in the optimal cycling range. I guess if you set them conservatively with shorter travel and anticipated shortening the spacer so the truck bumps at the optimal height, that's at least keeping the springs safer at the expense of a bit of travel. Some guys do like 2.5" of bump travel which I think Fox might have.

    And if a 4" bump is too low to the point where you're unable to bottom out ever, you don't have as much travel as you could. Unfortunately it's hard to make the perfect call over the internet without knowing a lot more about driving hard vs. cruising and other specific info.
     
    SR-71A and Icon_Adrian like this.
  6. Sep 8, 2019 at 2:54 AM
    #6
    Hawk373

    Hawk373 Well-Known Member

    Joined:
    Dec 10, 2013
    Member:
    #118276
    Messages:
    1,321
    Gender:
    Male
    Vehicle:
    2012 TRD Sport DCLB
    DMZ, ADS, King, JFR, SOS, ECGS, LSK
    Dalandser likes this.
  7. Sep 9, 2019 at 2:48 PM
    #7
    Dalandser

    Dalandser ¡Me Gustan Las Tacos-mas!

    Joined:
    Feb 19, 2015
    Member:
    #149090
    Messages:
    16,784
    First Name:
    Anthony
    Downey
    Vehicle:
    08 PreRunner Regular Cab / 98 4x4 Extra Cab
    Empty Wallet Mod
  8. Sep 10, 2019 at 8:56 AM
    #8
    Icon_Adrian

    Icon_Adrian Well-Known Member Vendor

    Joined:
    Jan 10, 2018
    Member:
    #240838
    Messages:
    183
    Gender:
    Male
    First Name:
    Adrian
    Riverside CA
    Vehicle:
    2004 Tacoma Pre-Runner
    Icon Bypasses & Coilovers Long Travel Front & Rear Supercharged 3.4L
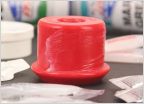
    There is also the added adjustment of welding the cans higher then needed when dry cycled and using bump spacer rings to fine tune in real world conditions. Most manufactures have them, or you can make them yourselves.
    CaptureBumpRing2.jpg

    CaptureBumpRing.jpg

    You can adjust as evolve/upgrade your build. @Dalandser is correct, there are a lot of variable that are different for each truck and your stack of component that determine the bump stroke that best fits. Shock stroke, shock position relative to bump striker, where your bypass bump zone kicks in past the last comp tube, ect... I personally prefer to have the added adjustment for easy on the fly changes to full bump.
     
    Dalandser likes this.
  9. Sep 11, 2019 at 2:23 PM
    #9
    81Trekker

    81Trekker Well-Known Member

    Joined:
    Aug 25, 2019
    Member:
    #303299
    Messages:
    3,750
    Gender:
    Male
    La Jolla SD
    Vehicle:
    81 Trekker and 2015 CCSB Tacoma
    Too many to remember
    If your shocks are valved correctly a 2” stroke bump is more than enough
     

Products Discussed in

To Top