1. Welcome to Tacoma World!

    You are currently viewing as a guest! To get full-access, you need to register for a FREE account.

    As a registered member, you’ll be able to:
    • Participate in all Tacoma discussion topics
    • Communicate privately with other Tacoma owners from around the world
    • Post your own photos in our Members Gallery
    • Access all special features of the site

motofish84's 3rd Gen SR modifications

Discussion in '3rd Gen. Builds (2016-2023)' started by motofish84, Oct 15, 2019.

  1. Mar 29, 2020 at 5:41 AM
    #21
    motofish84

    motofish84 [OP] Well-Known Member

    Joined:
    Jun 26, 2019
    Member:
    #297482
    Messages:
    145
    First Name:
    Tyler
    Over the last few days I made some progress on getting the Victory 4X4 rack to work with my shell. In addition to the bracket issue I had to reverse the tracks that were installed. It seems the tracks are commonly installed so that the top is at roughly a 20* angle. Not exactly sure why. My best guess is because they are designed for the Thule style two bar racks and the angle accommodates the attachment system of those racks.

    I got some 1 1/4" x 1/8" wall thickness square tubing and knocked up some brackets on the mill at my shop. Then I primed, painted and clear coated them. Once dried I fit them to the rack.

    91230849_10159527070729418_1531448581699_33ea8e27193d37f0a18d31769f94e1bda62de798.jpg

    91307679_10159527070639418_2231578321676_ea154b8bd0e7c9df192714f5999a14b9a8d616d7.jpg
    91187839_10159527070674418_1858978870682_fd5cff63b2f75c136bb7c7a9a9f0eda71483e786.jpg

    Once I had them in the correct position I threw a blanket on the topper so I didn't scratch it (again) and mounted the rack. I did cut some gaskets to go between the aluminum track and the bracket to prevent squeaks and scratches but you can't see them in any of the pics.

    91659061_10159527070509418_8731581419421_aac72fdb8854a0fd047299336d9f2e7cb64a1128.jpg
    91180038_10159527070604418_2644422037140_0c0fe58d661a530b4b587e094da194ffb20a78bb.jpg
    91183788_10159527070474418_2198650856117_42ab02756352962a3568dac83792c9ba878d65cd.jpg

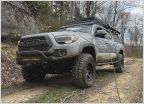
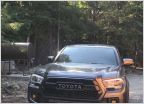
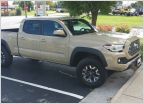
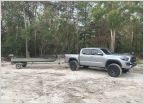
    I figured I'd wan't some light in the bed and since I was running power I also wanted a 12V outlet. I spent some time working this out as well. I added two Rigid knockoff lights like I have on the cab rack. These are controlled by a marine grade switch on the left side. As you can see I also added the outlet which is switched as well. I ran a separate buss bar and fuse setup for the bed so I have some room for additional circuits if I find the need. I used 16 gauge double shielded marine grade wire from the panel under the hood all the way along the frame rail and back to the bed. I wrapped the wire in split loom and followed another set of loomed wires that run back to the bed attaching it at various points along the way. The lights are almost too bright, the daytime pic doesn't do them justice.

    91391974_10159532286094418_3131274898178_a07d8136ddd2652199c7a0d4536ee36d007e516b.jpg 91221243_10159532286239418_4465700440813_783f359be56b83e111db42f694e775c371149b8d.jpg 90977063_10159532286169418_9014738752001_0d90c9232fbc50a6baf480fe0293bbcf9b440970.jpg 91195418_10159532286249418_7911795569910_e6d05f182b4a9f7c71a8b53bf745f6447ecf1ba3.jpg

    Anyway, here's a pic of how Mondo Spider currently sits:

    91290001_10159530456104418_7752237062417_1ea8fe7a3c0dcb3dd6ba53252d2029f4fc2e6472.jpg

    This truck has come a long way from the steel wheel, SR fleet vehicle that it was in it's previous life.
     
    Last edited: Mar 29, 2020
  2. Sep 8, 2020 at 4:29 AM
    #22
    motofish84

    motofish84 [OP] Well-Known Member

    Joined:
    Jun 26, 2019
    Member:
    #297482
    Messages:
    145
    First Name:
    Tyler
    Over the last couple months I added a Dobinsons heavy leaf pack to eliminate sag created by the additional weight the cap and rack added. With the pack I also added new u-bolts, new shackles, and greas-able pin bolts.

    I don't have a pic with the updated rear susp. Here's the most recent pic with Lund textured fender flares. I really prefer the OEM ones but I was being cheap. Also, these really look pretty good. I feel like they look better in person too. Also added a DIY fishing rod holder to the roof rack. Used an "Ultra Tow" conduit carrier kit fitted to an 8' x 6" pvc tube that I painted with Rustoleum bed liner spray. I also covered the Ultra Tow logos with some black and gray camo vinyl. This thing has worked out great. I fish rivers for Musky and Pike almost every day and an 8' rod is essential to have at all times. There isn't a better way to carry one IMO.

    118968496_10160176131599418_604680686115_b2d51c09956e82874580f282acba94a1535a0d0a.jpg


    I know these wheels get a lot of play on our trucks. It's the look and fit, they just work so well. I've done my best to stay away from the PRO grille but I couldn't help myself with the SCS Ray 10's.
    I'll be adding these with 285/70/17 Falken Wildpeak AT3W's

    118867406_10160166148279418_369584232791_46cc2d4f53006eb7d9f13c4547f4ea68248b9061.jpg

    Might go ahead and throw on new UCA's just to avoid any potential contact. Just haven't decided what brand.

    Also, I got ahold of a pair of nearly new TRD OR headlights from the classifieds. I'm planning to do the BHLM and retrofit them to my rig.

    [​IMG]
     
    Last edited: Sep 8, 2020
  3. Sep 8, 2020 at 4:45 AM
    #23
    AY_ARONTRD

    AY_ARONTRD Well-Known Member

    Joined:
    Sep 25, 2017
    Member:
    #231065
    Messages:
    3,913
    Gender:
    Male
    First Name:
    Aaron
    Murrieta ,CA
    Vehicle:
    2019 DCLB Cement OR 4x4
    Nice build. Trucks coming together well :thumbsup:
     
    motofish84[OP] likes this.
  4. Sep 21, 2020 at 10:20 AM
    #24
    motofish84

    motofish84 [OP] Well-Known Member

    Joined:
    Jun 26, 2019
    Member:
    #297482
    Messages:
    145
    First Name:
    Tyler
    Did the black headlight mod. I took it slow over the course of a few days and got it done in steps.

    First I baked the headlights to soften the butyl sealer. 7 min at 250 degrees then another 3 at 275.
    119886506_10160218737164418_274649379371_c560bf6e91516ec6ce4efa0138eb43eba539498e.jpg

    Then I pryed the lens from the housings to split them. The first one took some doing but the second was easier. I recommend prying a decent section at the bottom, get your fingers behind there and separate the two halves working your way around the perimeter and reheat for 3 minutes at a time to keep the butyl soft.
    120018405_10160218736929418_688267614163_d617b8acfc1bc5932cdcc42771b463ea0cc2aee1.jpg
    119736004_10160218737274418_790542476381_15b49ce6c724abb50ed10da8c59c7a6cf1bba7c5.jpg


    Once apart I took the time to dig out the old butyl sealant. This is the biggest pain of the project and I ended up with a bunch of cuts on my knuckles from slipping and catching the reflector in the housing. After I had most of it out I went in with a dremel to clean up the pry marks on the housings and clean out any left over sealant.

    119925987_10160218737179418_257125754293_e845fc5d16593b83e21c52685c4a13e7e02437bb.jpg
    119946087_10160218737139418_350186347124_3c6e9209b7e1e47244faeeb338861ed6f7660491.jpg

    119676386_10160218737289418_107293802811_46d3df61e44e6cd0b9c8fadee038dfebfc6496bf.jpg
    119966872_10160218737329418_668818279912_8b39d45d1480281e2639702bd26fb2a6efed0749.jpg

    After that I took the trims out of the lens and the LED and painted the trim with 4 coats of black and 3 coats of clear. I let them cure overnight and reassembled the following morning. To reseal the headlights I purchased some Morimoto headlight Butyl from Amazon. I fit the Butyl to the perimeter of the housings and , per the instructions on the butyl, baked the lights at 265 for 7 minutes then pressed the halves together and re-installed the screws that hold the lens to the housing.

    119811312_10160218737014418_442370607837_3a5ba3d20b1767af652a134dae481807f7a0eb87.jpg

    119792629_10160218737049418_420174446160_3ba966ae20fa9fb717a1bae897648f88101ce6a9.jpg
    120042165_10160218737219418_416093736446_198d6e438d010b3c5ed94cd1507dded5789921f2.jpg
    119940921_10160218736889418_220222407748_232e0d4a16461a8ba9d8b5d3d192018ae4ecb8d9.jpg


    Now all I need to do is get these fitted to the truck. I'll do that this week and post up the results!
    I have an SR so the LED running light requires some retrofitting. I'll also be changing the bulbs to Hikari LED's. I'll post up some before and after photos of the truck and the headlight output etc.
     
  5. Sep 23, 2020 at 10:06 AM
    #25
    motofish84

    motofish84 [OP] Well-Known Member

    Joined:
    Jun 26, 2019
    Member:
    #297482
    Messages:
    145
    First Name:
    Tyler
    Still need to button up the retrofit wiring but here's some before and after pics of the headlamps on my dirty rig.

    120076960_10160224764204418_438709559637_81cf2e266d6bc9f6fbdefb6cfff42823c4a08e32.jpg
    120001830_10160224764109418_328180825424_301b0a54798915136da0f19bfc3d9e5b12fda476.jpg
    120187906_10160224764169418_405221336987_a1f8346f3b7458042e08a7e381e70a2ec8c7190c.jpg
    120028586_10160224764279418_614128666244_3971ae0b073e91935131becb1209608c4a458ccb.jpg
    120092577_10160224764254418_469614469606_f903e1d8c9d31c78f182ef47adc62d2e901e846f.jpg
     
    J&ATacoma likes this.
  6. Dec 18, 2020 at 3:18 PM
    #26
    motofish84

    motofish84 [OP] Well-Known Member

    Joined:
    Jun 26, 2019
    Member:
    #297482
    Messages:
    145
    First Name:
    Tyler
    For the last 8 months, I've been rolling around with my shore fishing gear in the bed of the truck. It takes up quite a bit of space and doesn't allow me to pick up anything larger than the back seat without taking my fishing gear out. With that dilemma, I started building a set of bed drawers and a platform for the back.

    131391272_10160488680349418_822005586155_92c188ea7f7e2b2e2e7dfd59dda6f71db8dbf14c.jpg


    I checked out the Decked system but I don't like the height of it. It's too tall. I really like the ARB setup but...I also wanted something that was a little more tailored to what I'll use it for. Fishing gear, camping, off grid tailgating etc. With that and the price tag of the decked setup + some boredom I decided to try my hand at making my own.

    Here's where I'm at so far:

    131930595_10160488637609418_201308997181_fb977ad33da5be0e7c835aa84c55c3bbd7d48ddf.jpg 131459191_10160488637659418_325526273636_e9c6ad1dea0c0ec2797e276760e2bfd4af0c073c.jpg 131551574_10160488637729418_894960319202_e15dd0e8447c9ad9ea85a5868f0d90c352af133e.jpg 131578923_10160488637794418_467170492463_9d26b54784c111711f4bebe27062aece3974d7de.jpg 131913739_10160488637869418_175134614362_6e16f254de1d9a95e679819fc8ac2af608694832.jpg 131409659_10160488637919418_628255880660_fdc1873053e622802c3ed79f5743ab3eff93b858.jpg


    Still have a bit of work to go but will be tackling it over the next week or so.

    In addition to some of the smaller details, I have two panels that will set on top of the drawer box that are each half of the bed width. These will be carpeted in gray outdoor carpet to give a clean / comfortable look. I need to add some locking drawer pulls to the drawer faces, and I want to paint the drawers with black bed liner spray, carpet the bottoms of them, sand and finish the drawer dividers with polyurethane. Lastly I need to some up with a suitable solution for mounting everything to the bed. Might go the airline track route.
     
    BlueRidgeFly likes this.
  7. Dec 24, 2020 at 9:54 AM
    #27
    motofish84

    motofish84 [OP] Well-Known Member

    Joined:
    Jun 26, 2019
    Member:
    #297482
    Messages:
    145
    First Name:
    Tyler
    Got the majority of things wrapped up with the drawers setup


    upload_2020-12-24_11-47-41.jpg

    upload_2020-12-24_11-48-0.jpg

    The drawer box height is the same as the wheel wells. Then the carpeted panels sit on top of the box and span the width of the bed.
    upload_2020-12-24_11-48-45.jpg

    upload_2020-12-24_11-49-12.jpg

    After installing the drawers and taking some pics I realized the carpet grain on the drawer faces was going in different directions :censored:...... could not have that so I had to redo it.
    upload_2020-12-24_11-50-1.jpg

    upload_2020-12-24_11-50-25.jpg

    upload_2020-12-24_11-50-51.jpg

    I still need to add some brackets to make the locks functional. Also want to add some drawer guides and stops and a drop in work top on the left drawer for a camp cooker or a worktop when needed. I think I’ll also add a leg for this drawer as well to add support and make it level and add support when extended.
     
    Last edited: Dec 24, 2020
  8. Jun 17, 2021 at 3:58 AM
    #28
    motofish84

    motofish84 [OP] Well-Known Member

    Joined:
    Jun 26, 2019
    Member:
    #297482
    Messages:
    145
    First Name:
    Tyler
    Finally wore out my 265's and got 285's mounted on the RAY10's I had sitting.

    Got new spline lugs and tpms sensors in these wheels as well. Going to throw some 265's on the TRD wheels again and run them in the WI winter to prolong the life of the ray10's.

    I was back and forth on tire size for a long time as I didn't want to deal with upper control arm or cab mount rubbing. To my surprise these do not rub on either. I do have some plastic to trim cut but other than that these clear. Very happy about that.

    201178275_10161060971194418_116785640426_e7e9a9cc010a8e158172ef2b6ec1583fb2a93b12.jpg
    Before
    199531594_10161060971244418_395056520570_ca9688b031f9f8cbe0ba61bbe70dc4aa32ff7886.jpg
    After
    201634727_10161060971164418_436280533604_686c2adc29b641ed0e5493480bd7f2078006a49e.jpg
    Before
    199623125_10161060971094418_565811350771_f99a2d3618f5f81b7d18d4cdb1651934d354e5f5.jpg
    After
    200326582_10161060971304418_286766775818_49ac343df990d77de35e36f18c1c65abfec14c06.jpg
    Money Shot?
    201787964_10161060971119418_123504384197_28da62c6e08315513e08c05e5b895231548bd737.jpg
     
    Greg.Brakes.Tacos likes this.

Products Discussed in

To Top