1. Welcome to Tacoma World!

    You are currently viewing as a guest! To get full-access, you need to register for a FREE account.

    As a registered member, you’ll be able to:
    • Participate in all Tacoma discussion topics
    • Communicate privately with other Tacoma owners from around the world
    • Post your own photos in our Members Gallery
    • Access all special features of the site

Hella 500ff light setup

Discussion in '2nd Gen. Tacomas (2005-2015)' started by UnloadedRex, Mar 6, 2022.

  1. Mar 6, 2022 at 7:01 PM
    #1
    UnloadedRex

    UnloadedRex [OP] Tire and alignment guy

    Joined:
    Jun 13, 2021
    Member:
    #368523
    Messages:
    239
    Gender:
    Male
    First Name:
    Oscar
    Jacksonville, FL
    Vehicle:
    2007 DCSB Redneck Trophy Truck
    Bilsteins 5100, dobinsons coils, Apex Badlands winch, and lots of stickers
    So after my last post asking about a good oem switch I finally had everything I needed to start working on my setup. [​IMG]
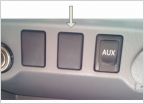
    The first step was mounting the lights on the bull bar which I had already done the week prior so I had a preassembled bull bar. I attached the brackets to the frame and when I went to attach the bull bar itself I noticed a lot of corrosion inside the first couple inches of the bar. So I paused what I was doing, sanded off the rust, and covered the previously rusty parts with rust oleum we had laying around in the garage. While I let that dry I started working on the interior, I pryed up all the trim I needed to get access to the lower buttons and was able to push one out and slide the new cali raise led button into its place. Then I attached my relay to a bolt on the passenger side of my engine bay and went ahead and grounded it on the inside of the wheel well. I positioned my power wire (black) near where the lights would be and ran my source (red) and switch (yellow) wires over to the driver side of the engine bay for easy access to the battery and a way through the firewall. Using a coat hanger I sharpened on a grinder and some electrical tape I pushed the switch wire through the boot with all the other wires and did the same with the wire meant to provide power to the switch (green).[​IMG]
    Then a few heat shrink wire connectors and a ground wire I connected to a bolt holding in a trim piece later I had the switch inside the cab fully wired up. I left the second red wire on the switch covered in electrical tape so it would just hang there. Now a few hours before I had all this done it had started lightly raining and there was heavy fog so both I and the inside of the truck were now slightly damp but I continued on. Finally able to close the door I did so and turned my attention to the engine bay. I ran the green wire the rest of the way to the battery and used some crimp on ring wire connectors that my girlfriend picked up from Walmart for me to finish everything for the switch. I finally was able to mount the bull bar with some help from my dad and get the bolts on the bracket properly tightened. Then I grounded both lights onto bolts used to hold them in the bull bar and connected the power wire I had run to the front of the radiator before to get everything connected up. I cleaned everything up using some zip ties to hold any extra wire in a loop and grabbed a fire extinguisher to test it. The first time I pushed the button the lights lit up like a Christmas tree and I let out a loud “f*ck yeah” reminiscent of Colt Bennett from “the Ranch”. Then disaster struck, I turned the key all the way back to off and cranked it to start the truck and everything shut off, I hadn’t tightened my battery terminal back up enough. No matter, tightened the bolt on the ground wire back up and the truck started up fine. Me and my girlfriend drove the truck around the neighborhood to experience the new lights and found that the slight dampness I referred to earlier had not cleared up and my windshield was now covered in water on the inside, we rolled the windows down, finished our drive around the neighborhood, wiped out the inside of the truck when we got home, and took a couple pictures before shutting everything down for the night.[​IMG]
    [​IMG]
    This is the end product, I think they look awesome and are exactly what I wanted when I set out on this journey to find these parts. If there are any questions I’ll be more than happy to answer them and I’ll try to update the thread with more daytime photos of the truck.
     

    Attached Files:

    Last edited: Mar 7, 2022
    TRDSport10 likes this.
  2. Mar 6, 2022 at 8:24 PM
    #2
    Waasheem

    Waasheem The catholic radio bear

    Joined:
    Jun 26, 2019
    Member:
    #297494
    Messages:
    2,664
    Gender:
    Male
    First Name:
    Waasheem
    Vehicle:
    2007 xrunner
    Nice look there. Betcha it’s bright af.

    Hooking wires between the positive terminal and post isn’t ideal. Crimp some cable lugs on and put it under the nut that has a cable going to the right. Then abrasion resistance. Use some split loom or a whole buncha zip ties. Having a hot wire rub through and short is bad. You’ll see lots of stinky smoke and possibly fire. An inline fuse would also be a good idea.

    I’ve had really good results with the noco terminal felt pads. I put them on my taco and 6 vehicles I regularly maintain. All remain acid free and only need the occasional brushing to clean off oxidation. I’m hinting to clean the terminals and posts of acid.

    https://www.amazon.com/gp/product/B001DKUTR0?ie=UTF8
     
    TRDSport10 and UnloadedRex[OP] like this.
  3. Mar 7, 2022 at 10:01 AM
    #3
    UnloadedRex

    UnloadedRex [OP] Tire and alignment guy

    Joined:
    Jun 13, 2021
    Member:
    #368523
    Messages:
    239
    Gender:
    Male
    First Name:
    Oscar
    Jacksonville, FL
    Vehicle:
    2007 DCSB Redneck Trophy Truck
    Bilsteins 5100, dobinsons coils, Apex Badlands winch, and lots of stickers
    Both wires connected to the battery came with inline fuses since I used the Hella 500ff kit. Tonight I'll move the wires to the other bolt and order some split loom off Amazon.

    I'll also order this stuff and make sure the terminals are clean. I really appreciate the advice, I've never done anything like this before so I put together advice from my grandpa with 3 different youtube videos and a couple other threads on tacomaworld to jerry rig my way through this.
     
    TRDSport10 and Waasheem[QUOTED] like this.
  4. Mar 8, 2022 at 8:26 PM
    #4
    UnloadedRex

    UnloadedRex [OP] Tire and alignment guy

    Joined:
    Jun 13, 2021
    Member:
    #368523
    Messages:
    239
    Gender:
    Male
    First Name:
    Oscar
    Jacksonville, FL
    Vehicle:
    2007 DCSB Redneck Trophy Truck
    Bilsteins 5100, dobinsons coils, Apex Badlands winch, and lots of stickers
    [​IMG]

    [​IMG]
    All my wires are covered in split loom now but I couldn’t get that nut with the cable off. I used everything short of my cordless impact to get it off (hand tools and my cordless ratchet) and it wouldn’t budge. Not sure what to do next.
     

    Attached Files:

Products Discussed in

To Top