

-
Welcome to Tacoma World!
You are currently viewing as a guest! To get full-access, you need to register for a FREE account.
As a registered member, you’ll be able to:- Participate in all Tacoma discussion topics
- Communicate privately with other Tacoma owners from around the world
- Post your own photos in our Members Gallery
- Access all special features of the site
 Snorkel For 1st Gen Tacoma
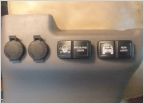 Tacoma accessory switches
 Door Stop replacement?
 1999 Tacoma 2.7L 4x4 Manual Tranny and Diff Fluid Change
 Code P1130 won’t go away after changing the sensor and clearing the code.
2.7L Fuel Filter Replacement DIY in 6 easy steps
Discussion in '1st Gen. Tacomas (1995-2004)' started by Moco, Dec 27, 2013.
Page 1 of 2
Page 1 of 2


