1. Welcome to Tacoma World!

    You are currently viewing as a guest! To get full-access, you need to register for a FREE account.

    As a registered member, you’ll be able to:
    • Participate in all Tacoma discussion topics
    • Communicate privately with other Tacoma owners from around the world
    • Post your own photos in our Members Gallery
    • Access all special features of the site

2nd Gen Hunting Rig Build - Drawers,Rack, Bumper, Bags

Discussion in '2nd Gen. Builds (2005-2015)' started by SwampDonkeyBait, Jun 12, 2018.

  1. Jun 12, 2018 at 4:01 PM
    #1
    SwampDonkeyBait

    SwampDonkeyBait [OP] Member

    Joined:
    Feb 9, 2017
    Member:
    #210113
    Messages:
    19
    Gender:
    Male
    San Diego
    Vehicle:
    2008 Tacoma TRD
    I've been working on my hunting rig for a few months now, and figured I may as well share the progress with you all.

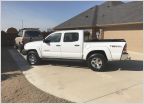
    A little background: Last year I had the urge to get a dedicated hunting rig since I try to be out in the field for at least 20-30 days per year. Figured that I might as well have a rig that could get me where I wanted to go and haul all of my equipment safely. My first truck in high school was a stick shift Toyota pickup with a 4 banger and I loved the thing, so I decided to stay with the manual transmission. A Tacoma fit the bill for me because its compact, and a known offroad capable rig. A cheap, 4x4 v6 Tacoma with a manual tranny are extraordinarily hard to find around Southern California. After looking for two months, I saw one for sale in Yuma Last February; a 2008 Tacoma TRD offroad, manual with 125k miles, so I snatched it up and drove it home.


    Here she was:
    [​IMG]


    At first I wanted a simple truck and keep it mostly stock. Then I start thinking about what I COULD do to make it more trail worthy. When I get to thinking, my wife sees $$, but I see purpose and investment. That's where DIY comes in. We're very comfortable financially, however my wife is much more agreeable when I tell her I that can make it myself instead of dropping thousands on parts and equipment. Everything you will see in this build was built by hand in my parents garage (because of my stupid HOA).

    At a minimum I needed a few improvements prior to hunting season:

    1. New tires - I got a set of BFG AT KO2 265/75R16 from 4 wheel parts.
    2. New radio - My cousin gave me the factory navigation head unit from his new 2017 Tacoma.
    3. New front struts - Bilstein 5100's.

    The list was small at first. Then I got to thinking. What was practical for hunting? Offroad lights? Bed drawers? Winch? The list was growing before I even had the new tires mounted. Basic ideas snowballed into more and more complex designs in my head.

    Each post below will be dedicated to a build feature on the truck. Here is my list of improvements thus far, and a few which are in the works:

    1. Fabrication of the bed drawer system. Includes safe lock devices and anti-intrusion features.
    2. Fabrication of winch bumper with removable winch plate and integrated lightbar. 100% tig welded (this was a mistake)
    3. Upgrading the radio to a 2017 navi head unit. Huge pain in the ass.
    4. Fabrication for mounting plates and installation of air bags in the rear.
    5. Blue sea dual battery system. Second battery is in the bed drawer system.
    6. Bed rack.
    7. Fabrication of overhead console and wiring.
    8. Projector headlight conversion. (I wont bore you with this, as there are many threads for BHLM)
    9. Welding cart for my Tig machine. (unrelated)
    10. Uniball upper A-arms w/ heim joints. (Near future)
    11. Stealth rock sliders (future)
    12. DIY folding hard side rooftop tent (Future, MAYBE)

    I didn't really start working on the truck until August, thinking that 2 months would be plenty of time before my November elk hunt in Colorado. Wrong.

    Yes, I know the garage is a mess. Don’t let that distract you :)
    Yes, I know my welding sucks.

    I am open to criticism. No soft balls. If something sucks or can be improved, point it out so we can discuss.

    This thread will be photo heavy and I will post the items in their chronological order of progress. I was inspired to build this stuff by rigs I saw on Tacomaworld, Expedition Portal, and Pirate 4x4. If this thread inspires someone else to try and DIY. Then all the typing and documentation was worth it.
     
    Last edited: Aug 27, 2021
    MarX and JMY24 like this.
  2. Jun 12, 2018 at 4:06 PM
    #2
    JMY24

    JMY24 Well-Known Member

    Joined:
    Mar 19, 2016
    Member:
    #181715
    Messages:
    653
    Gender:
    Male
    First Name:
    John
    Huntsville AL
    Vehicle:
    '05 white TRD OR DCSB
    3 inch TOYTEC lift with Bilsteins Total Chaos uniball UCAs BAMF sliders
    Subbed. Interested to see all the DIY.
     
    MarX likes this.
  3. Jun 12, 2018 at 4:15 PM
    #3
    SwampDonkeyBait

    SwampDonkeyBait [OP] Member

    Joined:
    Feb 9, 2017
    Member:
    #210113
    Messages:
    19
    Gender:
    Male
    San Diego
    Vehicle:
    2008 Tacoma TRD
    As stated above. Chronological order. The beginning shit is boring, so I’ll get it out of the way in one post.


    The radio: I was given a brand new 2017 Tacoma navi head unit by my cousin. Being somewhat arrogant in my automotive electrical skills, I figured it would be a slam dunk easy job to get the old radio out, cut the bezel to size and install the new radio in no time. The experience was sobering.

    The online forums are very lacking in factory radio information because everybody takes these out, but nobody puts them back in. So I was going in blind. Outside of the speaker plug being a direct fit between the old system and new, nothing else fit. Wiring diagrams are junk and I didn’t want to dedicate days to trying to reverse engineer the wiring scheme to make it fit. Miraculously, someone on ebay makes a harness to convert the plugs, so I snatched that up, along with a factory Toyota microphone.

    Old radio out:
    [​IMG]


    Look at that rats next. FML.
    [​IMG]


    The cool thing about the harness is that it came with connections for microphone, USB plug in, headphone jack, backup camera plug (which I cannot get to work), and an OBD II plug in, which I haven’t tried because I’m scared to know what it does. I also picked up an aftermarket GPS antenna which works great with the entune radio. If anyone knows how to get an aftermarket camera to work with this, let me know. I know the reverse wire is plugged in correctly, and I read something about a low voltage camera feed on the factory receivers.

    [​IMG]

    OEM Mic
    [​IMG]

    Done.
    [​IMG]


    Next was to get the new Bilstein struts installed and get an alignment before putting the new shoes on. Getting the struts off the truck, transferring the coil springs, and reinstalling in the driveway was easy. 2 hour job. I wanted to eye-ball the alignment before I drove it 10 miles to the alignment shop, so I loosened the caster bolts on the lower frame mounts and tried to turn them. Nope, not moving. Tried an impact gun, nope, tried a breaker bar, nope. I had the dreaded seized Toyota caster sleeves. 7” dewalt angle grinder with a cut-off wheel did the trick. I ended up nicking one of the lower arms with the wheel, so I just replaced both lower arms and all of the alignment hardware in one shot. This time, I slathered anti-seize on all of the hardware because I was not going through that again.

    [​IMG]

    Here is how she sat after the struts and tires:

    [​IMG]
     
    This site contains affiliate links for which the site may be compensated.
    #3
    WormSquirts and MarX like this.
  4. Jun 12, 2018 at 4:59 PM
    #4
    SwampDonkeyBait

    SwampDonkeyBait [OP] Member

    Joined:
    Feb 9, 2017
    Member:
    #210113
    Messages:
    19
    Gender:
    Male
    San Diego
    Vehicle:
    2008 Tacoma TRD
    Bed drawer system.


    The venerable “Truck Vault” systems on this website inspired me to build my own drawer system. Primarily, I wanted a place that I could transport and keep firearms safely, while still having a functional storage system for other items. This led to a two main-sliding drawer system with one side being regular storage and the other side being firearm storage.


    The firearm side had to be hardened against intrusion, while everything else could be “medium-security.” The drawers had to sit entirely between the wheel wells, which left some space fore and aft of the wheel wells along the side of the bed for more storage. Those areas will have hatches to access items from the top. I also thought that the bed would be a good place for the second battery, so another hatch was made for that feature. What I ended up with was a two drawer, five hatch storage system.

    The frame is attached to the frame of the truck via four of the bed bolts. Two of the bed bolts are within the frame itself, so the drawers must be removed to gain access to those.

    All tubing is 1”x1” or 1”x1.5” .065 mild steel, unless otherwise noted. This is for weight savings.


    Fitting the main frame pieces in the bed:
    [​IMG]


    Top and Bottom frame:
    [​IMG]


    Determining necessary depth for the drawer to ensure that tall-scoped rifles would fit:
    [​IMG]


    I ended up going with a total depth that was 1” taller than the molded ledge in the bed liner.


    5ft x 10ft piece of 18 gauge for skinning. Thank god for plasma cutters:
    [​IMG]


    Joining main rails with cross rails. This is the face side of the drawer:
    [​IMG]


    Drawer face side mocked up. Right drawer (firearm drawer) is 21” wide, 64” deep. Left side drawer is 18” wide, 48” deep (leaving room for battery behind it). Safety is paramount. Make sure to keep gas cans at least 2ft away from all welding work:
    [​IMG]


    Center support welding:
    [​IMG]


    Tacking in the jambs. Jamb is 1/2"x1/2" square tube. Top cross rail is 1"x1.5", bottom rail is 1/4in plate. Weather bulb seal will ride inside of the jamb.:
    [​IMG]


    Drawer fab. Main rail are 1x1.5 running longitudinally. 1”x .5” cross members:
    [​IMG]


    Tacking in the tracks. Tracks are 1x1 hot rolled angle. This was a mistake that I realized too late in the process. The rough surface of hot rolled angle is not conducive to a smooth roll on the casters. I ended up flap-discing the tracks after it was finished to get a smooth surface:
    [​IMG]


    Caster install. Each drawer rides on 6 casters. Two caster are installed on the main frame to support the drawer coming forward. Four casters are on the drawer itself, two in the back on top, and two on the bottom. This covers all scenarios of drawer loading to ensure that there is proper support both front and rear.
    [​IMG]


    Bottom caster on the drawer had to be recessed into the rail. Plasma cutter works wonders:
    [​IMG]

    [​IMG]

    Mocking up the drawer faces. ¼” plate steel plasma cut to size. When centered, the clearance is 1/16” all the way around:
    [​IMG]


    Left side drawer gets a standard paddle latch with a keyed lock:
    [​IMG]


    Right side drawer gets a hardened steel pin safe latch with electronic lock. Both sides get the same weld-on handle and ¼ plate steel pockets to hold their respective locking mechanisms.
    [​IMG]


    Face of the drawer system. Mocking up the anti-pry feature. I allowed for an extra 1.5” on the face to weld on additional tubing and plate to ‘recess’ the drawer further. The further the drawer face is from the edge, the harder it is to pry.
    [​IMG]


    Frame welded up an in place for final fitment:
    [​IMG]


    Battery hatch that sits behind the left drawer. ½” x ½” tubing for the frame and a weld on piano hinge.
    [​IMG]


    Additional security for the firearms side. .375” 316 stainless steel rods. These were embedded into the frame and installed inside polished sleeves to allow rolling. Sawzall prevention.
    [​IMG]


    Cut the 18ga skin for the bottom and welded into place.
    [​IMG]


    Side skins welded in place:
    [​IMG]

    The main drawer frame is weather sealed from the rest of the storage compartments. I used roofing caulk to get a good bond with bare metal.
    [​IMG]


    Expanded metal on the right side front. To prevent access to locking mechanism. Stringers were cut from 18ga and welded vertically to support the deck. Getting ready for paint. Primed:
    [​IMG]


    Mocking up the side boxes. These were a lot more work that I anticipated:
    [​IMG]

    Framed side box:
    [​IMG]

    Side boxes with hatches installed. Same manner as the battery hatch. ½” x ½” frames with ½” x ½” jambs to hold the weather stripping.
    [​IMG]

    Painted. Side boxes in place.
    [​IMG]


    Now its time for the diamond plate deck. This also took a lot longer than I expected. Plasma cutter to the rescue. Pro tip - do not do what I did and cut the diamond plate from the smooth side. This makes cleaning the edge much more difficult. Cut from the diamond side. I found this out after I was done.
    [​IMG]


    Now its time to finish the drawers. Reinforced the drawer face with tubing and ¼” thick gussets.
    [​IMG]

    Welding in tabs to hold the drawer bottoms. I opted to use painted plywood for the drawer sides due to weight savings.
    [​IMG]

    Drawer system in place prior to final decking.
    [​IMG]

    Decking getting cut to size.
    [​IMG]

    Decking was glued on using commercial weather tight sealant/adhesive. Water bottles are helping hold it down tight. The deck is secured to all bearing surfaces using security torx panhead screws. Don't look at the bondo that I used to seal the side box to the main box.
    [​IMG]


    Deck painting time. After all joints between the deck and bed were sealed with paintable caulking, I sprayed this Herculiner shit all over it. It works surprisingly well if you allow it to fully cure.
    [​IMG]
    [​IMG]

    Final product:
    [​IMG]

    [​IMG]
     
    Last edited: Jun 14, 2018
  5. Jun 12, 2018 at 8:22 PM
    #5
    MarX

    MarX Hotdogs, spam and skittles.

    Joined:
    Jun 14, 2013
    Member:
    #106295
    Messages:
    25,180
    Gender:
    Male
    First Name:
    Mark
    NE Kansas
    Vehicle:
    2013 DCLB Tacoma TRD sorta Sport 4X4, 2009 Tundra SR5 workhorse
    RETRAX bed cover, Tailgate lock, TRD exhaust. 887's, LR UCA'S, Bilstein 5100's and Deavers AAL.
    Nice truck, impressive drawer build!
     
  6. Jun 13, 2018 at 9:16 AM
    #6
    SwampDonkeyBait

    SwampDonkeyBait [OP] Member

    Joined:
    Feb 9, 2017
    Member:
    #210113
    Messages:
    19
    Gender:
    Male
    San Diego
    Vehicle:
    2008 Tacoma TRD
    Bed rack.

    I started this little project the day before I was scheduled to go to Colorado. This took only a few hours to put together. I had 3 goals for developing this rack. First, to be able to support a RTT (future). In the interim, I was going to throw a tarp over the top and sleep in the bed of my truck in the middle of Nowhere, Colorado. Second, I wanted it to be a building platform for a retractable lightbar system. Lastly, a shovel/axe/fuel can holding platform. The rack is still a work in progress as I decide what to do with it.

    I sat down and calculated the minimum tubing sidewall thickness for structural loading before deciding on material. I’d have to look back at my calcs, but I believe each hoop (3 total) can take an 700lb static load at top center. The material I chose was 1” x 3” .065 mild tubing:

    Most DIY bed cages that I looked at the on the web were either sitting on the bed rails without proper structural support, or were tied into truck frame, but looked like crap. I decided to make it sit on the bed rails, and tie into a solid structural piece coming off the frame of the truck. In this case, the bed drawer system, which had vertical support off of the bed bolts. The base sits on 3” x 3” hot rolled angle trimmed to fit the Tacoma bed rails, with additional vertical supports tying the cage to the drawer frame.

    2ea 20ft sticks of 1x3 .065
    [​IMG]

    Miter cutting the angles for vertical supports:
    [​IMG]

    Cut to fit and tacked into place.
    [​IMG]

    Two of the longitudinal pieces at the top of the cage did not fit well. Luckily there was enough left over material to recut those pieces and true the alignment.
    [​IMG]
    [​IMG]
    Vertical supports at the front of the cage. These bolt to small dowels that I welded into the front uprights, then run down to the main frame of the drawer system. All bolts are 3/8" grade 8.
    [​IMG]


    After it was all welded together, I primed and painted with the same herculiner stuff that was sprayed on the drawer deck. I started the trip before the paint was fully dry. Forgot to get a final photo before going to Colorado, so here is a pic from a rest stop in Utah. Notice the truck squatting. It did not like having that much weight in the bed.
    [​IMG]
     
    Last edited: Jun 14, 2018
    Manfred, WormSquirts and MarX like this.
  7. Jun 13, 2018 at 9:39 AM
    #7
    SwampDonkeyBait

    SwampDonkeyBait [OP] Member

    Joined:
    Feb 9, 2017
    Member:
    #210113
    Messages:
    19
    Gender:
    Male
    San Diego
    Vehicle:
    2008 Tacoma TRD
    Dual Battery.

    Redundancy gives peace of mind in the back country. I've been stranded far from main roads before, and wanted something to ensure that I had a better chance of starting the truck if I left a dome light or some other electrical component on by accident. I figured that since the truck is stick shift, bump starting is an option, but that would only work if I was on a slope. Soooo.... dual battery it is.

    I chose the blue sea systems 7622 ML because Blue Sea makes great marine grade equipment. Link to the product: https://www.amazon.com/Blue-Sea-Aut...rd_wg=lVbUo&psc=1&refRID=XGNR69QFFTR5KAS3A8D8

    I went to costco for the interstate size 36 batteries. The main battery stays in the OEM location, and the second battery goes in the back of the bed drawers. I used 2/0 welding cable for all of the wire runs.

    Cables were crimped using my AK47 rivet jig, then soldered.
    [​IMG]

    DIY mount for the second battery. Simple 5/16 all thread from home depot cut to length does the trick:
    [​IMG]

    Bolted in location:
    [​IMG]

    Temporary ACR location double-side taped to the top of my engine fuse box. I was in a hurry to get this done before Colorado, so I half-assed mounting location. I am relocating it in the next few weeks to behind the fuse box, under the brake master cylinder.
    [​IMG]

    Different view of the ACR. The left side has two cables, one off the alternator, and one off the main batter. The other side runs to the second battery through a 300 amp fuse. The cables run under the trucks floor board to the frame, then back up into the bed.
    [​IMG]

    I wired up the switch using 18-5 cable running through the firewall. The biggest pain of this whole thing was disassembling the dash to find the starter solenoid wire coming off the ignition switch. Again, half assed because I was in a hurry. This wiring get fixed later on in the build. I threw the switch in the ashtray as a temporary location for the trip.
    [​IMG]
     
    WormSquirts and MarX like this.
  8. Jun 13, 2018 at 9:55 AM
    #8
    SwampDonkeyBait

    SwampDonkeyBait [OP] Member

    Joined:
    Feb 9, 2017
    Member:
    #210113
    Messages:
    19
    Gender:
    Male
    San Diego
    Vehicle:
    2008 Tacoma TRD
    Air Bags:

    Air bags were never a planned upgrade. While the bed rack and drawer system do not weight very much (<200lbs), the weight of all the gear I took with me made driving less than pleasant. The truck rode 1” off the bump stops the entire trip. Hit a bump in the road, get a hard jolt. Go over a speed bump faster than 1 mph, get a jolt. Offroading… you get the idea.

    The solution to my problem was more support in the rear. I tend to shy away from add-a-leafs as it is really a crap shoot to calculate how much it will affect spring rate and ride height. Air bags had the ride-height adjustment I was looking for. Instead of spending $400 for an airbag kit, I decided to make my own with left-over plate steel that I had lying around, plus $150 for Air lift 5814 air springs.

    Air spring:
    [​IMG]

    Bottom mounting plates cut and drilled:
    [​IMG]


    Top plate cut and drilled. Mocked up in truck for final ride height determination. Yes, I know I need new rear shocks. They are my to-do list.
    [​IMG]

    Countersunk:
    [​IMG]


    While cleaning up a plasma cut edge with a flip disc, the disc decided that it was time to give me hand a kiss. Went through my work glove:
    [​IMG]


    Bottom mount with side extensions welded on. I needed to get the mounting surface down to the top of the leaf spring:
    [​IMG]


    Top bracket. The Z bracket ties into the side of the frame for lateral support. The small plates on top of the main bracket act as pads under the frame and match the topography of the frame supports/rivets, giving the bracket more bearing area for support:
    [​IMG]


    Painted and assembled:
    [​IMG]


    Installed. All hardware is grade 8. 3/8" for everything except the 3/4" bolt at the very top. The air port is on the bottom. I ran the air lines to a Tee near where the brake lines tee is located, then ran the air line up to the bed drawer with a single schrader valve.
    [​IMG]
     
    WormSquirts and MarX like this.
  9. Jun 13, 2018 at 10:03 AM
    #9
    SwampDonkeyBait

    SwampDonkeyBait [OP] Member

    Joined:
    Feb 9, 2017
    Member:
    #210113
    Messages:
    19
    Gender:
    Male
    San Diego
    Vehicle:
    2008 Tacoma TRD
    Welding cart:

    Not exactly relevent to this thread, but I built this welding cart between different projects on the truck. I wanted it to be able to hold my plasma, mig, and the new tig machine along with two 240CF bottles on the back. Three levels, cable holders on the top two levels, and a tig foot pedal box on top:

    Cable holders
    [​IMG]

    Tig rod holders
    [​IMG]

    Painted
    [​IMG]

    Left over aluminum diamond plate decking
    [​IMG]

    [​IMG]

    Room for bottles
    [​IMG]
     
    MarX likes this.
  10. Jun 13, 2018 at 12:09 PM
    #10
    SwampDonkeyBait

    SwampDonkeyBait [OP] Member

    Joined:
    Feb 9, 2017
    Member:
    #210113
    Messages:
    19
    Gender:
    Male
    San Diego
    Vehicle:
    2008 Tacoma TRD
    Winch Bumper:

    The mother in law bought me a XRC 9500 winch with synthetic line for Christmas. This forced my hand into starting a new project of building a winch bumper. I had the idea in my head that I wanted the winch to be easily removable in case I had to winch backwards. Designing a removable which plate while trying to keep the entire bumper strong made this project a challenge. I also wanted an integral lightbar with fog lights. The winch plate is made from ¼” plate, clevis’ are made from 1” plate and the bumper attachment points are ½” plate. For the main body I opted for 11ga to save weight. This is a little on the thin side, and in retrospect, I would go no less than 10ga thick in the future on light trucks such as the Tacoma.

    I was brand new to tig welding, and figured what better way to get experience than to weld this bumper entirely using tig? This was great because it was hours of welding experience, but bad in the sense that I had to double-pass each weld to build up the weld bead high enough to be ground to a smooth finish. Mig would hands-down be the better welding process here.


    Before I cut the first piece of metal, I spent a good 2 days look at my truck thinking what the f*ck are you getting yourself into?
    [​IMG]

    Mocking up a light bar, with a removable winch underneath is a not a easy as one would thing. Thank god for CAD, cardboard-aided design. Once I was ready to start, I began on the foundation, the frame mounts. Flat 1/4" plate with 1/2" plate gussets with 1" clevis.

    [​IMG]

    Rough cut clevis prior to cleaning them up (removing mill scale and shaping the ends. Notice the beveled edge for welding.
    [​IMG]

    Frame mount.
    [​IMG]

    Winch plate base. The winch plate slides onto the frame mount plates with 1/4" top and bottom plates to sandwich the 1/2" plate.
    [​IMG]

    [​IMG]

    Next, I had to figure out the angle of the skid plate. skid plate is 1/4" and tacked into place. 1/4" plate side gussets were traced from cardboard and cut to shape.
    [​IMG]

    [​IMG]

    Cut and welded into place.
    [​IMG]

    In place.
    [​IMG]

    Locating and drilling the holes for the removable pins. 3/4" grade 8 bolts, uncoated. Notice the reinforcements under the winch bolt mounting points.
    [​IMG]

    52" curved lightbar zip tied into place. I was not happy with the lack of clearance on between the top of the winch and the bottom of the bar. There was no room to operate the free spool lever. I ended up trimming the headlight brackets and moving the lightbar up by 1.5 inches.
    [​IMG]

    [​IMG]

    Beginning the 11ga framing. Starting out with the vertical pieces off of the frame mounts. I messed around with this for an entire day trying to get the light bar height in the sweet spot.
    [​IMG]

    [​IMG]

    After the verticals were set, it was time to tie the sides together with a cross member. 1" bar, 1/4" thick was miter cut and welded into place. The angle of the cross member determined the mounting depth of the light bar. Too shallow of an angle would make winch plate would stick out, beyond the rest of the bumper, too deep and the light bar would be recessed too far to be usable. Another few hours figuring out the sweet spot.
    [​IMG]

    [​IMG]

    Once the cross member was complete, I started on the sides. I wanted to keep the bottom of the bumper far enough off the ground to have a good approach angle offroad, so the sides got angled upwards at 15 degrees.
    [​IMG]

    Looks like a sharper angle from this perspective:
    [​IMG]

    [​IMG]

    [​IMG]

    Vertical face cut out for the 52" light bar. $300 ebay plasma cutter is a champ.
    [​IMG]

    [​IMG]

    Top closure plates to match the lines of the truck.

    [​IMG]

    The ends of the bumper were left long so they could be cut to final width at the end. Everything was cut with cardboard then traced onto the steel plate.

    [​IMG]

    [​IMG]

    After the top pieces were cut and tacked into place, I cut the ends and traced the cap pieces with cardboard. Cut and tacked into place:
    [​IMG]

    Welding
    [​IMG]

    Mocked up with the light bar in place.
    [​IMG]

    Flap disc time
    [​IMG]

    [​IMG]

    I left a 4 inch gap between the edge of the skid plate and the edge of the 11ga bumper. I made closure plates to fill the gap and maintain a small clearance for future removal. The closure piece had to be angled to match the lines of the bumper.
    [​IMG]

    About this time in the project. I decided to go a different direction with the fog light location. Initially, I wanted to put them down low on either side of the winch, but decided that they would serve the roadway better to be a bit higher. Out with the old 52" light bar, and in comes a 42" curved light bar. This leaves enough room on the outside to place cans for the foglights.

    You can see the foglight peaking around the corner.
    [​IMG]

    Scrap 4.5" pipe with mounting tabs welded at 2, 4, 8 and 10 o clock.
    [​IMG]

    Problem was that I had to fill in the existing light bar channel with scrap plate and weld into place. Here it is with a 4.5" hole saw. This was fun.
    [​IMG]

    Welded in place
    [​IMG]

    Next was the winch plate pin system. My intention was to have easily removable pins with a cross bolt to hold them in place. Weld on blind nuts were installed on the frame mount for the bolt to thread into from the front of the bumper.
    [​IMG]

    [​IMG]

    [​IMG]

    Time for paint primer and final assembly.

    Primer
    [​IMG]

    [​IMG]

    Herculiner. Love this stuff
    [​IMG]

    After the main bumper was painted, I focused on finishing the winch plate. I had to cut the fairlead hole and vents. Then cut and welded a trailer hitch to the bottom with reinforcing plates.

    Welds are looking better at this point.
    [​IMG]

    [​IMG]

    [​IMG]

    [​IMG]

    Cut the stainless steel mesh and installed it behind the light bar opening. The backside has full length plates holding the mesh in place with #10 machine screws threaded through the front.
    [​IMG]

    On the truck.
    [​IMG]


    Final winch plate assembly.
    [​IMG]

    Slathered all joining surfaces and pins with anti-seize.
    [​IMG]

    On the truck.
    [​IMG]

    [​IMG]

    Also - those foglights are stupid bright. Well worth the $30 from Amazon.
     
    This site contains affiliate links for which the site may be compensated.
    #10
  11. Jun 13, 2018 at 12:19 PM
    #11
    SwampDonkeyBait

    SwampDonkeyBait [OP] Member

    Joined:
    Feb 9, 2017
    Member:
    #210113
    Messages:
    19
    Gender:
    Male
    San Diego
    Vehicle:
    2008 Tacoma TRD
    Reserved
     
    MarX likes this.
  12. Jun 13, 2018 at 12:23 PM
    #12
    MattCowsmasher

    MattCowsmasher ( -_・)ᡕᠵ᠊ᡃ່࡚ࠢ࠘⸝່ࠡࠣ᠊߯᠆ࠣ࠘ᡁࠣ࠘᠊᠊ࠢ࠘

    Joined:
    Apr 7, 2017
    Member:
    #215629
    Messages:
    48,680
    Gender:
    Male
    Temple, Tx
    Vehicle:
    2015 sporty dcsb 4wd
    Lifted, armored, lumenz w/ switches, positraked, long legged, big tars, debadged with a hood skewp
    Nice work on the bumper
     
    MarX likes this.
  13. Jun 13, 2018 at 12:27 PM
    #13
    MarX

    MarX Hotdogs, spam and skittles.

    Joined:
    Jun 14, 2013
    Member:
    #106295
    Messages:
    25,180
    Gender:
    Male
    First Name:
    Mark
    NE Kansas
    Vehicle:
    2013 DCLB Tacoma TRD sorta Sport 4X4, 2009 Tundra SR5 workhorse
    RETRAX bed cover, Tailgate lock, TRD exhaust. 887's, LR UCA'S, Bilstein 5100's and Deavers AAL.
    Wow looks good. All awesome, really like that bumper too. Hope the hand is ok.
     
    MattCowsmasher likes this.
  14. Jun 13, 2018 at 12:28 PM
    #14
    Snatch Me

    Snatch Me Yeehaw

    Joined:
    May 14, 2018
    Member:
    #253416
    Messages:
    157
    Gender:
    Male
    PBC FL
    Vehicle:
    Cement TRD OR 4x4 DCSB
    Freaking impressive. Keep on it, season will be here before you know it!
     
    MarX likes this.
  15. Jun 13, 2018 at 12:33 PM
    #15
    dirty deeds

    dirty deeds Big Blue Nation!

    Joined:
    Oct 13, 2016
    Member:
    #199662
    Messages:
    29,323
    Gender:
    Male
    First Name:
    Nick
    Eastern KY
    Vehicle:
    '14 Wht AC SR, 2.7, MT, Baja wheels
    PlastiDip front emblem, twine, and Scotch tape
    Job well done! Very nice!
     
    MarX likes this.
  16. Jun 13, 2018 at 2:45 PM
    #16
    Bluegrass Taco

    Bluegrass Taco Politically incorrect low tech redneck

    Joined:
    Jul 27, 2015
    Member:
    #160391
    Messages:
    23,081
    Gender:
    Male
    First Name:
    Bill
    Mt Washington Ky
    Vehicle:
    2011 DCSB, TRD OR, 5100's, 885's 285/75r16 Cooper STT PROs.
    Craftsmanship gets an A+.

    Any guess as to how much weight was added?
     
    brofog and MarX like this.
  17. Jun 13, 2018 at 3:18 PM
    #17
    SwampDonkeyBait

    SwampDonkeyBait [OP] Member

    Joined:
    Feb 9, 2017
    Member:
    #210113
    Messages:
    19
    Gender:
    Male
    San Diego
    Vehicle:
    2008 Tacoma TRD
    Thanks for the kind words.

    Drawers: ~150lbs (minus the second battery)
    Rack: ~50lbs
    Bumper with winch & synthetic rope: 100 - 110lbs. This sagged the front of the truck 1/2"

    Saving weight was a major consideration throughout all of these little projects. I'll correct it above later, but 90% of the tube was .065, not .085.

    The welding cart was built with .25 wall tubing and weighs in at a good 200lbs, 500+lbs with the bottles.
     
    MarX and Bluegrass Taco[QUOTED] like this.
  18. Jun 13, 2018 at 3:21 PM
    #18
    Bluegrass Taco

    Bluegrass Taco Politically incorrect low tech redneck

    Joined:
    Jul 27, 2015
    Member:
    #160391
    Messages:
    23,081
    Gender:
    Male
    First Name:
    Bill
    Mt Washington Ky
    Vehicle:
    2011 DCSB, TRD OR, 5100's, 885's 285/75r16 Cooper STT PROs.

    I'm taking welding classes now to become proficient at welding aluminum. Very concern with weight considering fuel economy mostly.

    Again, great work!
     
    MarX likes this.
  19. Jun 13, 2018 at 4:02 PM
    #19
    beertimecontinuum

    beertimecontinuum What's outside the simulation?

    Joined:
    Dec 29, 2013
    Member:
    #119461
    Messages:
    9,993
    Gender:
    Male
    First Name:
    Everett
    Ky,Earth,SolarSystem,MilkyWay,VirgoSupercluster
    Vehicle:
    10 Pyrite DCSB VEEEEEE 1.618
    FoxShox, Dirt King Heims, Chevy63s, 2UZ-FE V8 Flowmaster 40, Demello Front/DYF Rear w/Swigouts, BAMF sliders, DYFAF
    Looks good OP!! :cheers:
     
    MarX likes this.
  20. Jun 14, 2018 at 5:17 AM
    #20
    ovrlndkull

    ovrlndkull STUKASFK - HC4LIFE

    Joined:
    Jan 7, 2017
    Member:
    #206806
    Messages:
    37,791
    Gender:
    Male
    First Name:
    Skip
    Burlington, NC
    Vehicle:
    2005 DCLB Silver
    63s, XD Machete, Beat not Babied
    Like the bed drawers and the bumper. I like your thought in functionality with the bumper having a removeable winch plate is pretty cool. If I were you I would put a skit on the front bumper that goes down and connects to the frame where the factory skid is. Most your aftermarket bumpers do this to have a sliding point instead of a flat spot on the front of your truck that could get hung up or what not.

    Very nice work!:thumbsup:
     
    MarX likes this.

Products Discussed in

To Top