1. Welcome to Tacoma World!

    You are currently viewing as a guest! To get full-access, you need to register for a FREE account.

    As a registered member, you’ll be able to:
    • Participate in all Tacoma discussion topics
    • Communicate privately with other Tacoma owners from around the world
    • Post your own photos in our Members Gallery
    • Access all special features of the site

eBay fog light kits for '08-'09-'10 Tacomas....

Discussion in '2nd Gen. Tacomas (2005-2015)' started by 10taco, Sep 6, 2009.

  1. Mar 2, 2011 at 2:26 PM
    #221
    10taco

    10taco [OP] Well-Known Member

    Joined:
    Sep 4, 2009
    Member:
    #22251
    Messages:
    160
    Gender:
    Male
    Massachusetts
    Vehicle:
    '23 4X4 DCSB V6 AT SR5/SX MGM
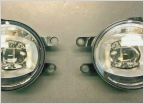
    If your Tacoma had factory fogs originally, you should just need to install two new lamp assemblies. The new lamps should snap into the factory mount points and attach (via electrical connectors) directly to the factory harness. You can get replacement lamps from eBay, but be sure to get lamps with the correct adjusters and mounting points. Some of the posters in this thread have (unfortunately) gotten some lamps that seem to be missing certain installation mounts; be sure to 'see' pictures of the back of the lamps you are acquiring to ensure that they will install properly (the link you included in your post did not seem to have these pics). Good luck!
     
    This site contains affiliate links for which the site may be compensated.
  2. Mar 5, 2011 at 8:05 AM
    #222
    mattygabe

    mattygabe Well-Known Member

    Joined:
    Jan 29, 2011
    Member:
    #50137
    Messages:
    196
    Gender:
    Male
    First Name:
    Matt
    Western PA
    Vehicle:
    2011 Access Cab SR5
    Access Limited Soft Rollup Tonneau Cover
    So, after reading everyone's comments, decided to take the dive. I ordered a kit with both fog lamps, the two wiring harnesses and a cheap aftermarket switch. A day or two later, after reading that most everyone who got these types of kits found the switches to be cheapy (now that I have it, it's true), so I ordered an OEM switch. Stupidly, I somehow thought I wouldn't need a harness. So I've ordered another OEM switch WITH a harness, and am contemplating either selling the harness-less switch here on TW, or just getting it refunded (opened the package, not entirely sure that's allowed).

    So here's the deal. Going to try to update this SINGLE post because it seems that a lot of EPA's helpful advice is strewn across three or four forum pages, among tens of posts involving questions between TW members and EPA. Try and pay back a lot of the helpfulness I've received from EPA and others like it on TW.

    For reference, since eBay links eventually die, the seller I bought the kit from (lamps + harnesses + cheap switch) is xrteam.

    Here are pictures of the kit I got, I added annotations and arrows in Paint.NET.

    The fog lamp the kit came with. Has a plastic film over the lens.
    DSC02595_49fc8edaca9c2d09705d4c8a83a21a7b584c55df.jpg

    The back of one of the fog lamps. Notice the white adjuster knob.
    DSC02596_f59c60f05f4a01db88b89374e138a572588048e2.jpg

    Comparo of two switches side-by-side (switch height is biggest factor... the generic switch "fits" in my slot, but doesn't click in or anything):
    DSC02592_eaab57808c8b602440bdf213ebacf31c8ba802cd.jpg
    DSC02593_7e03fec44c719fc5c7bd56753251d86ec1d908c9.jpg
    DSC02594_a4bccd99b8205a22b030d125ee3cbf8c61df114b.jpg

    Here's the lamp harness (the one thats in the engine bay):
    DSC02583_b8fd1b28851c976f5eb747477d97bb378832f400.jpg
    DSC02584_fe39fbd646d222da1d5240fa51d311ca63a62802.jpg

    Here's what I need help with, the other harness. There's a white wire coming from the 15A inline fuse with an odd brown connector. I assume this is what gets connected to the positive battery terminal... But how? Do I splice it and put a suitable connector on? Also, would like clarification on the red wire for the Add-a-Fuse, and the wires coming from the generic switch plug:
    DSC02585_d86f08a6fe6ca80955d1669e32f948224f49aab3.jpg
    DSC02586_702d2571d6ed5af6c1b50bfd2cc5c9ab0b455d2c.jpg
    DSC02587_8ce814a6f5694175bea47b8dfd951823c98ce89c.jpg
    DSC02590_3cd3800d6ac4b4cce6831a7d96d8cb40c3034a52.jpg
    DSC02588_33b0250b9d70e206e850e7a40f35bf1a08562738.jpg
     
    This site contains affiliate links for which the site may be compensated.
  3. Mar 5, 2011 at 8:19 AM
    #223
    epa4wd

    epa4wd Well-Known Member

    Joined:
    Mar 17, 2009
    Member:
    #14828
    Messages:
    2,323
    Gender:
    Male
    First Name:
    Eduardo
    Vehicle:
    2019 SR
    Clazzio Seat Covers OR Wheels 40% tint Side Steps KC Fog Lights
    Yes you are correct, splice it and put a suitable connector, and yes the red to the add a fuse.
     
  4. Mar 5, 2011 at 8:23 AM
    #224
    epa4wd

    epa4wd Well-Known Member

    Joined:
    Mar 17, 2009
    Member:
    #14828
    Messages:
    2,323
    Gender:
    Male
    First Name:
    Eduardo
    Vehicle:
    2019 SR
    Clazzio Seat Covers OR Wheels 40% tint Side Steps KC Fog Lights
    For the switch:

    [​IMG]

    btw thanks for the pictures, this pic should help anyone installing theirs in the future

    DSC02586_702d2571d6ed5af6c1b50bfd2cc5c9ab0b455d2c.jpg
     
    This site contains affiliate links for which the site may be compensated.
  5. Mar 5, 2011 at 8:45 AM
    #225
    mattygabe

    mattygabe Well-Known Member

    Joined:
    Jan 29, 2011
    Member:
    #50137
    Messages:
    196
    Gender:
    Male
    First Name:
    Matt
    Western PA
    Vehicle:
    2011 Access Cab SR5
    Access Limited Soft Rollup Tonneau Cover
    So I'm assuming I'll also just splice on a longer wire, since the majority of that harness will be inside the cab? I think I read you had only the lamp harness connector (red wire, white connector) and the 12V battery connector going out. I saw that and thought the wire was a bit short.
     
  6. Mar 5, 2011 at 9:06 AM
    #226
    epa4wd

    epa4wd Well-Known Member

    Joined:
    Mar 17, 2009
    Member:
    #14828
    Messages:
    2,323
    Gender:
    Male
    First Name:
    Eduardo
    Vehicle:
    2019 SR
    Clazzio Seat Covers OR Wheels 40% tint Side Steps KC Fog Lights
    I honestly don't remember if I did had to extend it or not. You can also remove the black wire hose from the wires, and see if you re-distribute the wires a better way, then put the wire hose back on, but from looking at those pictures, I would just extend the white wire so it runs together along the red wire that connects to other part of harness.(since those two are the ones going out to the engine bay)

    If you do extend it, I recommend that you solder the extension, don't crimp them together, or you could run a new longer wire from the relay to the battery, if you don't want to be splitting wires and soldering wires.
     
  7. Mar 5, 2011 at 1:49 PM
    #227
    mattygabe

    mattygabe Well-Known Member

    Joined:
    Jan 29, 2011
    Member:
    #50137
    Messages:
    196
    Gender:
    Male
    First Name:
    Matt
    Western PA
    Vehicle:
    2011 Access Cab SR5
    Access Limited Soft Rollup Tonneau Cover
    Well, I ended up finishing, and when I connected the negative terminal back up, went in and turned on the truck (without starting) - everything worked! I can't tell you the last time I remember something working on the first try, but I owe that success to this in-depth thread, and your help, so thank you again.

    What I ended up doing was buying more 16 gauge wire (I guessed at the size in-store - ended up being precisely what was used), and bought a circular connector that had built-in solder AND heat shrink. To connect the new extension wire to the harness, I found nifty insulated connectors (photo below has washed out flash), and crimped my wires in those connectors and used heat shrink to seal them up proper. The connectors sit inside the cabin, so after I connected them I wrapped them neatly in some electrical tape to ensure good connection. Here are a few more photos of this process:

    Photo of the spool of wire with the new circular connector:
    DSC02597_672048860aacb99cdf4f9634f102a1d46e61a99c.jpg

    Washed out pic of the female end of the quick connect connector I used for the white power wire extension:
    DSC02598_d197b86673b920e51b7c71986741314ef0243ef6.jpg

    And, just for kicks, here's how the add-a-fuse was connected to the red wire:
    DSC02599_9648c02798212883e491778b89041d7f284d6445.jpg

    I spent probably around 4 hours of solid work on this today, mostly due to first fighting to get the holders out, and then fighting with the firewall grommet on the drivers side to get my two wires through (coathanger worked for me), but I'll post some photos when I get a chance.

    Waiting on my stock switch to come in. I do have a question, though: How do you access the row of switches where the fog switch goes? I have the generic one sitting in the row below for now, but I couldn't see where to get at those switches without taking the lower dash out.

    Thanks again.
     
  8. Mar 5, 2011 at 1:59 PM
    #228
    epa4wd

    epa4wd Well-Known Member

    Joined:
    Mar 17, 2009
    Member:
    #14828
    Messages:
    2,323
    Gender:
    Male
    First Name:
    Eduardo
    Vehicle:
    2019 SR
    Clazzio Seat Covers OR Wheels 40% tint Side Steps KC Fog Lights
    Looking good!, did you add the fuse/fuse-holder to the new white wire you made?

    The three top blanks are easy to access, you don't have to take the lower part of the dash out.

    Remove the little door compartment (the one that lets you access the fusebox) and with the blank removed from the top row, point a flashlight from the bottom, up, and you should be able to see clearly.

    Another option is to remove the button blank, and insert a wire till makes it way down under the dash or around the fusebox, then tie it to the foglight harness and pull it back.
     
  9. Mar 9, 2011 at 9:38 PM
    #229
    LBCdan

    LBCdan TACO --> TUNDRA

    Joined:
    Aug 24, 2010
    Member:
    #42169
    Messages:
    913
    Gender:
    Male
    First Name:
    Dan
    Long Beach , CA
    Vehicle:
    2018 Tundra CM 4x4
    Toytec Coilovers, TotalChaos UCA, Icon w/ Resi, Toytec Lift Shackle, Methods w/ 285/75/18 Tires.

    I know this is an old ass thread.. but does anybody know what the lose wire in the 6th picture goes to? I cant seem to find an answer and it is bugging the crap out of me. Thanks for the help!
     
  10. Mar 9, 2011 at 9:45 PM
    #230
    pinktaco808

    pinktaco808 Hot Steppa

    Joined:
    Jul 23, 2010
    Member:
    #40651
    Messages:
    4,688
    Gender:
    Male
    what color is it????
     
  11. Mar 9, 2011 at 9:48 PM
    #231
    LBCdan

    LBCdan TACO --> TUNDRA

    Joined:
    Aug 24, 2010
    Member:
    #42169
    Messages:
    913
    Gender:
    Male
    First Name:
    Dan
    Long Beach , CA
    Vehicle:
    2018 Tundra CM 4x4
    Toytec Coilovers, TotalChaos UCA, Icon w/ Resi, Toytec Lift Shackle, Methods w/ 285/75/18 Tires.
    It is wrapped in that black protective stuff, it looks like a red and white wire with a black connector. Its all bundled up just sitting there.:confused:
     
  12. Mar 9, 2011 at 9:51 PM
    #232
    LBCdan

    LBCdan TACO --> TUNDRA

    Joined:
    Aug 24, 2010
    Member:
    #42169
    Messages:
    913
    Gender:
    Male
    First Name:
    Dan
    Long Beach , CA
    Vehicle:
    2018 Tundra CM 4x4
    Toytec Coilovers, TotalChaos UCA, Icon w/ Resi, Toytec Lift Shackle, Methods w/ 285/75/18 Tires.
    Untitled.jpg

    that one!:D
     
  13. Mar 9, 2011 at 9:52 PM
    #233
    pinktaco808

    pinktaco808 Hot Steppa

    Joined:
    Jul 23, 2010
    Member:
    #40651
    Messages:
    4,688
    Gender:
    Male
    that goes to the relay or the switch
     
  14. Mar 9, 2011 at 9:54 PM
    #234
    LBCdan

    LBCdan TACO --> TUNDRA

    Joined:
    Aug 24, 2010
    Member:
    #42169
    Messages:
    913
    Gender:
    Male
    First Name:
    Dan
    Long Beach , CA
    Vehicle:
    2018 Tundra CM 4x4
    Toytec Coilovers, TotalChaos UCA, Icon w/ Resi, Toytec Lift Shackle, Methods w/ 285/75/18 Tires.
    Untitled.jpg


    --ALSO.... i have this switch and harness... do you guys think that I have a chance of wiring this up to a OEM switch? ... or do I need to get a new switch and harness? Thanks for the help!
     
  15. Mar 9, 2011 at 9:54 PM
    #235
    LBCdan

    LBCdan TACO --> TUNDRA

    Joined:
    Aug 24, 2010
    Member:
    #42169
    Messages:
    913
    Gender:
    Male
    First Name:
    Dan
    Long Beach , CA
    Vehicle:
    2018 Tundra CM 4x4
    Toytec Coilovers, TotalChaos UCA, Icon w/ Resi, Toytec Lift Shackle, Methods w/ 285/75/18 Tires.
    For the fog lights? :confused: . That cable has been in my truck since day one. Does that mean I am prewired for fogs?
     
  16. Mar 9, 2011 at 11:00 PM
    #236
    pinktaco808

    pinktaco808 Hot Steppa

    Joined:
    Jul 23, 2010
    Member:
    #40651
    Messages:
    4,688
    Gender:
    Male
  17. Mar 9, 2011 at 11:28 PM
    #237
    LBCdan

    LBCdan TACO --> TUNDRA

    Joined:
    Aug 24, 2010
    Member:
    #42169
    Messages:
    913
    Gender:
    Male
    First Name:
    Dan
    Long Beach , CA
    Vehicle:
    2018 Tundra CM 4x4
    Toytec Coilovers, TotalChaos UCA, Icon w/ Resi, Toytec Lift Shackle, Methods w/ 285/75/18 Tires.
    Cool.. now how to wire up the OEM switch with my current harness. Thanks for your help.
     
  18. Mar 10, 2011 at 6:32 AM
    #238
    epa4wd

    epa4wd Well-Known Member

    Joined:
    Mar 17, 2009
    Member:
    #14828
    Messages:
    2,323
    Gender:
    Male
    First Name:
    Eduardo
    Vehicle:
    2019 SR
    Clazzio Seat Covers OR Wheels 40% tint Side Steps KC Fog Lights
    That loose wire he is referring to, I actually have no idea what is for. It is not part of the wiring of the foglights, that wire is there from factory, its only on the driver's side.

    EDIT:

    I think that wire is for the 2nd horn, my truck came only with one of the horns either the high tone or low tone.
     
  19. Mar 10, 2011 at 11:30 AM
    #239
    LBCdan

    LBCdan TACO --> TUNDRA

    Joined:
    Aug 24, 2010
    Member:
    #42169
    Messages:
    913
    Gender:
    Male
    First Name:
    Dan
    Long Beach , CA
    Vehicle:
    2018 Tundra CM 4x4
    Toytec Coilovers, TotalChaos UCA, Icon w/ Resi, Toytec Lift Shackle, Methods w/ 285/75/18 Tires.
    I think you are right... the connector doesnt look like anything on a fog light harness. thanks for the help.
     
  20. Mar 10, 2011 at 11:53 AM
    #240
    KenpachiZaraki

    KenpachiZaraki Its Wicked Flow BITCHES!!

    Joined:
    May 24, 2009
    Member:
    #17581
    Messages:
    4,159
    Gender:
    Male
    First Name:
    Alex •﹏•
    Lubbock
    Vehicle:
    05 TRD. 325/275/365 SBD
    ALL POSER- Afe Pro Dry S drop in filter, 3" AP leaf pack, Eibach w/5100's up front, 5100's rear, Fog Light Mod, ABS off mod, Dash Light MOD, Doug Thorley Long Tube Headers, Wicked Flow Bitches MAX Muffler, 4" floods, 20", 43" light bars, 265/75/16 Hankook Dynapro ATm, oil catch can, rear diff breather relocate, Custome Sliders, SOS concepts Front bumper, Demon Eye Mod, backlit TRD emblem on bumper, Morimoto D2S projectors,
    that's cool, and great pics! should help anyone else in the future
     

Products Discussed in

To Top