

-
Welcome to Tacoma World!
You are currently viewing as a guest! To get full-access, you need to register for a FREE account.
As a registered member, you’ll be able to:- Participate in all Tacoma discussion topics
- Communicate privately with other Tacoma owners from around the world
- Post your own photos in our Members Gallery
- Access all special features of the site
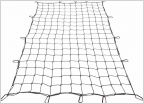 Mesh cover. short box
 How To: Retractable iPhone 5 Constant Hot Charger
 Vibration at 30-40 mph
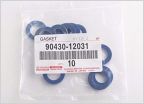 Anyone knows Oil Plug Gasket/crush washer and Rear diff gasket part #
Fuel pump replacement. Is there an easy way?
Discussion in 'Technical Chat' started by jax45, May 29, 2012.


