

-
Welcome to Tacoma World!
You are currently viewing as a guest! To get full-access, you need to register for a FREE account.
As a registered member, you’ll be able to:- Participate in all Tacoma discussion topics
- Communicate privately with other Tacoma owners from around the world
- Post your own photos in our Members Gallery
- Access all special features of the site
 3rd gen jbl audio upgrade help (aftermarket amp/Sub)
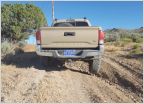 Sumo springs and off road flexing test
 Need Help Pricing these Rims and Tires.
 Aftermarket Steering Wheel?
 I messed up. Wd40.
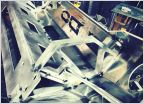 Low profile bumper in aluminum?
Fuel tank filler tube replacement
Discussion in '3rd Gen. Tacomas (2016-2023)' started by BigCarbonFootprint, Nov 25, 2019.
Page 2 of 4
Page 2 of 4

