1. Welcome to Tacoma World!

    You are currently viewing as a guest! To get full-access, you need to register for a FREE account.

    As a registered member, you’ll be able to:
    • Participate in all Tacoma discussion topics
    • Communicate privately with other Tacoma owners from around the world
    • Post your own photos in our Members Gallery
    • Access all special features of the site

FWC Project M Project

Discussion in '3rd Gen. Builds (2016-2023)' started by AverageGuyTaco, Jan 30, 2020.

  1. Dec 2, 2020 at 6:34 PM
    #81
    AverageGuyTaco

    AverageGuyTaco [OP] Well-Known Member

    Joined:
    Oct 14, 2017
    Member:
    #232959
    Messages:
    212
    Gender:
    Male
    Vehicle:
    2017 TRDOR-DCLB
    That’s great info. I did not have to pay extra so it would seem the rumors are true. Do you happen to know if they don’t charge the extra if you buy a thermal pack?
     
  2. Dec 2, 2020 at 6:58 PM
    #82
    RyanDCLB

    RyanDCLB Well-Known Member

    Joined:
    Jun 13, 2019
    Member:
    #296235
    Messages:
    3,360
    Gender:
    Male
    Vehicle:
    4/19 DCLBOR
    I made a thermal layer using the Home Depot Traffic Master floor underlayment as seen here. It worked fine as an insulation layer, but condensation was a big issue. :notsure:
     
    Pickeledpigsfeet likes this.
  3. Dec 2, 2020 at 7:02 PM
    #83
    socalexpeditions

    socalexpeditions IG: @socalexpeditions

    Joined:
    Sep 22, 2017
    Member:
    #230791
    Messages:
    5,239
    Gender:
    Male
    I highly advise you get that 5L fuel tank out of the engine compartment. Especially since diesel heater fuel tanks aren't properly vented and are cheaply made and notorious for leaking. Just safety wise, that tank does not belong in the engine compartment.
     
  4. Dec 2, 2020 at 7:26 PM
    #84
    AverageGuyTaco

    AverageGuyTaco [OP] Well-Known Member

    Joined:
    Oct 14, 2017
    Member:
    #232959
    Messages:
    212
    Gender:
    Male
    Vehicle:
    2017 TRDOR-DCLB
    Condensation is going to happen either way. So far it is mostly an issue up front in the sleeping area. The best way to somewhat mitigate is opening the roof vent and cracking the side window at night. If you can get air to flow through and bring in dry outside air it really helps. This works better if you have a heater to move the air around. Although, at this point, we do not run the heater when we are asleep. We are plenty warm in our 0F sleeping bags. I have a remote so I can turn on the heater in the morning with out getting out of bed. Running the heater for awhile works for the most part. Although we still have condensation up front near our heads to deal with.

    I’ve heard that if your heated air intact brings in air from the outside, it helps with the condensation. Grizzly and Bear overland just did an episode on this.
    https://youtu.be/QXTLNaxW4t0

    This sounds legit, but the logistics of pulling air from the outside and not being close to the exhaust is problematic and not advisable at least in how my heater is set up.

    I’ve finished the Thermal Pack so I will report back after our next trip on the condensation issue.

    Here is a link to the car cover material that I found online. I ended up not ordering it since I got an unused truck cover to harvest material from.

    https://www.seattlefabrics.com/54-Evolution-IV-Block-It-400-1350-linear-yard_p_122.html

    As far as heater tuning, there is a Facebook group that you can join that has a ton of info on the Chinese diesel heaters. Someone made a spread sheet where you enter your altitude and it churns out recommended settings. It is in the files section. It is a bit of a pain to have to adjust the settings all the time. Essentially, I set the fan RPM to 1800 min and 4500 max. Then change the Hz min and max setting for altitude. You have to change the Hz setting min and max in the firmware via the controller. There is a ton of info on this in the Facebook group. If you go up or down 1000-2000ft you need to adjust the Hz min/max setting. But it seems to be working for me. Mine coked up bad when I first installed it. I switched to kerosene when I was troubleshooting the issue. I ended up taking it apart and cleaning it. Since then I have been using the recommend setting from the Facebook group and no issues. I plan to switch back to diesel after I run out of Kerosene.

    Some folks use a CO meter to help tuning. I’ve given it a try and for the most part have lowish CO readings which indicates cleaner combustion. I also have noticed now that it is tuned correctly I no longer have visible exhaust. Before there was a hazy exhaust with black particles. Now it is not visible after the heater warms up. Seems that is a good indicator of proper combustion.

    I’ve heard 50/50 kerosene diesel mix works well in the winter and would be cheaper. We run winterized diesel where I live and the lows where we go are usually no lower than single digits so I am not worried about gelling. Will see if that holds true. If not I will do the mix.

    Based on my research the “running on high” to prevent coking is a myth. As long as the fuel air mixture is tuned correctly, you can run he heater at any setting and not coke up. For these heaters this really just means low and high setting. If you tune for the low and high setting you should be fine.

    At some point I plan on doing a more detailed write up on the heater. I am just waiting to get more time using it.
     
  5. Dec 2, 2020 at 7:27 PM
    #85
    Pickeledpigsfeet

    Pickeledpigsfeet Well-Known Member

    Joined:
    Sep 19, 2013
    Member:
    #112813
    Messages:
    1,198
    Gender:
    Male
    Foothills, CA
    Great info, thanks.
     
  6. Dec 2, 2020 at 9:12 PM
    #86
    AverageGuyTaco

    AverageGuyTaco [OP] Well-Known Member

    Joined:
    Oct 14, 2017
    Member:
    #232959
    Messages:
    212
    Gender:
    Male
    Vehicle:
    2017 TRDOR-DCLB
    While I agree on your assessment of the fuel tank in general, I am not overly concerned about the diesel fuel in the engine compartment. Diesel fuel is “relatively” safe compared to gasoline.

    I am looking into an alternate fuel container specifically a small aluminum fuel tank.

    I regularly inspect my current tank and have it wrapped in thermal tape. The way I have it installed allows me to pull the tank out for inspection without having to remove the fuel line. It also does have a pressure relief cap although the diaphragm was installed incorrectly when I got it. I am keeping a close eye on it.
     
  7. Dec 2, 2020 at 10:10 PM
    #87
    socalexpeditions

    socalexpeditions IG: @socalexpeditions

    Joined:
    Sep 22, 2017
    Member:
    #230791
    Messages:
    5,239
    Gender:
    Male
    Okay just making sure - I’ve had 3 fires start in an engine bay from fuel leaking. An aluminum tank properly tapped would be a great idea. Let me know when you design it; I’ll buy one too (;

    I’ve looked and have found a few go-kart gas tanks that would work.
     
  8. Dec 3, 2020 at 6:53 AM
    #88
    AverageGuyTaco

    AverageGuyTaco [OP] Well-Known Member

    Joined:
    Oct 14, 2017
    Member:
    #232959
    Messages:
    212
    Gender:
    Male
    Vehicle:
    2017 TRDOR-DCLB
    This is the best one I have found so far. Someone o the diesel heater Facebook page mentioned it. It a bit bigger than I’d like but I believe it would fit.

    https://www.amazon.com/SUPERFASTRAC...QS3TY5&psc=1&refRID=396D28KYGSEDS7QS3TY5&th=1

    There are a couple comments/ratings at the bottom of people using these as fuel tanks for heaters in vans.
     
    Last edited: Dec 3, 2020
  9. Dec 3, 2020 at 7:41 AM
    #89
    socalexpeditions

    socalexpeditions IG: @socalexpeditions

    Joined:
    Sep 22, 2017
    Member:
    #230791
    Messages:
    5,239
    Gender:
    Male
    Here’s a smaller one

    https://www.ebay.com/itm/223234498116
     
    This site contains affiliate links for which the site may be compensated.
    #89
    Pickeledpigsfeet likes this.
  10. Dec 3, 2020 at 8:11 AM
    #90
    AverageGuyTaco

    AverageGuyTaco [OP] Well-Known Member

    Joined:
    Oct 14, 2017
    Member:
    #232959
    Messages:
    212
    Gender:
    Male
    Vehicle:
    2017 TRDOR-DCLB
    I was watching a video of a FWC Hawk review. They recently picked up the camper. In the video there is a close up of the Thermal Pack fabric and the pattern is similar to the fabric sold by Seattle Fabrics.

    https://www.seattlefabrics.com/54-Evolution-IV-Block-It-400-1350-linear-yard_p_122.html

    This is new fabric that FWC appears to be using. Also a car cover fabric though.

    Time: 24:08
    https://youtu.be/F54OZ8PxoSs
     
  11. Dec 3, 2020 at 8:23 AM
    #91
    AverageGuyTaco

    AverageGuyTaco [OP] Well-Known Member

    Joined:
    Oct 14, 2017
    Member:
    #232959
    Messages:
    212
    Gender:
    Male
    Vehicle:
    2017 TRDOR-DCLB
    I have seen this one as well. Mounting it would be a challenge.

    I considered mounting a similar tank to the front of the Project M between the cab of the truck. That could be a good option. Although there are complaints that mounting the tank higher than the heater causes more fuel getting through the pump due to increased head pressure. More fuel than anticipated would throw off the anticipated fuel air mixture. Not sure if this is legit or not.
     
  12. Dec 3, 2020 at 12:17 PM
    #92
    AverageGuyTaco

    AverageGuyTaco [OP] Well-Known Member

    Joined:
    Oct 14, 2017
    Member:
    #232959
    Messages:
    212
    Gender:
    Male
    Vehicle:
    2017 TRDOR-DCLB
    Pickeledpigsfeet likes this.
  13. Dec 3, 2020 at 3:14 PM
    #93
    socalexpeditions

    socalexpeditions IG: @socalexpeditions

    Joined:
    Sep 22, 2017
    Member:
    #230791
    Messages:
    5,239
    Gender:
    Male
    Not too sure about that idea, but I don't foresee it being a huge issue. I should have an exterior mounted tank on my Drifter in the near future - I really would like to get the whole heater out of my bed buildout though.
     
  14. Dec 12, 2020 at 12:00 PM
    #94
    Voltron4x4

    Voltron4x4 Well-Known Member

    Joined:
    May 2, 2017
    Member:
    #217975
    Messages:
    2,032
    Denver, Colorado
    Vehicle:
    2014 Black Trail Limo
    This and that...
  15. Dec 12, 2020 at 12:41 PM
    #95
    AverageGuyTaco

    AverageGuyTaco [OP] Well-Known Member

    Joined:
    Oct 14, 2017
    Member:
    #232959
    Messages:
    212
    Gender:
    Male
    Vehicle:
    2017 TRDOR-DCLB
    Indeed. Watched most of his videos. Between his videos and the Facebook group I learned a bunch.
     
    Voltron4x4[QUOTED] likes this.
  16. Dec 12, 2020 at 5:23 PM
    #96
    AverageGuyTaco

    AverageGuyTaco [OP] Well-Known Member

    Joined:
    Oct 14, 2017
    Member:
    #232959
    Messages:
    212
    Gender:
    Male
    Vehicle:
    2017 TRDOR-DCLB
    I did a little surgery to the bed this afternoon. We did not buy the bed from FWC since we had a bed we liked from our first build. The bed is a 3” memory foam topped with a 2” foam bed topper. On the bottom there is silver bubble wrap insulation. The silver bubble wrap seems to help from getting moisture under the bed. Moisture under the bed seems to be an issue with FWCs. So far we have not had this problem.

    But we definitely had a problem folding the bed over when is is cold and we wanted to push in the bed platform for more interior room. Memory foam is ridiculously rigid when cold. It was comical trying to fold the bed in half to push in the bed platform.

    My solution was to cut the bed and attach the two pieces with velcro. I ended up cutting about 1/3 of the bed length from the bottom. I cut down the mattress cover and sewed 3” velcro at the end. For the other bed piece I purchase a second mattress cover and did the same.

    A six inch velcro strip holds the bed together creating a hinge. Works great and now someone can lounge up on top of the bed when the platform is pushed in.

    43F43AB9-FFA3-4859-A164-4D4D16343A9D.jpg

    D0BCBD12-7D8C-45C1-AB2C-BFD2B09602E5.jpg

    7E54043B-993F-43DE-952D-D57B2D47BD4B.jpg
     
    nftyper likes this.
  17. Dec 16, 2020 at 6:06 PM
    #97
    GJTaco

    GJTaco Member

    Joined:
    Feb 13, 2013
    Member:
    #97474
    Messages:
    7
    Gender:
    Male
    First Name:
    Paul
    Grand junction
    Vehicle:
    2012 Tacoma TRD sport.
    OME suspension, Flippack,
    Thanks for the inspiration to get it done. Just finished building. Now I want to do the electrical but don't have much of a clue. I do like that you framed in aluminum but I'm better with wood.

    20201216_184308.jpg
     
  18. Dec 16, 2020 at 6:44 PM
    #98
    AverageGuyTaco

    AverageGuyTaco [OP] Well-Known Member

    Joined:
    Oct 14, 2017
    Member:
    #232959
    Messages:
    212
    Gender:
    Male
    Vehicle:
    2017 TRDOR-DCLB
    Lookin good. Nice and clean. Don’t knock yourself short. If you can build what you did you can work with extruded aluminum.

    Checkout these sites for doing electrical. Even if you are not doing solar, there is a lot of great info on setting up power systems and wiring. There are some great diagrams. Biggest issue most people screw up with electrical is not grounding properly, not isolating your wiring from OEM wiring and not putting in enough circuit protection.

    https://www.mobile-solarpower.com/

    https://diysolarforum.com/

    https://youtube.com/c/WillProwse
     
  19. Dec 16, 2020 at 7:34 PM
    #99
    GJTaco

    GJTaco Member

    Joined:
    Feb 13, 2013
    Member:
    #97474
    Messages:
    7
    Gender:
    Male
    First Name:
    Paul
    Grand junction
    Vehicle:
    2012 Tacoma TRD sport.
    OME suspension, Flippack,
    Thanks for those links. I'll go through them tonight. My intention is to power batteries via solar and engine. The ideas is to run a fridge, lights and power devices.
     
  20. Dec 28, 2020 at 11:42 AM
    #100
    netlseh

    netlseh Active Member

    Joined:
    Apr 21, 2016
    Member:
    #184898
    Messages:
    34
    Gender:
    Male
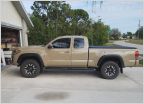
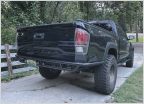
    I finally picked up my project M, so I thought I would share my experience and initial impressions. I have a 13' TRD Off Road with access cab and long bed. The suspension is the newest OME kit, with Nitrochargers and 884s (no spacers other than trim packer) up front, and the EL111R dakar pack plus the HD leaf (which I added in the back). Weight-wise the truck is stock except for a storage platform in the bed. Before the FWC, I had the same platform and a normal Snugtop shell. The regular ("medium") Dakar pack and the 884s worked well with that configuration, and I added the HD leaf spring in preparation for the project m. The tires are 25585r15 Cooper ST Maxx. As you can see, I like to roll with a slight bit of rake to account for big bed loads (full 105 quart cooler, dry boxes full of gear) and towing a drift boat or raft. Pics of the rig are below.

    Generally speaking, my initial impressions of the project M are positive. This topper will be very functional for my uses, which include a lot of camping in connection with river trips that include lots of driving (e.g., rafting, steelhead fishing, etc.) Many time the weather is foul and the campsite is primitive. The top on these pops pretty quickly. Also it's light for what it is. I don't think the weight affects the driving. However, at highway speeds, I can definitely feel the wind resistance. If it's relatively calm it's not an issue until about 70 mph. I suspect I'll get used to it and pay the price in decreased gas mileage, but I knew that would be the case.

    Overall, I'm happy with the options I chose. Off the top of my head, those include: a roof vent/fan, four LEDs (which are very bright, but dimmable to almost nothing), 80/20 track on the outside (both sides), a large door on the passenger's side, pre-wiring for solar, attachment points for thermal pack (but not the pack itself), no mattress, yakima roofrack track (I used a rack I have and pointed a fly rod vault to it)...I think that's it. I am in the process of adding airline L-track to the inside walls. Note, if you get 80/20 on the outside, the bolt ends on the inside have just enough extra to mount the L-track without additional drilling or longer bolts. I have some more L-track on order for tool/stuff mounts. For the time being I'm going to leave my original platform/storage in the back. It obviously wasn't designed with the project M in mind, but it's pretty good. I might redesign it to accommodate a small propane and/or water tank. We'll see. For the moment, the lights and fan are wired into my main (only) battery. The lights draw almost nothing. I need to see what the fan does after several overs or a night of running. When the bleeding from this purchase stops, I'll like get a second under-hood battery and run all the project M stuff off of that. I had a local shop run a heavy gauge wire and a fuse box to the back to allow for future changes. My biggest project at the moment is figuring out a bed. For the moment, we're on two paco pads Originally, I had planned to keep the bed tray pulled out all the time and just put a thin mattress. However, the bed is so big (it's huge), it encroaches on more of the bed space than I thought it would. There is still more room than there was under the snugtop, but now I'm feeling greedy about space.

    Overall I'm happy so far, but haven't had a chance to put it through it's paces. That said, I have a few complaints. The mechanism that raises and lowers the roof uses really cheap snap closures. Think snap closures from Joann Fabrics or Hobby Lobby. If fact, one of then broke off on the second use and I had to replace it. Another gripe--I think the person who crimped the corners of my aluminum roof was doing it for his or her first time. I think the only problem is cosmetic, but it's irritating. If fact, overall the fit and finish is a bit rough, but I think that was highlighted by the fact that it was all so clean. Once it gets a bit of use, I don't think I'll notice. Finally, the install process was very annoying. The appointment took 4.5 hours, and, as far as I could tell, one guy spent a total of about 40 minutes with my truck during that period. When I showed up, I asked him if he would wire the lights to the truck, and showed him where I pulled a wire up through the bedside. He said yes. At that end of the appointment, he had only wired up the brake light (very very very slopping it about 2 feet of extra wire hanging out) and left the electrical wire ends to the lights and fan dangling. Pretty cheesy for a $500 4.5 hour install of a camper shell. In the end, I'm glad it went down that way because I wouldn't have wanted this guy messing with my wiring anyway. My hope is that I got "One Eyed Pete" and this is not a widespread problem with FWC, but who knows.

    In the near future I plan to add bumpers, and that likely will require some suspension work. If any of you have relevant experience, please weigh in. My plan is to add an ARB front bumper with no winch, and a rear steel plate bumper (like 4X innovations). I am trying to decide whether to add a swing out. If I don't add the swing out, I've been told the bumper only adds 15 lbs (net after you remove stock equipment). If I end up needing additional capacity in the rear (whether due to the weight of a swing out or to compensation for lift in the front, I believe I can still add an HD leaf to my pack). The front suspension is what I'm worried about. As I stated, my preference is for less lift up front that a lot of guys like. I'm told the arb with no winch will add about 170 lbs. At the moment I'm between using the 887 or 886 spring, leaning toward 886. However, I'm a bit nervous I'll get more lift than I want given that it's an access cab and I wont have a winch. That said, I think the truck will handle a lot better than with a very compressed 887. I'd be interested to hear your thoughts on this.

    -B

    IMG_7340.jpg
    IMG_7338.jpg
    IMG_7289.jpg
     
    smelly621 and nftyper like this.
To Top