1. Welcome to Tacoma World!

    You are currently viewing as a guest! To get full-access, you need to register for a FREE account.

    As a registered member, you’ll be able to:
    • Participate in all Tacoma discussion topics
    • Communicate privately with other Tacoma owners from around the world
    • Post your own photos in our Members Gallery
    • Access all special features of the site

How hard is it to install a lift kit yourself?

Discussion in 'Suspension' started by NumNutz, Jul 25, 2008.

  1. Jul 25, 2008 at 8:12 PM
    #1
    NumNutz

    NumNutz [OP] One of the original 7928

    Joined:
    Jul 14, 2008
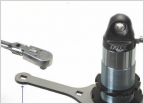
    Member:
    #7928
    Messages:
    4,899
    Gender:
    Male
    Virginia Beach, VA
    Vehicle:
    07 Tacoma 4x4 - Kings, TC, Dakars, broken stuff
    Lots.
    I'm thinking about the toytec 3" lift with AAL but I don't really want to pay the install prices. Is it hard to install myself?

    I have only changed headlights in my truck so I don't have to most experience.

    I have two friends how ever that installed their lift kits on their trucks and should I trust them that they can do mine too?
     
  2. Jul 25, 2008 at 8:13 PM
    #2
    chris4x4

    chris4x4 With sufficient thrust, pigs fly just fine. Moderator

    Joined:
    May 8, 2008
    Member:
    #6497
    Messages:
    112,751,526
    Gender:
    Male
    First Name:
    FlimFlubberJAM
    Tenoe, AZ
    Vehicle:
    2019 Rubicon 4 Door,
    4.10 gears, sliders, and lots of buttons.
    Its pretty easy. Just need a spring compressor, and basic hand tools. If you get stuck, Im sure someone online can help ya. :)
     
  3. Jul 25, 2008 at 8:26 PM
    #3
    tacomaman06

    tacomaman06 Carolina Alliance: Enforcer

    Joined:
    May 1, 2007
    Member:
    #1475
    Messages:
    26,212
    Gender:
    Male
    First Name:
    Will
    York,South Carolina
    Vehicle:
    '16 Tundra TRD Pro
    getting there....
    definitely.....save the $$$ and diy!!! you'll be glad you did, plus, you'll get to know your truck a little better!!!:)
     
  4. Jul 25, 2008 at 8:27 PM
    #4
    EquinsuOcha

    EquinsuOcha Bourbon

    Joined:
    Mar 18, 2008
    Member:
    #5368
    Messages:
    3,666
    Gender:
    Male
    First Name:
    Casey
    Ft Worth, TX
    Vehicle:
    07 PreRunner
    AFE Drop-in filter, Wet Okole seat covers, Hifonics 6.5" components in front, MA Audio midbasses in rear, Kicker 8", RE Audio 2 channel for components, Elemental Designs bridged 2-channel for sub, CB, Devil Horns, Rancho QuickLift, Rancho RS9000XL rear shocks, Toytec AAL, stickers, things and stuff.
    Ditto. I did mine myself. Just rent a spring compressor from your local Auto Zone or similar store. Air tools make it way easy, but hand tools are fine too.
     
  5. Jul 25, 2008 at 8:58 PM
    #5
    chris4x4

    chris4x4 With sufficient thrust, pigs fly just fine. Moderator

    Joined:
    May 8, 2008
    Member:
    #6497
    Messages:
    112,751,526
    Gender:
    Male
    First Name:
    FlimFlubberJAM
    Tenoe, AZ
    Vehicle:
    2019 Rubicon 4 Door,
    4.10 gears, sliders, and lots of buttons.
    X2! Why do I always think everyone has airtools and a compressor? :frusty:
     
  6. Jul 25, 2008 at 9:40 PM
    #6
    tacomaman06

    tacomaman06 Carolina Alliance: Enforcer

    Joined:
    May 1, 2007
    Member:
    #1475
    Messages:
    26,212
    Gender:
    Male
    First Name:
    Will
    York,South Carolina
    Vehicle:
    '16 Tundra TRD Pro
    getting there....
    when we finally get outta this condo and get a house with a garage..................a good compressor is gonna be mandatory!!:D
     
  7. Jul 25, 2008 at 10:09 PM
    #7
    ERdept

    ERdept Well-Known Member

    Joined:
    Oct 22, 2007
    Member:
    #3187
    Messages:
    990
    Gender:
    Male
    Not just a spring compressor, but also remove upper sway bar links, separate ball joint mounts, .

    Raise rear rear axle, disconnect rear brake cable , etc. etc. etc.


    Sounds simple, but involves a LOT of time to learn if you never did one.


    Then recheck all bolts a week later. Very time consuming.
     
  8. Jul 25, 2008 at 10:16 PM
    #8
    humanoid

    humanoid bite me

    Joined:
    Jun 27, 2007
    Member:
    #1932
    Messages:
    2,727
    Gender:
    Male
    Sunny SoCal
    Vehicle:
    I had a '99 Xtra Cab PreRunner SR5 V6
    In addition, if you've never worked with a spring compressor I would take your shocks, springs and spacer to a shop and have them install it for you. Working with spring compressors is not a simple task, you could lose a finger, an eye or hurt someone else in the vicinity, no joke. A loaded spring is a dangerous thing.
     
  9. Jul 25, 2008 at 10:21 PM
    #9
    EquinsuOcha

    EquinsuOcha Bourbon

    Joined:
    Mar 18, 2008
    Member:
    #5368
    Messages:
    3,666
    Gender:
    Male
    First Name:
    Casey
    Ft Worth, TX
    Vehicle:
    07 PreRunner
    AFE Drop-in filter, Wet Okole seat covers, Hifonics 6.5" components in front, MA Audio midbasses in rear, Kicker 8", RE Audio 2 channel for components, Elemental Designs bridged 2-channel for sub, CB, Devil Horns, Rancho QuickLift, Rancho RS9000XL rear shocks, Toytec AAL, stickers, things and stuff.
    I forgot to mention; If you get a kit from Toytec, they send detailed instructions with pictures with every order. Most kit instructions are on their website, too.

    I also forgot to add earlier, a floor jack is also necessary.
     
  10. Jul 25, 2008 at 10:26 PM
    #10
    chris4x4

    chris4x4 With sufficient thrust, pigs fly just fine. Moderator

    Joined:
    May 8, 2008
    Member:
    #6497
    Messages:
    112,751,526
    Gender:
    Male
    First Name:
    FlimFlubberJAM
    Tenoe, AZ
    Vehicle:
    2019 Rubicon 4 Door,
    4.10 gears, sliders, and lots of buttons.
    What!? You dont need to separate ball joint mounts. Or disconnect rear break cable, ets., etc., .
    I think you did WAY to much work to install a simple lift.
    Removeing the front is a simple process:
    Jack up truck and support with stands
    Remove wheel and tire
    Disco. Sway bar
    Remove 3 bolts on top of shock/spring leaveing the center bolt.
    Remove single bolt on the bottom,
    Pull assembly out.
     
  11. Jul 25, 2008 at 10:29 PM
    #11
    EquinsuOcha

    EquinsuOcha Bourbon

    Joined:
    Mar 18, 2008
    Member:
    #5368
    Messages:
    3,666
    Gender:
    Male
    First Name:
    Casey
    Ft Worth, TX
    Vehicle:
    07 PreRunner
    AFE Drop-in filter, Wet Okole seat covers, Hifonics 6.5" components in front, MA Audio midbasses in rear, Kicker 8", RE Audio 2 channel for components, Elemental Designs bridged 2-channel for sub, CB, Devil Horns, Rancho QuickLift, Rancho RS9000XL rear shocks, Toytec AAL, stickers, things and stuff.
    Yup. That's what I did as well.
     
  12. Jul 25, 2008 at 10:41 PM
    #12
    ERdept

    ERdept Well-Known Member

    Joined:
    Oct 22, 2007
    Member:
    #3187
    Messages:
    990
    Gender:
    Male

    So you're saying not to do those very things that the Toytec instructions specifically say to do?

    To take short cuts right?

    Because the things that I mentioned are on the instructions from Toytec among about forty other little things to do that don't just involve needing a spring compressor and some metric tools.

    As long as you say you're advocating deviating from the instructions, I'm OK with your statements as your opinion.

    I am, on the other hand am merely quoting from the instructions directly and am of the school, "If it don't work, read the instructions".

    Again, if you say that your method is your personal way of doing it, I'm OK with people expressing their opinions. But, since Im not an expert, I can only go by what the maker tells me to do.;)
     
  13. Jul 25, 2008 at 10:51 PM
    #13
    EquinsuOcha

    EquinsuOcha Bourbon

    Joined:
    Mar 18, 2008
    Member:
    #5368
    Messages:
    3,666
    Gender:
    Male
    First Name:
    Casey
    Ft Worth, TX
    Vehicle:
    07 PreRunner
    AFE Drop-in filter, Wet Okole seat covers, Hifonics 6.5" components in front, MA Audio midbasses in rear, Kicker 8", RE Audio 2 channel for components, Elemental Designs bridged 2-channel for sub, CB, Devil Horns, Rancho QuickLift, Rancho RS9000XL rear shocks, Toytec AAL, stickers, things and stuff.
    I'm definitely advocating deviating from the instructions.

    Mine worked out great while deviating from said instructions.
     
  14. Jul 26, 2008 at 12:33 AM
    #14
    ERdept

    ERdept Well-Known Member

    Joined:
    Oct 22, 2007
    Member:
    #3187
    Messages:
    990
    Gender:
    Male

    Hey, I'm cool with that. If that does the same thing faster and easier than what I went through, then good on you.:cool:
     
  15. Jul 26, 2008 at 4:43 AM
    #15
    Janster

    Janster Old & Forgetful

    Joined:
    Mar 25, 2007
    Member:
    #1138
    Messages:
    14,339
    Gender:
    Female
    First Name:
    Jandy
    Lancaster, PA
    Vehicle:
    2016 GMC Canyon SLT w/ LineX and....
    If you're putting a spacer in the front - you might wanna take the coil assembly to a shop and have them compress the springs to put the spacer in. The amount of preload on that spring can be down-right dangerous with a manual spring compressor. I've used a couple different spring compressors at home for spacer lifts and both of them couldn't handle the preload.

    If you're changing out coils only - that's easily done with a home compressor.

    I'm not sure if this still applies to the 05+ trucks or not...but when you're putting stuff back together, this is how the old trucks had to be lined up. If you didnt' get this right - it won't install in the truck.
    [​IMG]
     
  16. Jul 26, 2008 at 5:53 AM
    #16
    chris4x4

    chris4x4 With sufficient thrust, pigs fly just fine. Moderator

    Joined:
    May 8, 2008
    Member:
    #6497
    Messages:
    112,751,526
    Gender:
    Male
    First Name:
    FlimFlubberJAM
    Tenoe, AZ
    Vehicle:
    2019 Rubicon 4 Door,
    4.10 gears, sliders, and lots of buttons.
    I have never used instructions to install a lift. After removeing a dozen or so front springs from Tacomas, I have never found it nesessary to remove more than what I mentioned above. :)
     
  17. Jul 26, 2008 at 5:55 AM
    #17
    chris4x4

    chris4x4 With sufficient thrust, pigs fly just fine. Moderator

    Joined:
    May 8, 2008
    Member:
    #6497
    Messages:
    112,751,526
    Gender:
    Male
    First Name:
    FlimFlubberJAM
    Tenoe, AZ
    Vehicle:
    2019 Rubicon 4 Door,
    4.10 gears, sliders, and lots of buttons.
    If you are getting the OME springs instead of the spacer, take the assembly to a shop and have them install the springs for you. OME springs are a little thicker than stock, and some people have had problems removeing the compressor from the assembled unit. Plus, as mentioned by others, its safer. :)
     
  18. Dec 21, 2008 at 6:40 PM
    #18
    cbcs1987

    cbcs1987 Redneck from the hills

    Joined:
    Apr 1, 2008
    Member:
    #5670
    Messages:
    1,332
    Gender:
    Male
    First Name:
    Cody
    East Tennessee
    Vehicle:
    2007 Tacoma 4wd access cab
    6" Fabtech coilover lift. 35/12.50/17 Mickey Thompson MTZ, 17x9 ProComp 1089 wheels painted black, UWS black lowprofile toolbox, husky liners, tacoma bed mat, bed lights, Premier stereo, Cobra 19 cb, firestik 3' antenna.
    sorry to bring back an old thread, but im fixin to get this lift and install it myself. I've done suspension work before, but I'm thinkin about takin the coil n everything to a shop to have it done. What is an average cost for them to assemble the shock, spring, and spacer?
     
  19. Dec 21, 2008 at 6:56 PM
    #19
    roxspin72

    roxspin72 Enjoying my addiction

    Joined:
    Feb 9, 2008
    Member:
    #4659
    Messages:
    1,829
    Gender:
    Male
    NC
    Vehicle:
    Speedway Blue, TRD, 4X4,
    Oh Yeah!!!
    I had my Readylift spacer installed for $100. Same mechanic will install Coilovers, UCA, rear leaf pack, and rear shock for $400.

    I will save that money for Mods and do it myself. Gunna use a lift bay, and power tools. Should be a fun time.
     
  20. Dec 21, 2008 at 7:15 PM
    #20
    LonghornTaco

    LonghornTaco Can you pass the bailout please?

    Joined:
    Oct 6, 2008
    Member:
    #9763
    Messages:
    3,318
    Gender:
    Male
    First Name:
    Jason
    Minnesota
    Vehicle:
    Black 09 4x4 TRD Off Road Doublecab
    3" ToyTec coilover lift on Bilstein 5100s, Total Chaos UCAs, ToyTec diff drop, Scangauge II, 4D MagLite mounted on the drivers seat, Painted engine cover, Painted calipers (red), Painted skid plate (red) Valentine 1 radar detector hard wired, Damplifier Pro on the floor, back wall and doors, Luxury Liner Pro on the floor and doors, Kenwood DNX8120, 2 Pioneer TS-SW1041D 10" shallow mount subs, 2 Pioneer PRS-D4200F 1200W amps, Mr Marv sub enclosure, Hybrid Audio Clarus 6.5" components in the front doors, Alpine 5.25" coaxials in the rear doors, A.R.E. LSII fiberglass tonneau cover, All Pro bumper, All Pro sliders, Wet Okole seat covers, Sockmonkey Mountain badges, PIAA 510 SMR Driving Lights, Warn M8000 Winch, Bud Built skids
    I took my new coils and 5100s to a garage and they charged me $40 ($20/side) to assemble the coilover. Then I just took the stock coilover off and bolted in the new one.

    Very easy!
     

Products Discussed in

To Top