

-
Welcome to Tacoma World!
You are currently viewing as a guest! To get full-access, you need to register for a FREE account.
As a registered member, you’ll be able to:- Participate in all Tacoma discussion topics
- Communicate privately with other Tacoma owners from around the world
- Post your own photos in our Members Gallery
- Access all special features of the site
 License plate light -- shorted circuit?
 Intro and…hot foot
 A.C./Heater fan only blows on high
 Auto headlights
 Flashlight mod
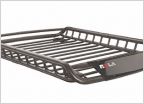 Time to Accessorize: Cargo Basket and/or Roof Racks!
HOW-TO: Snorkel on a Budget - Tips and Advice
Discussion in '2nd Gen. Tacomas (2005-2015)' started by Benson X, Sep 17, 2015.
Page 1 of 16
Page 1 of 16
Products Discussed in


