1. Welcome to Tacoma World!

    You are currently viewing as a guest! To get full-access, you need to register for a FREE account.

    As a registered member, you’ll be able to:
    • Participate in all Tacoma discussion topics
    • Communicate privately with other Tacoma owners from around the world
    • Post your own photos in our Members Gallery
    • Access all special features of the site

JDFabrication Full Float Ford 9 Inch Axle Install

Discussion in 'Long Travel Suspension' started by Airdog, Jul 15, 2022.

  1. Jul 15, 2022 at 3:17 PM
    #1
    Airdog

    Airdog [OP] did your Mom

    Joined:
    Dec 26, 2012
    Member:
    #93790
    Messages:
    4,548
    Gender:
    Male
    First Name:
    Tom
    SoCal
    Vehicle:
    https://www.tacomaworld.com/threads/airdogs-2012-prerunner-access-cab-slow-build.264263/
    52198658655_5c9898c862_o.jpg

    This thread is the install of the JDFab full floater ford 9 inch axle onto my truck. JDfab starts with a Speedway Engineering Grand National floater housing and hub assemblies. The housing is 3 inch diameter tube .250 wall and a 7 gauge center housing. It also comes with 35 spline axles of equal length. This is awesome as you only have to carry one spare if you so desire....though the chances of any tacoma smoking an axle or anything else on this rear end is remote
    JDFab then adds their custom truss a larger fill port and brake mounts to the housing. Included with the housing are Wilwood calipers and rotors. You will have to source your own 3rd member but JDFab can make suggestions on where to buy one.

    Now here is a warning....this is NOT a bolt on installation. This install will require welding and assembly from a completly bare housing. Knowlege and know how to set pinion angle. Knowledge of your tacoma brake system. Bending and flaring brake lines..bubble flare and inverted flare and regular flares. You will need the skill and knowlege to assemble an axle. You will need some fabrication skills and the abiltity to setup your suspension to cycle properly with this new axle. You will need all the tools to do this and then some.

    You will also have to accept the fact that anything that has to do with ABS/VSC/TRAC and Atrac will no longer work. Losing the rear speed sensor will make all those systems INOP! My Dash only had 3 lights come on after the install...they are the ABS light the Traction light (truck with snakes behind it) and the red BRAKE light. The truck drives just fine and there is no check engine light and it did not go into limp mode. You will also lose your speedometer though I have a workaround that I used and will go into detail later in the thread. My install is on a 2nd gen 2WD so some things may be different on your 4WD but I suspect its minor stuff.

    I personally made some major changes to the braking system that is not required to do but it does make thngs better IMO.

    What it starts with along with a few boxes filled with the hubs, brakes and axles
    52155964394_4baa7f1218_o.jpg

    I started by assembling the axle on a table to check fitiment and set some tolerances that need to be adhered to on a floater type axle. One of those tolerances is bearing preload. There are several ways to set this, 1 is a crush sleeve which is a one time use. The other is a machined spacer(DIY) and the other is what i did here at Harry's suggestion is to purchase an adjustable spacer. I got mine from DRP Performance (item is linked) Without going into the how to...here's a video explaining what you need to do.

    52155729691_2cda656090_o.jpg


    Another Item I bought at Harry's suggestion is some lockable axle nuts from Coleman products You will need to order 1 L/H thread and 1 R/H thread. Stock it comes with a spanner nut with a lock washer that you bend the tab into the spanner nut slot to lock it in place usually this is a 1 time use lock washer. This product is stronger better and reusable...worth it!
    52154712832_65a4ee9449_o.jpg

    Another Tolerance that needs to be set is axle end play. Speedway tells you how to do this here I set mine up differently than what they tell you but it ends up the same. I used a nut and a nordloc lock washer for the initial setup then machined the head of the bolts to get the 1/16th gap that is required for axle endplay. I used red loctite and those nordloc lock washers to pretty much keep them in place forever.

    52164370254_db77f32a36_o.jpg

    Heres a pic of the hub assembled with the brakes and the aluminim hub end caps that stick out a mile and they are ugly. Harry told me to just cut them down...
    52164369384_1f02f43ee8_o.jpg

    so onto my lathe they went....
    52164133153_c0eb4d6296_o.jpg

    Much Better
    52164619450_dd716722a3_o.jpg

    I also dropped in the Quick Perfomance 3rd member I ordered. Cost was $1530 delivered to my door. It took about 7 weeks for delivery. You can pay for a rush build if so desired.
    Here are the specs:
    Ford 9" Strange Nodular Iron Pro N Case Complete Center Section / Third Member
    Gear Ratio: 4.86
    Carrier Options: 35 Detroit Locker - $329.00
    Pinion Support: Nodular Iron Daytona
    Yoke: Billet Steel 1350
    Include LubeLocker Gasket: Yes, Include LubeLocker Gasket - $20.00
    Include Jaz Protecto Storage Case : No Thanks
    Rush Build Service: No Thanks
    REM Finish Ring & Pinion: No Thanks
    REM Finish Bearings: No Thanks
    52163107042_bba8dee115_o.jpg


    A couple of other things I did to improve things in my own mind. The speedway engineering hubs come with some weird brand of bearings and hub seals. My guess is that the supply problems are rearing their ugly head as name brand stuff is hard to get and a bit expensive. I switched out to Timken bearings and SKF double lip seals. Part numbers are as follows
    Timken bearings Part # L610549
    Timken Race Part# L610510
    SKF double lip seal 29866
    The seal I highly recommend to replace with a genuine SKF seal. I had to get mine off ebay as there is a nationwide shortage at the time I ordered them. Most places said stock would return by the end of July
     
    Last edited: Jul 16, 2022
    This site contains affiliate links for which the site may be compensated.
    #1
    YotaFAB, Jon64l, jamesepoop and 11 others like this.
  2. Jul 15, 2022 at 3:17 PM
    #2
    Airdog

    Airdog [OP] did your Mom

    Joined:
    Dec 26, 2012
    Member:
    #93790
    Messages:
    4,548
    Gender:
    Male
    First Name:
    Tom
    SoCal
    Vehicle:
    https://www.tacomaworld.com/threads/airdogs-2012-prerunner-access-cab-slow-build.264263/
    After you get all those tolerances setup and make sure everything fits properly its time to throw it on your truck and set pinion angle. Pinion angle is set at ride height. The word on the street is to set it 2 degrees down. And to just clarify..."down" is not the pinion pointing 2 degrees down..the pinion is actually 2 degrees up...but in the driveline world the reference is becauseits measured as an imaginary line running thru the middle of the pinion thru the back of the housing...which is a downward angle....hence 2 degrees down.

    Here is a link to a drivline calculator. Google setting pinion angle and read read read if you dont understand what you need to do. Explaining it here will take forever and there are a milllion opinions on how,why,science and all that shit I dont care to discuss or argue over. Educate yourself and and decide your best course of action. If you drive down the street and have no vibes or shudders you did it right...pat yourself on the back. There are angle spacers you can buy at different degrees if you screw it up to fix the problem...you dont have to cut off the perches if it goes south on you for whatever reason.

    This is my truck at ride height...i measured fender height before I disassembled everything then set the axle in adjusted the floor jacks to match the ride height I measured earlier..I put a digital protractor on the flat part where the 3rd member goes...set 2 degrees and had my welder buddy @Yotamac from Tacoma Pros start burning the perches on
    52185223411_e885114dfb_o.jpg

    52185231053_6d8ac0b47f_o.jpg

    Once the perches are on you need to break down the leaf pack and bolt the rear end to the leafs. Its time to cycle the suspension to set bump and droop....weld on shock tabs and limit strap tabs.

    But there's more!! You need to take measurements for your driveshaft. The driveline shop will need to know the measurements from the center of the input yoke ujoint to the center of the ujoint just past the carrier bearing (driveshaft 1) this measurement doesnt change plus you 4x guys have a flange there anyways at the xfer case. Then you need the measurement from the center of the ujoint bearing (after the carrier bering) to the flats on the pinion yoke. You need to do these measurements at full droop and at full stuff. The diff between these is you total plunge depth. This determines if you have the right size slip yoke and how long driveshaft 2 needs to be. And since I have a 1350 pinion yoke I also needed the driveline shop add that instead of the toyota flange. BTW...toyota uses a 1330 size ujoint. You 4x4 guys may get away with using a 1330 to 1350 ujoint if your driveshaft and slip yoke are the correct size. One other note....after you get the leaf pack back together and the hubs and wheels on you need to get a measurement of driveshaft 2 at ride height. Thats about the best I can do about the driveshaft. If you are confused or i make no sense go to your local drivline shop...they will tell you exactly what they need.
    52185722815_b9a5c6599c_o.jpg

    After it got back from the driveline shop
    52185423484_5e368fd04c_o.jpg

    Bolted up
    52185656705_004929830c_o.jpg

    Most of the welding is done in this pic...bump pads on...brakes lines mocked up
    52185723735_3972963462_o.jpg

    Here you can see the shock tabs, bump pads limit strap tabs and a cover plate all welded in
    52189696753_b3cf9131e6_o.jpg

    That pretty much wraps up the basic install. The next post will cover the brake mods I did and how to make the speedometer work.
     
    Last edited: Jul 15, 2022
  3. Jul 15, 2022 at 3:18 PM
    #3
    Airdog

    Airdog [OP] did your Mom

    Joined:
    Dec 26, 2012
    Member:
    #93790
    Messages:
    4,548
    Gender:
    Male
    First Name:
    Tom
    SoCal
    Vehicle:
    https://www.tacomaworld.com/threads/airdogs-2012-prerunner-access-cab-slow-build.264263/
    As you can see this axle has wilwood disc brakes for the rear. My goal for the brakes was to eliminate the ABS module completely considering it is now useless without the rear speed sensors. Turns out if you want a speedometer that works you need the ABS ECU that is part of the ABS module. Also since the tacoma does not come stock with rear disc some other mods will be required.

    I thought the SOS Performance mod that adapts the Sequoia master cylinder (this MC was made for disc brakes all around) to the tacoma booster would be the ticket to deal with the proportioning side of things. In my case it was not....its because I eliminated the ABS module. I ran into a note somewhere that Sequoias that do not have ABS would require a proportioning valve that Toyota sells for 185 bucks in order for it to work properly. I decided to put in an adjustable proportioning valve from wilwood for about 45 bucks. I did install the Sequioa MC in place of the tacoma one anyways due to its incresed size.

    This is where I had to piece together the right adapters to make it all work. The feed lines from the MC to the ABS module are a m12 x 1.0 inverted flare. The lines coming out of the abs to the individual brakes were m10x1.0 inverted flare. The only metric proportioning valve from wilwood is m10x1.0 bubble flare.....So this is what you see below...

    The line going into the the proportioning valve is like this:
    Line: M12x1.0 inverted flare
    Silver Adapter: is a m12x1.0 female inverted flare reduced to a m10x1.0 male inverted flare.
    Brass adapter into the proportioning valve: M10x1.0 female inverted flare to a male m10x1.0 male bubble flare.

    Line exiting the proportiong valve is 3/16 m10x1.0 male bubble flare line I bought at Napa. I cut off one end and made my own inverted flare with the fittings that came with the tees.

    The top tee fitting is the front brakes. It uses the same silver reducer to adapt the MC feed line into the tee then out to the front brakes.

    Hopefully this all makes sense....BTW...the brakes are awesome with out the abs module in the loop and using the larger Sequoia master cylinder.

    52218738269_0b1bb6b009_o.jpg

    In the rear JFab gives you fittings from the caliper to the first tab. Your on your own from there. The fitting at the tab is a AN-3 flared fitting. Again I bought brake line from napa that were the toyota m10x1.0 fittings and bent it as needed installled them to the stainless flex lines coming from the frame. The ends going to the an3 fittings i cut off installed the supplied ferrule and nut onto the line and then flared it to fit onto the an3 fitting. Simple and quick. You can also see that I reused the toyota bracket to hold the flex lines. Just drilled and tapped a hole in the truss to accomplish that.
    52185723735_3972963462_o.jpg

    Couple little clamps to hold the brake line in place from the right rear brake. Again I drilled and tapped a coup[le of holes there. My old breather line attached perfectly to the supplied fitting.
    On another note...both the breather fitting and the drain plug fitting should have some teflon tape added to them to prevent seepage of gear oil.
    52218511973_f5e9a54e59_o.jpg

    I busted the abs module in half made an aluminum plate to cover up the electronics and installed it close to where it originally was on the right fender. There is a oring on the ABS ecu that helps seal it to the aluminum cover plate
    52218500036_9d8251f0d5_o.jpg

    To get my speedometer to work I just had to move some wires in the plug that connects to the ABS ECU.

    The speed signal for my truck comes from the right rear wheel speed sensor. Obviously this axle does not have speed sensors anymore so its time to game the system. All I did was swap the wires from the left front speed sensor into the right rear speedsensor slots at the plug.

    On my truck the wire colors and socket location for the speed sensors are as follows:
    RR- Orange Pin#16
    RR+ Black Pin#17
    FL- Red Pin#18
    FL+ Green Pin# 19
    All I did was remove the all 4 of those wires from the connector then I reinserted the FL- and FL+ into slots 16 and 17 where the right rear sensor wires were originally. The picture below shows the wires in their new home and like magic the speedometer now works.
    52189539293_f0a0fcb556_o.jpg

    The main reason I did this was because if your speedo does not work it sets a P0500 code that will prevent you from getting your truck smogged in California. Supposedly its also the signal the transmission uses for speed also as the signal path goes from the speed sensor-abs ecu-combination meter-engine/tranny ecu. Ive got about 500 miles on it so far and its behaving just as it always has so I'm going to call this a successful trick fuck of the sytem.

    On another note....the wiring on my truck may not be the same as yours. YOU will need to get the correct wiring diagrams for your year and model truck as I have already seen that it can be significantly different from year to year and especially dependent on what nannies are installed on your model truck.

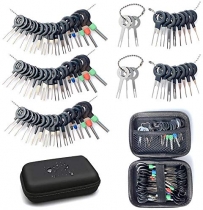
    Also to depin the plug you need some special tools. I ordered these from Amazon. On the front of the plug each socket has a very small hole next to it. You will need to insert the correct tool into this hole to disengage the barb on the socket internally. But this is not the only locking mechanism for these wires. once the plug is removed on the side you will be able to see a white plastic piece that runs thru the middle of the plug. One side its a solid piece and the other side you will see the 2 ends (the piece is U shape) You will need to press those 2 ends in just ever so slightly with a small punch and that should unlock this piece that gang locks all the wires to the connector. One of these days I'll remmebr to get better pics of the ABS connector to illustrate this better.

    On a final note. Brakes seem to be pretty important. If you are not confident and fully understanding of what you are doing just stop. Take it to someone that knows what they are doing.

    Oh ya...one other thing....if you are one of those guys that say OMG how can you disable ABS and drive it on the street..thats Unsafe! You can just fuck off...i dont really care to hear from you or your opinion on the matter. I'm good with my decision especially since my brakes are better than before and will only get better when I install larger brakes upfront in the very near future.
     
    Last edited: Jul 17, 2022
    This site contains affiliate links for which the site may be compensated.
    #3
    Tcodyw88, Naveronski, Camazon and 7 others like this.
  4. Jul 15, 2022 at 4:58 PM
    #4
    WormSquirts

    WormSquirts Armageddon

    Joined:
    Dec 18, 2015
    Member:
    #172583
    Messages:
    2,487
    First Name:
    Braeden
    BC
    Cool, I want this very badly. When are the 40's going on??
     
  5. Jul 15, 2022 at 5:01 PM
    #5
    Airdog

    Airdog [OP] did your Mom

    Joined:
    Dec 26, 2012
    Member:
    #93790
    Messages:
    4,548
    Gender:
    Male
    First Name:
    Tom
    SoCal
    Vehicle:
    https://www.tacomaworld.com/threads/airdogs-2012-prerunner-access-cab-slow-build.264263/
    never!! Think it will be 35's forever. i do nothing but desert go fast stuff havent seen the need for anything bigger at this point. Maybe 37's when the LS2 goes in???...sometime in the 2030's
     
    Last edited: Jul 16, 2022
    WormSquirts[QUOTED] likes this.
  6. Jul 15, 2022 at 8:30 PM
    #6
    Tacomoto23

    Tacomoto23 IG: Tacoma_Carey23

    Joined:
    Aug 31, 2014
    Member:
    #137329
    Messages:
    1,274
    Gender:
    Male
    First Name:
    Carey
    Torrance,CA
    Vehicle:
    11’ TRD Prerunner / 21’ TRD 4x4
    Sweet write up Tom! Looks pretty bomb proof
     
    Airdog[OP] likes this.
  7. Jul 16, 2022 at 11:53 AM
    #7
    WormSquirts

    WormSquirts Armageddon

    Joined:
    Dec 18, 2015
    Member:
    #172583
    Messages:
    2,487
    First Name:
    Braeden
    BC
    I did feel a big difference in suspension going to a 37. When they are aired down, it's pretty mental how much smoother the ride is compared to 35's.

    Can't wait for the LS... I'm considering the same thing, and on roughly the same schedule haha.
     
  8. Jul 17, 2022 at 10:59 AM
    #8
    welderf15

    welderf15 Well-Known Member

    Joined:
    Nov 8, 2011
    Member:
    #66687
    Messages:
    135
    Gender:
    Male
    First Name:
    Bryan
    Clovis, CA
    Vehicle:
    2011 DCSB
    Nice write up Airdog.....thanks for the effort. I'll be using this as a guide when I do a 9" axle swap in the future. :thumbsup:
     
    Airdog[OP] likes this.
  9. Jul 23, 2022 at 5:21 AM
    #9
    EatSleepTacos

    EatSleepTacos Well-Known Member

    Joined:
    Mar 24, 2015
    Member:
    #151688
    Messages:
    59,639
    Gender:
    Male
    First Name:
    Randy
    West Valley, AZ
    Vehicle:
    2017 4Runner
    Well damn, guess I’ve gotta go 37s next. I was on the fence but this helps push me towards them.
     
    fatfurious2 likes this.
  10. Jul 23, 2022 at 6:53 AM
    #10
    Jowett

    Jowett Well-Known Member

    Joined:
    May 5, 2016
    Member:
    #186182
    Messages:
    1,616
    Gender:
    Male
    First Name:
    Brian
    North Adams, MA
    FWIW and in the future, the Camry/Avalon/ES350 master cylinder 47201-06510 is a large bore 23.8mm piece that bolts in to the 2009 and later Taco booster, but requires no adapters or lines. While I don't like going against well thought out products, the adapter kit is obsolete.

    Great swap OP! Enjoyed reading the write up.
     
  11. Jul 23, 2022 at 9:14 AM
    #11
    Airdog

    Airdog [OP] did your Mom

    Joined:
    Dec 26, 2012
    Member:
    #93790
    Messages:
    4,548
    Gender:
    Male
    First Name:
    Tom
    SoCal
    Vehicle:
    https://www.tacomaworld.com/threads/airdogs-2012-prerunner-access-cab-slow-build.264263/
    Thanks..that is awesome info. Wish I had known about that...probably would have gone that route.
     
  12. Jul 23, 2022 at 9:33 AM
    #12
    Jowett

    Jowett Well-Known Member

    Joined:
    May 5, 2016
    Member:
    #186182
    Messages:
    1,616
    Gender:
    Male
    First Name:
    Brian
    North Adams, MA
    If we all had a dime + the cash invested in parts and mods that had better options or designs... well, you know the deal. Hopefully that little tidbit will save the next guy $100 - $200 that can better utilized elsewhere. This writeup will certainly help me when I build my axle.
     
    Airdog[OP] likes this.
  13. Jul 23, 2022 at 11:46 AM
    #13
    WormSquirts

    WormSquirts Armageddon

    Joined:
    Dec 18, 2015
    Member:
    #172583
    Messages:
    2,487
    First Name:
    Braeden
    BC
    Honestly, don't bother... Just skip to 40's. Or at least a lot of companies are doing a 38 these days, which will measure out closer to 37 than a 37 will.

    I've been looking at booster/MC options, but I'm in a 2006, so I'm guessing gotta stick with the tundra/seqouia swap?
     
  14. Jul 23, 2022 at 11:47 AM
    #14
    EatSleepTacos

    EatSleepTacos Well-Known Member

    Joined:
    Mar 24, 2015
    Member:
    #151688
    Messages:
    59,639
    Gender:
    Male
    First Name:
    Randy
    West Valley, AZ
    Vehicle:
    2017 4Runner
    You’re a horrible influence. I love it.
     
  15. Jul 23, 2022 at 11:50 AM
    #15
    Jowett

    Jowett Well-Known Member

    Joined:
    May 5, 2016
    Member:
    #186182
    Messages:
    1,616
    Gender:
    Male
    First Name:
    Brian
    North Adams, MA
    I'm unsure of the exact changes/differences of the 2009 and up. The master cylinder appears shorter/fatter... maybe dig around a bit, I'll see what I can find.
     
    WormSquirts and Airdog[OP] like this.
  16. Jul 23, 2022 at 12:02 PM
    #16
    WormSquirts

    WormSquirts Armageddon

    Joined:
    Dec 18, 2015
    Member:
    #172583
    Messages:
    2,487
    First Name:
    Braeden
    BC
    I guess as long as the booster itself is the same it shouldn't make a difference. But how much difference would just a MC swap make compared to swapping the booster as well?
     
  17. Jul 23, 2022 at 12:19 PM
    #17
    Jowett

    Jowett Well-Known Member

    Joined:
    May 5, 2016
    Member:
    #186182
    Messages:
    1,616
    Gender:
    Male
    First Name:
    Brian
    North Adams, MA
    Found it...The difference between the 08/09 split is the brakeline port size/thread. Up to 2008 has M10x1.0 and 2009+ uses M12x1.0. So for the older trucks, we need to find a master w/M10 ports, or you could find adapters and tweak the brake lines.

    The master is so the rear calipers receive a proper volume of fluid. Swapping the booster will give you more assist when pressing the brake pedal.
     
  18. Jul 23, 2022 at 12:24 PM
    #18
    EatSleepTacos

    EatSleepTacos Well-Known Member

    Joined:
    Mar 24, 2015
    Member:
    #151688
    Messages:
    59,639
    Gender:
    Male
    First Name:
    Randy
    West Valley, AZ
    Vehicle:
    2017 4Runner
    Makes sense why the abs module on my 05 is all m10. Would probably be easier to use the MC that bolts straight up but just use a couple of m10->m12 adapters.
     
    Airdog[OP] likes this.
  19. Jul 24, 2022 at 12:31 AM
    #19
    WormSquirts

    WormSquirts Armageddon

    Joined:
    Dec 18, 2015
    Member:
    #172583
    Messages:
    2,487
    First Name:
    Braeden
    BC
    Thanks for the info!
     
    Airdog[OP] likes this.
  20. Aug 11, 2022 at 12:14 PM
    #20
    EatSleepTacos

    EatSleepTacos Well-Known Member

    Joined:
    Mar 24, 2015
    Member:
    #151688
    Messages:
    59,639
    Gender:
    Male
    First Name:
    Randy
    West Valley, AZ
    Vehicle:
    2017 4Runner
    A little tidbit of info I thought I would add that may already be obvious to others, but the brass adapters for the proportioning valve are pretty dang soft, so don't crank on them too hard. I learned that the hard way today while chasing a leak and stripped one out.

    [​IMG]
     
To Top