1. Welcome to Tacoma World!

    You are currently viewing as a guest! To get full-access, you need to register for a FREE account.

    As a registered member, you’ll be able to:
    • Participate in all Tacoma discussion topics
    • Communicate privately with other Tacoma owners from around the world
    • Post your own photos in our Members Gallery
    • Access all special features of the site

Show off your aux fuse panels.

Discussion in 'Lighting' started by Newlife, Dec 29, 2013.

  1. Aug 23, 2024 at 8:50 AM
    #1841
    DesertRatliff

    DesertRatliff Well-Known Member

    Joined:
    Jan 14, 2012
    Member:
    #70618
    Messages:
    2,379
    Gender:
    Male
    Mt. Hood, OR
    Vehicle:
    Mas Tacos Por Favor
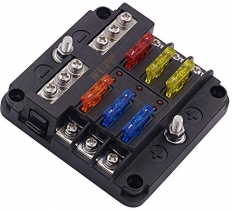
    Where are you all sourcing this distribution block? I can't seem to find a source using the part number in the picture. @Eddiebeer @wi_taco

    [​IMG]

    [​IMG]
     
    Aws123 likes this.
  2. Aug 23, 2024 at 9:11 AM
    #1842
    Eddiebeer

    Eddiebeer Member

    Joined:
    Jul 13, 2020
    Member:
    #334357
    Messages:
    23
    Gender:
    Male
    First Name:
    Ahmed
    Bend, OR, USA
    Vehicle:
    TRD Pro
    Icon Stage 10, Icon Rebound Wheels, OVTune
    This site contains affiliate links for which the site may be compensated.
  3. Aug 23, 2024 at 9:21 AM
    #1843
    DesertRatliff

    DesertRatliff Well-Known Member

    Joined:
    Jan 14, 2012
    Member:
    #70618
    Messages:
    2,379
    Gender:
    Male
    Mt. Hood, OR
    Vehicle:
    Mas Tacos Por Favor
    Thanks for the quick response! Rainy day off today has me wanting to get parts ordered up and on their way. I appreciate the info.
     
    This site contains affiliate links for which the site may be compensated.
  4. Aug 23, 2024 at 9:44 AM
    #1844
    Eddiebeer

    Eddiebeer Member

    Joined:
    Jul 13, 2020
    Member:
    #334357
    Messages:
    23
    Gender:
    Male
    First Name:
    Ahmed
    Bend, OR, USA
    Vehicle:
    TRD Pro
    Icon Stage 10, Icon Rebound Wheels, OVTune
    You got it. BTW, if you do order just the bare unit, make sure that you order 4 pin mini relays so you have the choice of orienting them either way. My 'kit' came with 5 pin relays so I had to cut & grind off the 5th leg to allow me to flip their orientation successfully.
     
    DesertRatliff likes this.
  5. Dec 21, 2024 at 5:14 PM
    #1845
    wradar

    wradar Well-Known Member

    Joined:
    Oct 13, 2014
    Member:
    #140245
    Messages:
    74
    Gender:
    Male
    Virginia
    Vehicle:
    2021 DC OR // 2002 DC Limited TRD OR(sold)
    I’m installing the Auxbeam mount from @switch and am having trouble figuring out how to drill the hole in the wheel well for the mount that goes immediately beneath the brake manifold lines. Does anyone who’s done this before have any tips?

    IMG_1292.jpg
     
    Last edited: Dec 21, 2024
  6. Dec 21, 2024 at 6:51 PM
    #1846
    switch

    switch Well-Known Member

    Joined:
    Oct 12, 2009
    Member:
    #24216
    Messages:
    485
    Gender:
    Male
    Norther California
    Vehicle:
    2022 Tacoma Access Cab

    I also replied to your question on Etsy.

    I used a 1/4" bit that was 6" long. I mounted the bracket in place using the other two mount positions: the existing hole in the wheel well and the fuse box nut (see #1 and #3 in figure 1 in the instructions). Then I marked the position to drill the hole using my drill bit without the drill because the chuck was in the way. I just turned the bit by hand until it had scratched the paint enough to see the correct location on the wheel well. Then I removed the mount so I could drill the hole. I still had to angle the bit because the chuck was so close to the break lines. You might find it easier to drill a pilot hole with a smaller bit and then drill up from the bottom with the 1/4" bit. Don't forget to put a dab of paint on the exposed metal edge of the hole to prevent rust.

    upload_2024-12-21_18-52-34.png
     
    TheWildMan and wradar[QUOTED] like this.
  7. Dec 21, 2024 at 7:53 PM
    #1847
    wradar

    wradar Well-Known Member

    Joined:
    Oct 13, 2014
    Member:
    #140245
    Messages:
    74
    Gender:
    Male
    Virginia
    Vehicle:
    2021 DC OR // 2002 DC Limited TRD OR(sold)
    Much appreciated, @switch! (I wasn't sure if you were holidaying it up, hence the inquiries both here and on Etsy.) I'll grab a longer bit tomorrow and finish it up.

    Happy holidays!
     
  8. Dec 22, 2024 at 6:09 PM
    #1848
    TrevoTaco

    TrevoTaco New Member

    Joined:
    Jan 9, 2021
    Member:
    #352213
    Messages:
    3
    Gender:
    Male
    First Name:
    Trevor
    Vehicle:
    2020 MGM Tacoma TRD Sport Upgrade
    Recently did a 2 battery setup for all my truck camping needs. Let me know what you think! Renogy 20a DC to DC charger, LiTime 100ah mini, 500w Inverter.
    IMG_4025.jpg IMG_3991.jpg IMG_4005.jpg
     
  9. Jan 7, 2025 at 10:24 AM
    #1849
    SCTaco79

    SCTaco79 Member

    Joined:
    Dec 20, 2023
    Member:
    #439943
    Messages:
    18
    Gender:
    Male
    Vehicle:
    2023 LunarRock Tacoma TRD Offroad
    I like that setup behind the seat, I was debating on doing something similar with 2 Minis.
     
  10. Jan 7, 2025 at 10:31 AM
    #1850
    guaco.supreme

    guaco.supreme Fk around and find out

    Joined:
    Jan 26, 2024
    Member:
    #442486
    Messages:
    537
    Gender:
    Male
    MN
    I like it.

    Does the Renogy DC-DC make a lot of noise? I had mine in the bed of the truck, but want to move it to the cab. Unsure if it has fan noise or anything.
     
  11. Jan 8, 2025 at 4:59 PM
    #1851
    SCTaco79

    SCTaco79 Member

    Joined:
    Dec 20, 2023
    Member:
    #439943
    Messages:
    18
    Gender:
    Male
    Vehicle:
    2023 LunarRock Tacoma TRD Offroad
    @TrevoTaco one quick question on that setup, where did you run your ground to? Again nice setup and thanks in advance!
     
  12. Jan 10, 2025 at 3:24 PM
    #1852
    BigRed2513

    BigRed2513 Active Member

    Joined:
    Aug 8, 2022
    Member:
    #403110
    Messages:
    37
    First Name:
    Grant
    Whistler, B.C., Canada
    Vehicle:
    2014 TRD Sport DCLB Super White
    Who manufactures trays? So far i've got Paranoid Fabrications, Overland Equipped, PowerTrays....
     
  13. Jan 10, 2025 at 7:13 PM
    #1853
    bagleboy

    bagleboy Well-Known Member

    Joined:
    Aug 5, 2017
    Member:
    #226018
    Messages:
    7,218
    Gender:
    Male
    First Name:
    Scott
    Norcal, Santa Rosa
    Vehicle:
    2014 5-lug AC 2.7L VVTI
    Snug top Rebel, Thule tracks, ditch tracks, Bagged rear suspension, F/R anytime camera, intermittent wiper switch...
    I got mine from a salvage yard by weight, maybe a buck or two. All it needs is a right angle and some thickness( or a corner). Aluminum bakeware works. Yes, time spent, but it’s also recycling.
     
  14. Jan 11, 2025 at 8:51 PM
    #1854
    paranoid56

    paranoid56 Well-Known Member

    Joined:
    Jul 25, 2012
    Member:
    #83443
    Messages:
    3,438
    Gender:
    Male
    San Diego
    Vehicle:
    14 double cab taco
    we are also one of the few that will do a custom setup per your drawings too :D
     
    BigRed2513[QUOTED] likes this.
  15. Jan 12, 2025 at 2:53 PM
    #1855
    Bootser

    Bootser Member

    Joined:
    Mar 26, 2024
    Member:
    #446659
    Messages:
    5
    Gender:
    Male
    First Name:
    Gary
    Vehicle:
    2021 White Tacoma TRD Offroad
    I was looking for a fuse/relay mounting tray but didn't want to pay $75 to $125 for something I could make myself. I found some black diamond plate sheets of 12" x 24" aluminum at Lowes on sale for $7.52, so I picked up two. I copied the Powertrays Blank for the TRD Offroad/Pro. Also needed to relocate the clutch reservoir, found some instructions with pictures, and made a simple bracket to mount to my tray. I did reach out to Powertrays about getting the relocation bracket for the blank tray (I was about to just buy the blank tray because it would have been easier) but they weren't very helpful.
    The Build:
    Took lots of measurements based on pictures of several different tray installations available online.
    Created a one-piece prototype.
    Used the prototype to test and realized that modular would be better.
    More measurements.

    Cut and fabricated each modular piece using:
    Jigsaw
    Bench and handheld grinders to smooth edges (metal gets too hot when using these to cut)
    Bench vise to bend parts.
    Propane torch to bend parts
    Rivet tool

    Pieces:
    Fender mount bracket.
    Tray.
    Wheel well mount bracket (goes to a ground screw below the main fuse distro panel).
    Clutch reservoir relocate bracket.
    Also used rivnuts for all the screw mounts.

    With the prototype, I couldn't get the main fuse distro panel lid open unless I loosened the tray. The modular tray allows easy removal without taking anything apart. Mostly because better final measurements.

    IMG_1979.jpg
    IMG_1980.jpg
    IMG_1981.jpg
    IMG_1982.jpg
    IMG_1986.jpg
    IMG_1987.jpg
     
    Foushee likes this.
  16. Jan 12, 2025 at 3:14 PM
    #1856
    Bootser

    Bootser Member

    Joined:
    Mar 26, 2024
    Member:
    #446659
    Messages:
    5
    Gender:
    Male
    First Name:
    Gary
    Vehicle:
    2021 White Tacoma TRD Offroad
     
  17. Jan 12, 2025 at 4:47 PM
    #1857
    DesertRatliff

    DesertRatliff Well-Known Member

    Joined:
    Jan 14, 2012
    Member:
    #70618
    Messages:
    2,379
    Gender:
    Male
    Mt. Hood, OR
    Vehicle:
    Mas Tacos Por Favor
    I used some aluminum 2" angle and some 1/8" aluminum sheet I had from another project, cut out the appropriate holes with a hole saw and Dremel, then wrapped it in carbon fiber vinyl wrap. I'm pleased enough with the results.

    20241118_133323.jpg
     
    Bootser likes this.
  18. Jan 12, 2025 at 6:25 PM
    #1858
    Bootser

    Bootser Member

    Joined:
    Mar 26, 2024
    Member:
    #446659
    Messages:
    5
    Gender:
    Male
    First Name:
    Gary
    Vehicle:
    2021 White Tacoma TRD Offroad
    Nice work! What hood strut setup did you install?
     
  19. Jan 12, 2025 at 7:36 PM
    #1859
    DesertRatliff

    DesertRatliff Well-Known Member

    Joined:
    Jan 14, 2012
    Member:
    #70618
    Messages:
    2,379
    Gender:
    Male
    Mt. Hood, OR
    Vehicle:
    Mas Tacos Por Favor
    Thanks! The hood struts are the Redline Tuning stainless struts.
     
    Bootser[QUOTED] likes this.
  20. Jan 15, 2025 at 11:33 PM
    #1860
    bagleboy

    bagleboy Well-Known Member

    Joined:
    Aug 5, 2017
    Member:
    #226018
    Messages:
    7,218
    Gender:
    Male
    First Name:
    Scott
    Norcal, Santa Rosa
    Vehicle:
    2014 5-lug AC 2.7L VVTI
    Snug top Rebel, Thule tracks, ditch tracks, Bagged rear suspension, F/R anytime camera, intermittent wiper switch...
    One nice thing about 5-pin relays is you can use a pair of them to create a reversing circuit using a low current on-off-on switch instead of running high current and wiring to a more expensive reversing switch.
     

Products Discussed in

To Top