

-
Welcome to Tacoma World!
You are currently viewing as a guest! To get full-access, you need to register for a FREE account.
As a registered member, you’ll be able to:- Participate in all Tacoma discussion topics
- Communicate privately with other Tacoma owners from around the world
- Post your own photos in our Members Gallery
- Access all special features of the site
 Glovebox wallet for 2023 Tacoma TRD Pro
 How to make audio default to USB?
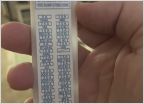 Abbreviations on cab fuse box
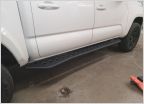 New running boards. Look like sliders
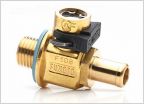 Which Fumoto?
 Tire Dia. Measurement for Hpertech Speedo Calibrator
Steering Wheel Plastic Removal
Discussion in '3rd Gen. Tacomas (2016-2023)' started by Airborne22, May 3, 2019.


