-
Welcome to Tacoma World!
You are currently viewing as a guest! To get full-access, you need to register for a FREE account.
As a registered member, you’ll be able to:- Participate in all Tacoma discussion topics
- Communicate privately with other Tacoma owners from around the world
- Post your own photos in our Members Gallery
- Access all special features of the site
 Show me your subs (in a 1st Generation only please)!
 So heres a question Microusb--RCA
 Subaru tweeters with active crossover?
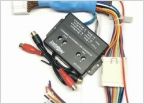 Amp harness for 2022 Tacoma needed
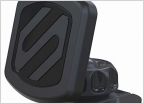 Dashboard tablet holder
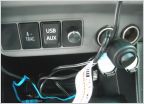 Speaker box behind rear seat
Valentine 1/BlendMount: Install w/pics
Discussion in 'Audio & Video' started by Octoparrot, Oct 22, 2011.