1. Welcome to Tacoma World!

    You are currently viewing as a guest! To get full-access, you need to register for a FREE account.

    As a registered member, you’ll be able to:
    • Participate in all Tacoma discussion topics
    • Communicate privately with other Tacoma owners from around the world
    • Post your own photos in our Members Gallery
    • Access all special features of the site
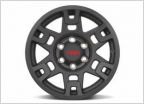
Vinyl wrapping the radio trim

Discussion in '3rd Gen. Tacomas (2016-2023)' started by Six7, Sep 11, 2017.

  1. Sep 11, 2017 at 3:54 PM
    #1
    Six7

    Six7 [OP] Well-Known Member

    Joined:
    Jul 13, 2017
    Member:
    #223968
    Messages:
    49
    Gender:
    Male
    First Name:
    Matt
    RVA
    Vehicle:
    '17 DCSB TRD Sport
    I bought a roll of vinyl with the fantastic idea of wrapping some of my dash trim. Two hours and a scrapped attempt later....Anyone have any vinyl wrapping tips on how to do it? I can't seem to do it without a bunch of creases. Is it even possible to do with a single piece of vinyl?
     
  2. Sep 11, 2017 at 3:58 PM
    #2
    greg8765

    greg8765 Well-Known Member

    Joined:
    Sep 19, 2016
    Member:
    #197683
    Messages:
    1,414
    Gender:
    Male
    First Name:
    Greg
    Utah
    Vehicle:
    2016 Magnetic Grey Tacoma Sport DCSB
    Empyre Off Road Grille, Nitto Ridge Grapplers, 17 Inch TRD Pro Wheels, 3 Inch Tuff Country Lift, Bakflip Tonneau Cover, Tint, Pop & Lock, Door Sill Decals, Tailgate Insert Decals
    this is the exact reason i've never done this. i'm thinking about taking everything apart and spraying it down with plasti dip. that, I CAN DO!!!!

    good luck man
     
  3. Sep 11, 2017 at 6:34 PM
    #3
    over60

    over60 Over70 & still a "Grumpy Old Guy"

    Joined:
    Oct 20, 2010
    Member:
    #44995
    Messages:
    4,812
    Gender:
    Male
    First Name:
    John
    Muskoka, Ontario
    Vehicle:
    2016 Inferno (Punkin) TRD 4X4 Sport DCLB w/upgrade & tech pkg..!!
    Toyota running boards/Solid Fold 2.0/custom stickers/Anti-Dark LED light under hood/Derped grill/Scoop, etc.
    Isn't there a product that you place in hot water and then dip the part in and pull it out through this stuff and it sticks to it like crazy..?? I don't know what it is but guys do rifles, etc with camo stuff on it..!
     
    shakerhood likes this.
  4. Sep 11, 2017 at 6:38 PM
    #4
    tcjacado

    tcjacado Well-Known Member

    Joined:
    Aug 29, 2016
    Member:
    #195947
    Messages:
    41,610
    I do not think you can do it in one piece I think it had to be 3 pieces one top, one side and one bottom. Matching it up is difficult. Try using a hair dryer to smooth out areas. @mesojdm did his in camo i believe maybe he can chime in.
     
  5. Sep 11, 2017 at 6:54 PM
    #5
    Six7

    Six7 [OP] Well-Known Member

    Joined:
    Jul 13, 2017
    Member:
    #223968
    Messages:
    49
    Gender:
    Male
    First Name:
    Matt
    RVA
    Vehicle:
    '17 DCSB TRD Sport

    Yeah, the more I stare at this thing, the more I think that I should just hydro dip it. Kinda wish I didn't buy all this nice vinyl :censored:
     
    tcjacado likes this.
  6. Sep 12, 2017 at 12:18 AM
    #6
    sorgon82

    sorgon82 wanna go for a rip bud

    Joined:
    Oct 1, 2015
    Member:
    #165572
    Messages:
    1,994
    Gender:
    Male
    Ont. Canada
    Vehicle:
    2016 Grey Tacoma sport dc long bed
    heat is your friend..... and patience
     
    Resqu2 and Fredisasian like this.
  7. Sep 12, 2017 at 7:09 AM
    #7
    SearArtist

    SearArtist Hybird

    Joined:
    Jan 5, 2016
    Member:
    #174151
    Messages:
    18,820
    Gender:
    Male
    First Name:
    Matt
    NC
    Vehicle:
    2014 Lexus CT200h F Sport
    Battery
    GPsevinSixx and tcjacado like this.
  8. Sep 12, 2017 at 10:19 AM
    #8
    splitbolt

    splitbolt Voodoo Witch Doctor

    Joined:
    Mar 7, 2010
    Member:
    #32761
    Messages:
    7,874
    Gender:
    Male
    NW Arkansas
    Vehicle:
    2016 TRD OFFROAD DCSB MGM
    Probably a problem where you're starting and stopping.
    I'd trying laying the vinyl surface on a flat surface, sticky side up, and lay the bezel on it. Work it from the center out...
     
    tcjacado likes this.
  9. Sep 12, 2017 at 11:52 AM
    #9
    johnny6

    johnny6 Unknown Member

    Joined:
    Feb 26, 2017
    Member:
    #211711
    Messages:
    597
    Northern California
    Vehicle:
    '17 DCLB 4X4
    Also worth mentioning that cheaper quality vinyl is much harder to work with for compound curves.
     
  10. Sep 12, 2017 at 12:58 PM
    #10
    Six7

    Six7 [OP] Well-Known Member

    Joined:
    Jul 13, 2017
    Member:
    #223968
    Messages:
    49
    Gender:
    Male
    First Name:
    Matt
    RVA
    Vehicle:
    '17 DCSB TRD Sport
    Alright, I'm giving this another shot tonight. I'll post up the results.
     
  11. Sep 12, 2017 at 1:09 PM
    #11
    MapleTRD

    MapleTRD Well-Known Member

    Joined:
    Jul 27, 2017
    Member:
    #225167
    Messages:
    222
    Gender:
    Male
    Vehicle:
    2017 trd sport
    Lay the Vinyl wrap flat on the piece cut a slit straight down the middle and work the vinyl from the inside edge to the outter edge. make sure your warp is tucked under the edges so it don't lift. Take your time

    IMG_4510.jpg
     
  12. Sep 12, 2017 at 1:23 PM
    #12
    Six7

    Six7 [OP] Well-Known Member

    Joined:
    Jul 13, 2017
    Member:
    #223968
    Messages:
    49
    Gender:
    Male
    First Name:
    Matt
    RVA
    Vehicle:
    '17 DCSB TRD Sport
    That's clean! Okay, that gives me inspiration. I'm going to get it right tonight
     
    tcjacado likes this.
  13. Sep 12, 2017 at 2:26 PM
    #13
    MapleTRD

    MapleTRD Well-Known Member

    Joined:
    Jul 27, 2017
    Member:
    #225167
    Messages:
    222
    Gender:
    Male
    Vehicle:
    2017 trd sport
    Take your time if it gets wrinkled Pulled that wrinkle part up and redo it don't take the whole piece off again just the wrinkled part
     
    tcjacado likes this.
  14. Sep 12, 2017 at 2:53 PM
    #14
    MESO

    MESO Major Modder Vendor

    Joined:
    Feb 16, 2015
    Member:
    #148809
    Messages:
    16,295
    Gender:
    Male
    State of Jefferson
    Vehicle:
    2016 DCLB TRD HELLCAT SWAP
    Here's some more inspiration:)
    [​IMG]
    [​IMG]
     
  15. Sep 12, 2017 at 4:58 PM
    #15
    Six7

    Six7 [OP] Well-Known Member

    Joined:
    Jul 13, 2017
    Member:
    #223968
    Messages:
    49
    Gender:
    Male
    First Name:
    Matt
    RVA
    Vehicle:
    '17 DCSB TRD Sport
    You guys are vinyl pros. I'm amateur hour over here.

    I wrapped the entire inside radio dash trim. I got all the way to the last corner and cut the excess vinyl too short...when I heated it up, it wrinkled and pulled back to the point that I couldn't pull out the creases. I almost had it! 2 more hours worth of practice I guess. For now I left it intact, but I'm going to unwrap it and try it once more when I get over my failure, yet again.

    So first lesson learned: Heat is most definitely your friend.
    Second lesson: Don't lose concentration and get sloppy at the end.
     
    tcjacado likes this.
  16. Sep 12, 2017 at 5:07 PM
    #16
    Six7

    Six7 [OP] Well-Known Member

    Joined:
    Jul 13, 2017
    Member:
    #223968
    Messages:
    49
    Gender:
    Male
    First Name:
    Matt
    RVA
    Vehicle:
    '17 DCSB TRD Sport

    Should have put this advice into practice.
     
    tcjacado likes this.
  17. Sep 13, 2017 at 7:25 PM
    #17
    Six7

    Six7 [OP] Well-Known Member

    Joined:
    Jul 13, 2017
    Member:
    #223968
    Messages:
    49
    Gender:
    Male
    First Name:
    Matt
    RVA
    Vehicle:
    '17 DCSB TRD Sport

    I am starting to get the hang of wrapping. It has taken me a few attempts, but I'm getting better at it. I saw you wrapped the insert around the A/C knobs. Question...I managed to pull out that whole insert. It was rather easy to get out. Once I removed it though, I fiddled with it for a while but couldn't figure out how to pull the face off (well, remove it without breaking it, that is). Could you enlighten me on that? I'm assuming you removed the plastic trim around the knobs. I managed to get the start button out and pulled the corner free, but something in the center seemed to hold it all together.
     
  18. Sep 13, 2017 at 7:27 PM
    #18
    Six7

    Six7 [OP] Well-Known Member

    Joined:
    Jul 13, 2017
    Member:
    #223968
    Messages:
    49
    Gender:
    Male
    First Name:
    Matt
    RVA
    Vehicle:
    '17 DCSB TRD Sport
    Also, I was looking at the chrome vent rings...I was going to spray mine...I managed to break half of one of the vent ring clips. Are those little plastic welds holding them in as well as the clips?
     
  19. Sep 15, 2017 at 8:41 PM
    #19
    dd564

    dd564 Sour Grapes Guy

    Joined:
    Dec 18, 2016
    Member:
    #205178
    Messages:
    151
    Gender:
    Male
    First Name:
    Dan
    Shakopee, MN
    Vehicle:
    2016 SR DCSB
    I tried doing this recently and my patience ran out. I wanted to "complete" it so I could at least get the look of it.

    I had it in about 13 different pieces and you could see all the numerous seams and it started peeling the next day.
    Worst waste of vinyl wrap ever.

    The next day, my second roll of vinyl came in the mail, but right now I have it plasti-dipped which I didn't do a very good job on either.
     
  20. Sep 15, 2017 at 8:46 PM
    #20
    MESO

    MESO Major Modder Vendor

    Joined:
    Feb 16, 2015
    Member:
    #148809
    Messages:
    16,295
    Gender:
    Male
    State of Jefferson
    Vehicle:
    2016 DCLB TRD HELLCAT SWAP

Products Discussed in

To Top