1. Welcome to Tacoma World!

    You are currently viewing as a guest! To get full-access, you need to register for a FREE account.

    As a registered member, you’ll be able to:
    • Participate in all Tacoma discussion topics
    • Communicate privately with other Tacoma owners from around the world
    • Post your own photos in our Members Gallery
    • Access all special features of the site

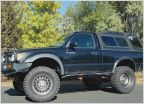
what a toy - keep on building it... (pics)

Discussion in '1st Gen. Builds (1995-2004)' started by whatatoy, Dec 28, 2011.

  1. Mar 10, 2012 at 8:12 AM
    #41
    Fiolo

    Fiolo Senior member

    Joined:
    Sep 10, 2011
    Member:
    #63227
    Messages:
    4,381
    Gender:
    Male
    Vehicle:
    1998 Tacoma, 2022 Tacoma, 2019 L5P Duramax
    Lost track many mods ago
    looking good man
     
  2. Mar 10, 2012 at 9:44 AM
    #42
    ttaM

    ttaM 4.8.15.16.23.42

    Joined:
    Jan 13, 2012
    Member:
    #70582
    Messages:
    355
    Gender:
    Male
    First Name:
    Matt
    Kentucky
    Vehicle:
    2002 Tacoma 2.4L 5 Lugger
    I'm super jelly of that cabinet you've built for the back.
     
  3. Mar 11, 2012 at 6:18 PM
    #43
    whatatoy

    whatatoy [OP] Galt/Rearden 2012

    Joined:
    Jul 13, 2011
    Member:
    #59829
    Messages:
    291
    Gender:
    Male
    SO CAL
    Vehicle:
    I like it
    This truck is a work truck - not a lot of fancy mod's here, but it's getting the job done!
    Thanks man. I'd do a write up on them specifically, but I didn't take any pics, didn't draw any plans - just kinda measured and cut... after thinking about how I'd want it too function.
     
  4. Apr 2, 2012 at 8:05 AM
    #44
    HammerHead

    HammerHead Well-Known Member

    Joined:
    Oct 2, 2011
    Member:
    #64493
    Messages:
    902
    Gender:
    Male
    First Name:
    Jake
    Georgia
    Vehicle:
    04 TRD OffRoad PreRunner SR5 DC
    How come I can't see your pics? All our little red 'x''s. May be that my corp is blocking the links, but wanted to see if I was the only one.:confused:
     
  5. Apr 2, 2012 at 2:20 PM
    #45
    whatatoy

    whatatoy [OP] Galt/Rearden 2012

    Joined:
    Jul 13, 2011
    Member:
    #59829
    Messages:
    291
    Gender:
    Male
    SO CAL
    Vehicle:
    I like it
    This truck is a work truck - not a lot of fancy mod's here, but it's getting the job done!
    not sure why man - I know I can see them at work and at home... maybe its cause it's a photobucket link???
     
  6. May 2, 2012 at 8:26 PM
    #46
    whatatoy

    whatatoy [OP] Galt/Rearden 2012

    Joined:
    Jul 13, 2011
    Member:
    #59829
    Messages:
    291
    Gender:
    Male
    SO CAL
    Vehicle:
    I like it
    This truck is a work truck - not a lot of fancy mod's here, but it's getting the job done!
    I'm a little bored - what should I do next to my truck?
     
  7. May 30, 2012 at 1:11 PM
    #47
    zaoc

    zaoc Well-Known Member

    Joined:
    May 26, 2012
    Member:
    #79542
    Messages:
    75
    Gender:
    Male
    Texas
    Vehicle:
    02 PreRunner
    fog light mod spray painted rims
    can you elaborate on the cupholder wiring? That's all I'm doing for now but I don't know where to splice the wires
     
  8. May 30, 2012 at 8:54 PM
    #48
    whatatoy

    whatatoy [OP] Galt/Rearden 2012

    Joined:
    Jul 13, 2011
    Member:
    #59829
    Messages:
    291
    Gender:
    Male
    SO CAL
    Vehicle:
    I like it
    This truck is a work truck - not a lot of fancy mod's here, but it's getting the job done!
    I bought a tool that looks like an al (screw driver, but with very sharp tip used to help start screws, make holes, etc), has a light inside it, and a wire running out the back with an alligator clip. I attach the alligator clip to a good grounding place and then poke into wires to search for power - you have power when the light turns on... not sure what to call this tool.

    Once I've found power, I use a wire tap and tap that wire for power. A wire tap allows the wire you're tapping to run through, and a second channel for a new wire. Once you clap it on with a pair of pliers, it splices the wires together. I always secure these well with electrical tape.

    So, to find the wires to test for power, take your center console apart and locate the light bulb under the shifter (if you have an auto). There should only be 2 wires going to it, so use your tool and poke the tool into a wire.

    That is what I did until I found the right one. I didn't get the right one at first, so I taped the hole I created in the wrong wire. BTW - make sure the light you're taking power from is on... ie, power is going to it so that when you get the power source wire, your tester light turns on too...

    hope that helped...
     

Products Discussed in

To Top