

-
Welcome to Tacoma World!
You are currently viewing as a guest! To get full-access, you need to register for a FREE account.
As a registered member, you’ll be able to:- Participate in all Tacoma discussion topics
- Communicate privately with other Tacoma owners from around the world
- Post your own photos in our Members Gallery
- Access all special features of the site
 Transfer Case Actuator robustness
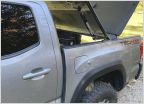 Diamondback Owners, what up?
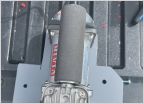 VIAIR 300P Engine Bay Mounting & Hardwiring
 Access Cab Storage Organization
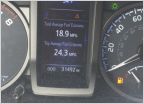 New exhaust. Better mpg?
 How to install bike racks on factory tonneau cover
Who's installed pop'n'lock through passenger side?
Discussion in '3rd Gen. Tacomas (2016-2023)' started by Diego1931, Jun 10, 2016.


