1. Welcome to Tacoma World!

    You are currently viewing as a guest! To get full-access, you need to register for a FREE account.

    As a registered member, you’ll be able to:
    • Participate in all Tacoma discussion topics
    • Communicate privately with other Tacoma owners from around the world
    • Post your own photos in our Members Gallery
    • Access all special features of the site

C0d3M0nk3y's Whitewater build

Discussion in '2nd Gen. Builds (2005-2015)' started by C0d3M0nk3y, Nov 15, 2015.

  1. Nov 15, 2015 at 5:25 PM
    #1
    C0d3M0nk3y

    C0d3M0nk3y [OP] Well-Known Member

    Joined:
    Nov 13, 2015
    Member:
    #169500
    Messages:
    205
    2008 Tacoma Sport DCSB (silver)
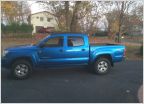
    I picked up a 2008 Tacoma Sport DCSB in the early summer 2015 and have been tinkering with it ever since. Only a few major mods, and a handful of minor ones.

    The goal: carry 10 whitewater kayaks and be able to go just about anywhere there is good boating.

    Everything I am doing is related to that goal. In addition to carrying that many boats, being able to carry 10 people would be nice as well (and that doesn't mean they have to be comfortable, that is their problem).

    The backstory:
    I took a trip to Moab (and other parts of Utah) in Spring 2015. I ended up borrowing a very beat up Grand Cherokee for the trip (~240,000 miles on it). I drove it across the country to get to Utah, and it had issues. I kept wondering what was going to break next (oil pressure gauge was flaky and no air conditioning). While in Moab, the girlfriend wanted to go see Dead Horse. She plugged in the GPS coordinates and it sent us in the wrong direction (complete opposite direction actually). As we were following the directions, it took us onto some gravel roads. As we were driving, I saw some mud ahead. I knew I couldn't stop in time, and I also knew the girlfriend wasn't going to be please with what was coming next, I kept going. We hit the mud, windshield got a bit dirty, and the Jeep proceeded to fishtail a bit (not bad, but you knew you were in some slick stuff). She became very un-amused at that point and asked if we could please stop (in the middle of the mud while we were still moving). I pretended I didn't hear her, and kept going through the mud. On the other side we had a nice conversation about where we were and what we wanted to do next. I didn't trust the Jeep and was happy to turn around. We made it back to the other side, and proceeded to find Dead Horse using pavement.

    After we got home from Utah, I decided it was time to buy a more capable off-road vehicle for my uses. I am a whitewater boater (have been at it for several years). I want a vehicle that can haul a lot of boats and can go just about anywhere. In addition to going anywhere, I want the ability to sleep in the back. So, this will be a bit of an expedition build.

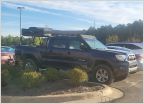
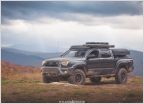
    Current Pic (9/5/2019):


    Truck Bed pic (since I did a lot of work back there):


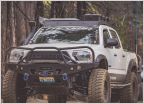
    The truck looked pretty much like this when I picked it up:


    And a puppy pic in the truck (co-pilot). Should have at least one in this thread.


    And Whitewater shot:

    Current mods:
    Racks:
    • Move over bolt mounted Yakima racks from other car to front cab of Tacoma{build}{2}
    • Thule The Stacker Rack {build}
    • Thule Get-a-grip (paddle holder) {build}
    • Thule square bars on Cap {build}
    • Prinsu 29" clone {build}
    Interior:
    Suspension:
    Recovery:
    Media:
    Communications:
    • Passed HAM Tech exam 8/5/2016. In the database as of 8/23/2016.
    • Intro radio: Baofeng UV-5R
      • Went to a Radio shop with the expectation of spending more money, and I was not impressed with the information the guy at the counter had for me. In the end I decided to save some $ on my first radio and went with this. I do not expect it to be my long-term choice but it will give me the opportunity to learn.
    • Picked up HackRF One, and the ShareBrain PortaPack. I have been able to do some spectrum sniffing, but not much more
    Other:
    • Double sided tape fix for glove box {build}
    • OBDII Bluetooth adapter and Torque app for phone (though I haven't set this up or configured it yet)
    • Tacoma temp gauge (replacement, tried to fix it, but failed miserably)
    • Disable Seat Belt Warning {build}
    • WiFi Sniffer{build} {2}
    Armor:
    • Mobtown No Drill Bolt-On Rock Sliders {build}

    Expedition Mods:
    Future Mods:
    Expedition Mods:
    Suspension/Tires:
    Armor:
    Communications:
    Media:
    • Sound Deadening
    • TruckPi
      • Raspberry Pi with Arduino
      • Read sensor data and display on PiTFT Plus 3.5" screen
      • Run Kismet for war driving, and display information on navigation map
      • Read OBDII Data and display on screen {OBDII Error Coes}{OBDII Codes}{OBDII Pi}{OBDII Pi2}
      • Have menu to navigate between the different options
    Recovery:
    • Lots of Hi-Lift stuff, shackles, tow straps, chains and other things
    • Front Tow Hook
    Lights:
    • C4Fab Hood Scoop Light Bar {TW} {C4Fab}
    • Replace front headlights (they are visibly cracking) {1}

    Older replaced Mods:
    • Yakima Whistpbar Through bar S17 with Fit Kit K475 (wanted S18, but dealer was difficult and didn't feel like returning what was ordered) {build}
    • Yakima SUP crossbar pads (for the squirt boat) {build}
    • Grid-It Organizer for center console {build}
      • Ultimately this failed and has been removed.
    • Icon AAL replaced with full leaf spring replacement (OME Dakars)
     
    Last edited: Sep 22, 2019
    Dalandser and chiefcrunchy like this.
  2. Nov 15, 2015 at 5:40 PM
    #2
    C0d3M0nk3y

    C0d3M0nk3y [OP] Well-Known Member

    Joined:
    Nov 13, 2015
    Member:
    #169500
    Messages:
    205
    2008 Tacoma Sport DCSB (silver)
    So...time for some mods. Let's start with the most recent, and one that is not as common. The Hi-Lift backseat storage mod.

    I borrowed (or researched) from this thread.


    So, my mod ends up looking like:


    I had already taken the plastic out of the back a couple of times, and didn't take any pictures before they were out (though I did do a mod earlier where I cut out the plastic shelf, but we won't talk about that here).


    After the back was clean, I took some steel, cut it into 2 small lengths and drilled 2 holes to be used as attachment points later. I also bent the steel a bit.


    Zip tied the plastic on the right and left of the back seat.


    Cut up the 1/2 plywood to fit the space in the back (I picked 1/2" birch plywood because it seemed to fit better than the 3/4"). A dremmel does solve many of the problems that I made while cutting. Trust me, there are many problems you don't see.


    Check the fit with the seats up to ensure that the plan will actually work.

    Pull the wood out and check the placement of the jack.


    Cut out the hole for the mechanism (otherwise the jack won't fit behind the seat). You don't want the hole too big or else the mechanism will hit the back wall of the truck and rub. At this point you will want to figure things out on your own. Check the fit.


    I added additional bracing because I had the room, the wood, and it allowed things to sit a little better.


    The jack in the pictures is the Hi-Lift X-TREME.
     
    Last edited: Dec 7, 2015
    ramonortiz55, Leppz and ssanders2211 like this.
  3. Nov 15, 2015 at 5:53 PM
    #3
    C0d3M0nk3y

    C0d3M0nk3y [OP] Well-Known Member

    Joined:
    Nov 13, 2015
    Member:
    #169500
    Messages:
    205
    2008 Tacoma Sport DCSB (silver)
    • Organizational mods. Not a lot of details, but should at least post a few things here.

    Center Organizer mod. Funny thing is that I could have bought one and saved myself a lot of trouble, but where is the fun in that. I ended up trying it out with hobby wood (failed miserably). I ended up using clear acrylic and sized up a center organizer that meets my needs. It chipped horribly and I used the dremel to clean up the edges. I took no pics during the fab, but here is what it looks like afterwards.


    Glove box organizer (this one was purchased):

    Much later, but in the same general area, I did the glove box fix (the one where the the hinge keeps coming off, but is easily fixed with double sided tape):
    Products discussed:
     
    Last edited: Dec 7, 2015
    I married my tacoma likes this.
  4. Nov 15, 2015 at 6:03 PM
    #4
    C0d3M0nk3y

    C0d3M0nk3y [OP] Well-Known Member

    Joined:
    Nov 13, 2015
    Member:
    #169500
    Messages:
    205
    2008 Tacoma Sport DCSB (silver)
    GTA Carkits audio mod.

    I really wanted to listen to my iPod (160 GB iPod). I know people talk about streaming media...but seriously...nothing can beat my 160 GB iPod right now. The thing is a beast, and it is wonderful when traveling across the country.

    This was the first mod I did.

    The install was pretty straightforward. Pull the dash apart. Plug the harness into the stock CD player. Find a place to mount the box. Run a wire somewhere where you can play the iPod.

    I chose near the shifter for the box. I then ran the wire into the center console. I plan on cleaning up the wire mounting. I have a "Grid-it organizer" to the top of the center console (pics at some point).


    Parts used in this mod:
     
    Last edited: Dec 7, 2015
  5. Nov 15, 2015 at 6:20 PM
    #5
    C0d3M0nk3y

    C0d3M0nk3y [OP] Well-Known Member

    Joined:
    Nov 13, 2015
    Member:
    #169500
    Messages:
    205
    2008 Tacoma Sport DCSB (silver)
    Yakima Whispbars over the cab.

    These racks can handle about 4-5 boats (closer to the 5 number). I have used the round Yakima bars on other vehicles and found that the the ones that attach to the doors have a tendency to wander over time. I had hoped that the Whispbars wouldn't have the same problem. So far, they are about the same.

    I REALLY want to find the bolts under the whether stripping (on the roof) that the Toyota roof rack attaches to. I did pull up the stripping once and looked at what was underneath. I didn't find what I was looking for. I eventually settled on the Whispbar S18. What arrived was the S17 (a couple inches shorter than what I wanted).

    In the end, the rack above the cab is going to be the secondary rack. The rack that will be above the Leer cap will end up being my primary rack (eventually).

    In addition to the rack itself, I picked up the Thule The Stacker racks. Thule makes better kayak stackers are better than Yakima.

    For paddle holder, I have the Thule Get-a-grip. The build quality of the Thule paddle holder is nice, but it isn't as stable as the Yakima multi-mounts. I want to like the Thule Get-a-grip more, but I like the Yakima ones better (I have both, but I only keep 1 set in a vehicle, and the Tacoma gets the Get-a-grip for now).

    The SUP crossbar pads work really well to protect the squirt boat (fiberglass/kevlar).


    The various components for the racks are:
     
    Last edited: Dec 6, 2015
  6. Nov 15, 2015 at 6:26 PM
    #6
    C0d3M0nk3y

    C0d3M0nk3y [OP] Well-Known Member

    Joined:
    Nov 13, 2015
    Member:
    #169500
    Messages:
    205
    2008 Tacoma Sport DCSB (silver)
    Seat protection: Wet Okole.

    I was going to put this off for quite some time, but the dog showed me that I needed to accelerate my plan. The dog doesn't destroy anything. He does happen to get dirty and the seats were getting beat up. I ordered the Wet Okole and several weeks later they showed up.

    In the end, the seat covers are doing a spectacular job. Now they get beat up instead of the seats.


    Parts used in this mod:
     
    Last edited: Dec 7, 2015
  7. Nov 19, 2015 at 4:53 PM
    #7
    C0d3M0nk3y

    C0d3M0nk3y [OP] Well-Known Member

    Joined:
    Nov 13, 2015
    Member:
    #169500
    Messages:
    205
    2008 Tacoma Sport DCSB (silver)
    Icon Stage 2.

    Front coil overs (not very clean):


    Rear Remote Reservoir Shocks:


    AAL:


    Parts used in this mod:
     
    Last edited: Dec 7, 2015
  8. Dec 6, 2015 at 5:19 PM
    #8
    C0d3M0nk3y

    C0d3M0nk3y [OP] Well-Known Member

    Joined:
    Nov 13, 2015
    Member:
    #169500
    Messages:
    205
    2008 Tacoma Sport DCSB (silver)
    Grid It center console mod.

    The first install failed pretty bad. The Velcro did not bind as well as expected. I also trimmed too much and lost 2 of the straps. The 2nd install also failed pretty badly. Eventually I replaced the whole thing with something I sewed up on my own, and that worked much better. A few pictures can be found here.


    Here is the final results:


    Here is what the fail looked like:


    The Grid It organizer that has been trimmed looks something like this:


    The back of the organizer was cleaned up of the extra fabric (and zipper) and the Velcro was added:


    The center console had the other side of the Velcro added:


    The Grid It organizer was then attached:


    Since I had the plastic of the center console already off, I looked at what the spring was like and how I could possibly be stiffened up some:


    Parts used in this mod:

    Update 7/5/16:
    Still failing. The Velcro is not keeping the Grid-It in place. I am going to have to find something else to do. Looking at some ABS plastic and rivets along with some webbing. No idea what I am actually going to do, but this clearly isn't working out as expected.

    Update 9/19/16:
    This has been removed. I tried to sew the Velcro to the Grid-It Organizer. I broke my sewing machine. Not happy, I pulled the whole thing out. The sewing machine is now being repaired.

    Udate 3/15/17:
    Has been replaced. It was actually replaced January 2017, but I didn't get around to writing it up or taking any pictures. You can see some of the newer pictures here.
     
    Last edited: Mar 15, 2017
  9. Dec 7, 2015 at 11:01 AM
    #9
    C0d3M0nk3y

    C0d3M0nk3y [OP] Well-Known Member

    Joined:
    Nov 13, 2015
    Member:
    #169500
    Messages:
    205
    2008 Tacoma Sport DCSB (silver)
    L-Bracket mod.

    This mod is in preparation for the bed platform. I spent a fair amount of time trying to figure out how to attach the bed platform to the truck bed. The D-rings by the tailgate would not hold the entire bed. I saw where some people had added another set of D-rings near the cab, but I was looking for more. I didn't want to permanently bolt wood to the bed, so I searched more.

    At some point I stumbled upon people adding L-brackets to the truck bed. Not a whole lot of information on what they did, so I ordered some stuff and decided to give it a shot. Turns out I ordered the wrong size L-brackets first. Be very careful about what size L-brackets you order (width needs to be 1-1/8").

    The brackets by US Cargo Control work really well.

    The final install looks like this:

    I ended up wanting 2 6" tracks near the tailgate off to the side of where the wheel wells are. I am going to run braces for the bed platform parallel to the wheel wells, and want mounting holes to the side of those braces. I went under the bed and found some good spots where there were no wires or anything else obstructing the install and drilled from the bottom up for the first hole, then would go to the top and drill down for the 2nd. This worked pretty well.

    From the top:

    From the bottom:

    and:


    For the brackets closest to the cab, I spent a good amount of time under the bed looking for good spots where I could easily get a wrench under the bed and have few obstructions. I really wanted something closer to the cab, but there was too much interference up that way. In the end, I found a spot with some great cross braces to add stability and they were perfectly sized for the 6" L-brackets. I had originally planned on doing 2 brackets near the cab, 2 somewhere in the middle, and 2 near the tailgate. Since I couldn't get close enough to the cab, I went with 4 in the middle.

    The top looks like this:


    Under the bed I found the cross braces, and it looks like this:

    and this:


    A second set of hands helps when installing. I believe there are ways to do the install yourself, but just offer someone a beer and they can hold a screwdriver while you get under and wrench the bolt into place.

    I am going to be using L-track double lug stud fittings to mount the wood base to the L-tracks when the time comes. I also picked up a few other things to mount to the L-track. It is nice having options, even though in the end I will just be mounting a wood base to these.

    Parts used in the mod:
     
    ItalynStylion likes this.
  10. Dec 8, 2015 at 10:49 AM
    #10
    C0d3M0nk3y

    C0d3M0nk3y [OP] Well-Known Member

    Joined:
    Nov 13, 2015
    Member:
    #169500
    Messages:
    205
    2008 Tacoma Sport DCSB (silver)
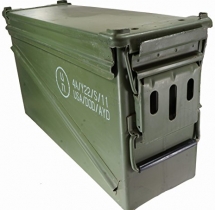
    Back seat storage: 40mm Ammo can mod.

    I have seen a few mentions here and there about fitting a 40mm Ammo can behind the rear seat, but I haven't seen a good write-up for it. I thought it would be a fairly simple straight forward solution, but reality had something else in store for me.

    I drew my inspiration from this thread.

    I had some 50 cal ammo cans and a 30mm ammo can to play with, and though they fit, there was quite a bit of wasted space. The 40mm Ammo can was something I had to pick up and tinker with. I went to my local army surplus store and test fitted the ammo cans. I quickly realized that they wouldn't fit exactly as I envisioned, but it was close. Close enough for me to pick up the cans now, and get it to work later.

    The final result for my build looks like this:


    In my 2008 DCSB, the 40mm Ammo can will not fit without some modifications. I can get 1 can in by removing the plastic stock organization crap, and tinkering with the ammo can itself. To get the 2nd ammo can installed, I ended up having to trim some of the plastic in the rear. I really wanted good storage, so I trimmed. If you don't want to trim, then you can easily get 1 can in there and you still have plenty of space for other stuff.

    First step, remove the plastic organization stuff from behind the backseat. I did this previously with my Hi-Lift mod, but it should look something like this:


    Pick up 1 or 2 40mm Ammo cans:


    Pay attention to these little lips on the top of the ammo cans, they will be important later.


    I had to take a file to these lips and grind them down. A grinder would be much faster than a file, but the grinder wasn't easily available at the time. At a minimum you will want to file down 2 of the lips on one side. You can file all 4 corner lips down (I did, but didn't take many pictures of all 4 filed down). After it is filed down, it should look something like this:


    With the edge filed down, the 40mm Ammo can will now fit under the back seat cross member. There is a tiny bit of wiggle room, but not much.


    With the seat up, everything fits and is quite secure.


    With no trimming of plastic, I can fit 1 50 cal ammo can, 1 40mm ammo can, and some other stuff behind the seat.

    I double checked the width of the 40mm ammo can, and where the braces were spaced for the smaller back seat. The 40mm ammo can was less than 18" wide, and the metal braces for the smaller back seat were pretty close to 18" wide. It should fit, but it wasn't working.

    Here you can see how the ammo can lines up with the back seat brace.


    But the plastic on the other side is getting in the way. I saw pictures in the thread that inspired me to do this mod with no trimming, but I couldn't get it to work. Perhaps this has changed in other models of the Tacoma, but for me...I had to trim. Here is what was blocking me.


    I pulled out my trusty permanent marker, and marked where I wanted to cut.


    I used a dremel with a cutting disk and started cutting away. I need to go back and clean up the edges some, but the cutting was pretty straight forward.


    There was a bit of sound deadening fabric back there that I cut out with a knife.

    After everything was completed, I can now fit 2 40mm ammo cans and 1 50 cal ammo can behind the seat, along with the Hi-Lift jack.

    I went ahead and painted up the ammo cans because I can (and it will help identify what each is for). My plan is for one of the ammo cans to be tools, and the other for recovery. Since I am light on recovery gear right now, there isn't much to fill that can with. The 50 cal ammo can is currently emergency food, but could be switched to something else if need be.

    I have a thin layer of minicell foam lining the floor under the ammo cans, but will eventually add some sound deadening material. I haven't noticed any change in acoustics with this mod. I was expecting it to be a tad bit louder, but the truck is already pretty loud.

    Parts used in this mod:
     
    Last edited: Apr 17, 2016
    Leppz and Frogman172 like this.
  11. Jan 5, 2016 at 1:55 PM
    #11
    C0d3M0nk3y

    C0d3M0nk3y [OP] Well-Known Member

    Joined:
    Nov 13, 2015
    Member:
    #169500
    Messages:
    205
    2008 Tacoma Sport DCSB (silver)
  12. Feb 3, 2016 at 10:19 PM
    #12
    Leppz

    Leppz Well-Known Member

    Joined:
    Sep 23, 2014
    Member:
    #138965
    Messages:
    759
    Gender:
    Male
    First Name:
    Ryan
    Vancouver, BC
    Vehicle:
    2014 DCLB Sport Premium
    Really liking what you've done with your rear storage. I was wondering if a hi-lift extreme would fit behind the rear seats and your post nicely answers that question.
    I think I'm going to do something very similar in the future.

    How easy is it to remove the ammo cans? They do look pretty tight back there.
     
  13. Mar 2, 2016 at 7:22 PM
    #13
    C0d3M0nk3y

    C0d3M0nk3y [OP] Well-Known Member

    Joined:
    Nov 13, 2015
    Member:
    #169500
    Messages:
    205
    2008 Tacoma Sport DCSB (silver)
    Sorry for the delayed response. The ammo cans are very tight. The one on the 60 side comes out easier than the one on the 40 side. The storage they give me is well worth it though. I hated the wasted space, and the ammo cans are almost a perfect fit (tight but they do fit).
     
  14. Mar 2, 2016 at 7:30 PM
    #14
    C0d3M0nk3y

    C0d3M0nk3y [OP] Well-Known Member

    Joined:
    Nov 13, 2015
    Member:
    #169500
    Messages:
    205
    2008 Tacoma Sport DCSB (silver)
    Blower replacement

    The Air Conditioner motor started making this slight noise when the truck was at a certain angle. I checked a few things...took the motor out and tried to re-grease various components. Things went well...for a day or two...then they got much worse. I tried again...and a little better...for a week, and then back to pretty darn bad. Another week...another "fix".

    When I originally took the blower out it looked like this:


    I ordered part: 87103-04044.

    Nice and shiny.

    With a quick install...I now have a blessedly quiet motor (for now).

    All is well in the world, and I no longer want to pull my hair out with a squeaky blower.
     
  15. Mar 2, 2016 at 7:32 PM
    #15
    Silence9

    Silence9 Solve et Coagula

    Joined:
    Dec 26, 2013
    Member:
    #119249
    Messages:
    825
    Alberta, Canada
    The sleeping dog mod is my favorite. It's better than a radio!
    Nice truck man.
     
    C0d3M0nk3y[OP] likes this.
  16. Mar 2, 2016 at 7:37 PM
    #16
    C0d3M0nk3y

    C0d3M0nk3y [OP] Well-Known Member

    Joined:
    Nov 13, 2015
    Member:
    #169500
    Messages:
    205
    2008 Tacoma Sport DCSB (silver)
    The dog is happiest when he is in the truck with me (or playing fetch). I think he understands that while the car is moving I can't get away easily and he knows exactly where I am at.
     
    Silence9 likes this.
  17. Mar 2, 2016 at 7:57 PM
    #17
    C0d3M0nk3y

    C0d3M0nk3y [OP] Well-Known Member

    Joined:
    Nov 13, 2015
    Member:
    #169500
    Messages:
    205
    2008 Tacoma Sport DCSB (silver)
    Bed Platform (in-progress)

    Design Goal: Have a platform with 3 main storage compartments, with 1 of the drawers able to fit my dog's crate (36"x23"). The other drawer will be equally deep, but narrower. The remaining compartment will be a pop-up lid and fill the remainder of the space. The drawers will utilize sliders for easy access. Locks are a plus.

    Given the goals, I will be sacrificing some storage for some functionality. I spent WAY too much time trying to think of ways to get what I wanted done, and I over-engineered some aspects.

    The bed platform has been a "work-in-progress" for over a month. I have the base, frame and the better part of the two drawers put together. I also have the majority of the top cut, but not mounted. It turns out that with a 4'x8' sheet of plywood, I have been unable to get the top to fit perfectly as one piece.

    Materials used (to-date):
    • 2 sheets 4'x8'x1/2" birch plywood (for base and drawers)
    • 1 sheet 4'x8'x3/4" birch plywood (for top)
    • several planks of 1" poplar (for frame)
    • 2 sets of 200 lb sliders {link}
    • 2 paddle latches {link}
    • 6 6" L-track (seen in a previous update)
    • LOTS of screws
    • Some corner braces
    • Some L brackets (for additional bracing)
    • LOTS of time
    Things learned so far:
    • I am not a carpenter
    • A dremel can be my friend
    • You can never have too many clamps
    • Mistakes will be made...deal
    • You can over-think a problem
    • You can under-think a problem
    • Deal (and drink some beer, it helps)
    So...onto the build (thus far).

    I wanted to have a piece of 1/2" plywood to act as a base that I will attach the frame to. This will provide stability for the frame and will give me something solid to attach to the bed of the truck so things won't bounce around all that much. The base ultimately took this shape (with the help of a dremel).


    From there I spent WAY too much time getting the frame cut out and figuring out how high I could make my drawers. I didn't take many pictures during this time. Several mistakes were made, but it will work out in the end.

    The frame with drawers rigged up on top of the base:


    Once I had the sliders attached and everything was tested, I dropped it all into the truck bed and checked it out. Drawers are made of 1/2" birch plywood.


    To reduce weight, I cut rather large holes in the base.


    To add stability to the frame (in addition to L brackets and corner brackets) I put screws through the base to the frame. The base and frame are all one piece now. In the event I need to remove the platform, it will come out in 4 pieces. The drawers are removable, the base and the top (still in progress).

    The frame is attached to the base with screws every 6" (when I didn't make a mistake).


    The frame and drawers installed look something like this:


    I still have the top to finish up. The top I have is about 12" short to the tailgate. I have a few ideas on how to solve that problem.

    I have already started putting finish on the frame and the drawers (at least what is finished on the drawers). Since I plan on putting about 5 coats of finish on everything, I figured I would start early. No pictures yet though.

    More updates on this will come along, but this is where I am at so far.
     
    Last edited: Oct 15, 2016
    kashtyaatsi, Leppz and OpptimusPrime like this.
  18. Mar 4, 2016 at 9:51 AM
    #18
    C0d3M0nk3y

    C0d3M0nk3y [OP] Well-Known Member

    Joined:
    Nov 13, 2015
    Member:
    #169500
    Messages:
    205
    2008 Tacoma Sport DCSB (silver)
    Truck cap is getting installed tomorrow.

    Leer 100RCC with 2 windoors, rack and just about every other bell and whistle I could get.

    Pics before and after will probably be taken.

    Need to finish up the bed platform next.
     
    Leppz likes this.
  19. Mar 14, 2016 at 11:31 AM
    #19
    C0d3M0nk3y

    C0d3M0nk3y [OP] Well-Known Member

    Joined:
    Nov 13, 2015
    Member:
    #169500
    Messages:
    205
    2008 Tacoma Sport DCSB (silver)
    Truck Cap Install

    Leer 100RCC with lots of options. I had intended to get the vented windoors, but there was a miscommunication and I ended with with just windoors. We will be discussing switching them out at some point.

    I asked for the longest Thule bars they could get their hands on. Turns out the longest bars are about 79" long. It also turns out that is longer than I really wanted, but it is pretty easy to cut them down. Initial pictures are with the longer bars. I did cut them down to be 68" long (as seen in later pictures).

    Height before install (can't remember if passenger side or driver side, but the order of the pictures is the same for the before and after):


    Height after the install (lost about an inch):


    Windoors:


    You can see how far out 79" bars stick out here:

    General truck shot:


    After I cut the bars down, this is how it finally turned out:


    Final shot (with the dog):
     
    Last edited: Mar 14, 2016
  20. Mar 14, 2016 at 11:43 AM
    #20
    C0d3M0nk3y

    C0d3M0nk3y [OP] Well-Known Member

    Joined:
    Nov 13, 2015
    Member:
    #169500
    Messages:
    205
    2008 Tacoma Sport DCSB (silver)
    Bed Platform Update

    I was able to get the top put together (though I still don't have the pop-up lid cut out). The drawers are almost done. I was worried the dog's crate would interfere with the paddle latches purchased. The drawers were being fabricated before the latches were even purchased. Once I found the right latches, I then realized (after the fact) that the mechanism was rather large and could potentially interfere with the crate fitting into the space.

    This weekend I finally was able to get the front of the drawers attached and double checked everything. It all fits as expected.

    Latch and crate close up:

    Crate in drawer:

    Helper being rather wet after staying out in the rain while I worked:
     
    Last edited: Mar 27, 2016

Products Discussed in

To Top