1. Welcome to Tacoma World!

    You are currently viewing as a guest! To get full-access, you need to register for a FREE account.

    As a registered member, you’ll be able to:
    • Participate in all Tacoma discussion topics
    • Communicate privately with other Tacoma owners from around the world
    • Post your own photos in our Members Gallery
    • Access all special features of the site

59.99 ebay leveling kit instruction mods

Discussion in '5 Lug' started by Dr Amocat, May 24, 2020.

  1. May 24, 2020 at 12:32 AM
    #1
    Dr Amocat

    Dr Amocat [OP] Active Member

    Joined:
    May 11, 2020
    Member:
    #327751
    Messages:
    35
    Gender:
    Male
    First Name:
    Zack
    Vehicle:
    '13 Base (old Orkin truck) | '18 Black F150 XLT 4x4 STOCK | '88 Red GMC Sierra 1500 (wife's car)
    2" Leveling Kit 235/75/R15 Tires ARE Camper Shell Black Plastidip Badges/Frame
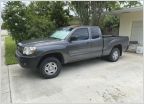
    Alright so I went and purchased this 60$ kit off eBay to give my truck a leveled look. Think it turned out pretty good - the base wheel/tire pairing looks silly but I think am going to go for new tires when I get back to GA from my family's place in MD.


    Light offroading with lighter sports equipment (hockey stuff, pew pews, etc) is the goal for this old bug crusher Orkin fleet vehicle. Like the higher look and sitting up a bit higher. (am thinking about doing something cool with this aluminum system in the bed at some point so I will do the aals to beef it up then)

    Did not see any modified instructions on the leveling kit on TW but I might have missed it because the site is so vast - and after going through the process with the instructions that came with it there were a few things that could use some elaborating and changes.

    1st change: The bolts on top of the strut
    • The directions say that you should only cut 1/2" off the top of the longer bolt (1 of the 3 is longer)
    • Pretty sure these are the same directions that come with the 2.75" kit with the AALs since the download also includes that part - after consulting with google, TW, my dad, and anyone else i could think of - I decided that having the old bolts all sit above the spacer would be bad
    • test fitted it to confirm the theory - and it was bad
    • just cut them all down so that you can fit the spacer flush
    2nd change: No real instructions on the rotation of the top of the strut

    For the rest of the instructions honestly the paper PDF was fine for me, easy peasy
    - but there is also this youtube video - which is basically the same product.


    LMK your opinions for tires/wheels --- I would like to be able to commute in this thing and also be capable in light offroading / look a little tough lol!
     
    This site contains affiliate links for which the site may be compensated.
    #1
  2. May 24, 2020 at 9:47 AM
    #2
    5 Lug Fury

    5 Lug Fury Well-Known Member

    Joined:
    Nov 21, 2014
    Member:
    #142831
    Messages:
    3,037
    Gender:
    Male
    First Name:
    Kenny
    Knoxville, TN
    Vehicle:
    V8 5 lug
    Got a lot of stuff lol
    Looking good man. Thanks for writing up more up to date instructions. I only had that old video when I did mine
     
  3. May 24, 2020 at 3:05 PM
    #3
    Dr Amocat

    Dr Amocat [OP] Active Member

    Joined:
    May 11, 2020
    Member:
    #327751
    Messages:
    35
    Gender:
    Male
    First Name:
    Zack
    Vehicle:
    '13 Base (old Orkin truck) | '18 Black F150 XLT 4x4 STOCK | '88 Red GMC Sierra 1500 (wife's car)
    2" Leveling Kit 235/75/R15 Tires ARE Camper Shell Black Plastidip Badges/Frame
    thanks man! I actually think it feels a little better to drive its more tight and less soft on the suspension with the spacers in, had a lot of slop because this thing was used hard as a work truck for the first 70k
     
  4. May 10, 2023 at 4:35 PM
    #4
    shemzem

    shemzem New Member

    Joined:
    Mar 11, 2023
    Member:
    #419916
    Messages:
    2
    Gender:
    Male
    Vehicle:
    2014 Tacoma 5 Lug Double Cab
    Hey Amocat, saw your post about the coil becoming unseated when you rotated the bottom of your shock and I’ve run into a similar issue. From what I’ve gathered, the way to go is to secure the top of the strut assembly and to twist the bottom of the shock with leverage, preferably with the coil under compression. So, I went and got a spring compressor, and twisted it 30 degrees or so to align with the bolt holes. It was then that it became unseated but aligned nonetheless. The questions I have for you are did you end up rotating the top or the bottom after you got the compressors, and how did you do so without unseating the coil? I’m also thinking that the coil may decompress itself back into the groove Know it’s been a few years but any help is appreciated! I attached a few pics for where I’m at.
     

Products Discussed in

To Top