

-
Welcome to Tacoma World!
You are currently viewing as a guest! To get full-access, you need to register for a FREE account.
As a registered member, you’ll be able to:- Participate in all Tacoma discussion topics
- Communicate privately with other Tacoma owners from around the world
- Post your own photos in our Members Gallery
- Access all special features of the site
 Uniball lubrication
 LCA Replacement Options
 Rear Leaf Bushings Suggestions
 3rd gen Rancho Loaded quickLIFT RS999915 on 285 70 17
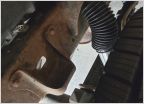 Normal amount of dust boot compression in rear shock?
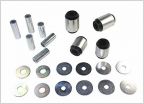 Does this come with the Energy Suspension bushings?
CV axle dilemma during ecgs bushing install
Discussion in 'Suspension' started by Zoey'sTaco, Nov 25, 2020.
Page 2 of 4
Page 2 of 4


