

-
Welcome to Tacoma World!
You are currently viewing as a guest! To get full-access, you need to register for a FREE account.
As a registered member, you’ll be able to:- Participate in all Tacoma discussion topics
- Communicate privately with other Tacoma owners from around the world
- Post your own photos in our Members Gallery
- Access all special features of the site
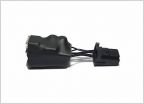 DASH CAM QUESTIONS
 Black Headlights on amazon
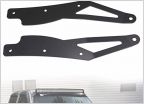 OEM roof rack light bar mounts
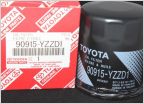 6 quart, Mobil 1 full synthetic oil change with genuine Toyota oil filter for $31
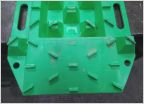 Traction Board Mod/Upgrade
 How much magnetic paste on diff drain plug is 'normal'?
Gentex 453 Mirror and temp sensor install in 2014 Off Road - Pictures
Discussion in '2nd Gen. Tacomas (2005-2015)' started by MustDrive, Dec 20, 2013.
Page 4 of 7
Page 4 of 7


