

-
Welcome to Tacoma World!
You are currently viewing as a guest! To get full-access, you need to register for a FREE account.
As a registered member, you’ll be able to:- Participate in all Tacoma discussion topics
- Communicate privately with other Tacoma owners from around the world
- Post your own photos in our Members Gallery
- Access all special features of the site
 Locker Anytime Mod for Dummies 2005+
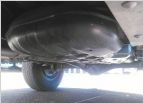 OEM Gas Tank Skid from TRD OR on SR5 Prerunner
 Suspension strut bushing
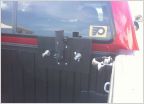 Flag mount
 Climate Control Cluster Lights
 05 Taco
How To Remove CV Axle+Replace Front Wheel Bearing 2nd Gen
Discussion in '2nd Gen. Tacomas (2005-2015)' started by KenpachiZaraki, Nov 22, 2011.
Page 1 of 24
Page 1 of 24
Products Discussed in


