1. Welcome to Tacoma World!

    You are currently viewing as a guest! To get full-access, you need to register for a FREE account.

    As a registered member, you’ll be able to:
    • Participate in all Tacoma discussion topics
    • Communicate privately with other Tacoma owners from around the world
    • Post your own photos in our Members Gallery
    • Access all special features of the site

El Taco Diablo... Mall Crawlin, now with LT for tall curbs

Discussion in '1st Gen. Builds (1995-2004)' started by El Taco Diablo, Dec 12, 2017.

  1. Dec 12, 2017 at 10:22 PM
    #1
    El Taco Diablo

    El Taco Diablo [OP] Professional Pinstriper

    Joined:
    Nov 6, 2017
    Member:
    #235223
    Messages:
    13,281
    Gender:
    Male
    First Name:
    Matt - KN6DZP
    Hughson, CA
    Vehicle:
    Impulse Red DC, 5vz-fe, 4wd swap, LT, dual case, F/R locked
    Just 3 tons of fun!!!
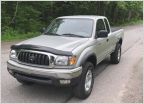
    Here's how the truck looks at the very beginning.. the last hunting/camping season it will see stock.


    This past hunting season made me realize a few things.
    #1 How much I love my truck (and didn't even realize it)
    #2 How much I ask my (2x4 stock height) truck to do, that is probably more than most ask of their truck.
    #3 How much my truck is in dire need of fresh steering and suspension componants.

    So, once I started realizing these things, I decided that after 13 years of owning the truck and about 180,000 miles of driving it (260,000 total on the truck, I'm 2nd owner) I need to make it "cool"... and more importantly more functional on the fire roads and trails I take it on.

    Since I need to replace a bunch of suspension componants anyway... well... it's going to just have to get lifted, right?

    I figured it might be cool to keep track of the progression. I figure it will be slow and steady, but we'll just have to see how it goes.


    Updated Pic

    Engine and Drivetrain
    - GM CS144 (Cadillac) Alternator and big 3 wire upgrade info HERE
    - Dual Optima Yellow top batteries
    - Swapped 4wd with manual hubs and Front Range Offroad twin sticks
    - TransGo shift kit
    - Factory rear eLocker
    - Harrop front eLocker
    - Derale Twin fan Transmission cooler info HERE

    Suspension
    Front:
    - Fox 2.5 extended travel with reservior
    - Eibach 14 inch 700 pound coils
    - Modified Wheelers Superbumps
    - SPC Upper control arms
    - Whiteline Lower control arm bushings
    - Gusseted spindles

    Rear:
    - Fox 2.0 10 inch with reservior 7/8 shaft
    - Alcan +4 with +700 pound leaf springs
    - Ubolt flip kit
    - Wheelers Super bumps with custom spacers

    Armor
    - Trail Gear with stinger info HERE
    - 4x Innovations 1/4 inch IFS and mid skid info HERE
    - Skid Row Offroad transfer case skid
    - All Pro Offroad sliders with kickouts info HERE and HERE
    - Low Range Off Road elocker guard info HERE
    - Low Range Off Road gas tank skid info HERE
    - Low Range Off Road diff skid info HERE
    - Custom high clearance rear bumper with wrap around info HERE and HERE

    Exterior
    - Custom Roof Top tent rack and awning mounts
    - Smittybilt RTT and awning info HERE
    - Custom bed platform and truck box mount
    - Weatherguard 48 inch side boxes
    - Vijay roof rack (2nd Gen Tacoma - Modified to fit)
    - Custom satoshi grill info HERE and HERE
    - Warn M8000 winch with synthetic line and Factor 55 link
    - Badlands 10K winch with Badlands Thimble
    - eBay snorkel info HERE

    Lighting
    - Morimoto LED projectors with switchback halos, RGB halos, and demon eyes info HERE and HERE and HERE
    - All markers, and turn signals are now LED
    - Hella 7 inch ralley lights on bumper
    - Auxbeam white/amber - solid/flashing ditch lights (hood)
    - Auxbeam white/amber - solid/flashing chase lights (rear facing in boxes)
    - Mictuning fog light/reverse light (rear bumper)
    - 42 inch Mictuning curved light bar
    - 2x2 white/amber (switchable) fog lights (lower front bumper)
    - 12 rock lights info HERE
    - 6 Three inch patio/camp lights = 2 facing driver side, 2 facing passenger side, 2 facing rear
    - 13 inch led cargo light in bed
    - Under hood lights
    - LED light strip in each truck box


    Interior
    - BMW 128i front seats info HERE
    - Rear seat deleted for platform
    - Power Acoustik Hi/Mid/Subs and amps
    - Icom HAM radio
    - Torque Pro app running on spare cell phone on modified mount info HERE


    Here are some of my write ups on some of them work I have done to the truck:
    - Tie Rods
    - Steering Rack Bushings
    - Radiator Water Pump and Timing Belt
    - Tundra Brakes
    - 4x Conversion
    - Valve Cover Replacement
    - Mobile Audio and interior


    Here are some of the shenanigans committed in the presence of other Taco
    owners:

    The hangout for local 209 Taco owners is >>here<<

    - Relief Reservoir 7/22/18 = First ride of the 209 Tacos
    - Camp Fire Relief Run 11/17/18
    - Death Valley Feb 2022


    Check >>HERE<< to see the 209 Mod Day discussion thread.
     
    Last edited: Dec 28, 2022
    This site contains affiliate links for which the site may be compensated.
    #1
  2. Dec 12, 2017 at 10:28 PM
    #2
    El Taco Diablo

    El Taco Diablo [OP] Professional Pinstriper

    Joined:
    Nov 6, 2017
    Member:
    #235223
    Messages:
    13,281
    Gender:
    Male
    First Name:
    Matt - KN6DZP
    Hughson, CA
    Vehicle:
    Impulse Red DC, 5vz-fe, 4wd swap, LT, dual case, F/R locked
    Just 3 tons of fun!!!
    Before any work =


    After Bilstein lift 1.5 inch in front, Wheelers 1.5 inch AALs =


    After truck boxes were added =

    After the RTT rack =


    After another lift, wheels and tires.
    Bilstein 5100s with ToyTec 620# springs
    Rear lift is Wheelers 1.5 AAL and middle leaf from a 5 lug Tacoma
    17x8.5 wheels with 4.5 inch backspace.


    So the first thing I did was change the spark plugs. The last weekend of deer hunting season it started really stuttering on me. When I got home, I decided to pull one of the plugs (no pics on this one, wasn't thinking). The electrode was nearly gone. I pulled the rest, and they were all in nearly the same condition. Replaced them all with NGK dual electrode plugs. Man, it runs smoother... and with better gas milage.
     
    Last edited: Apr 27, 2020
  3. Dec 12, 2017 at 10:37 PM
    #3
    El Taco Diablo

    El Taco Diablo [OP] Professional Pinstriper

    Joined:
    Nov 6, 2017
    Member:
    #235223
    Messages:
    13,281
    Gender:
    Male
    First Name:
    Matt - KN6DZP
    Hughson, CA
    Vehicle:
    Impulse Red DC, 5vz-fe, 4wd swap, LT, dual case, F/R locked
    Just 3 tons of fun!!!

    The next order of business is the shimmy while breaking and wierd wear pattern on the front tires. I know the breaks aren't the cause of the shimmy as I just replaced the rotors about a year ago and the pads have a lot of meat left... and they look to be wearing even.

    Decided to replace all the tie rods...
    https://www.tacomaworld.com/threads/tie-rod-end-replacement-suggestions.523928/

    And decided to replace the steering rack bushings.
    www.tacomaworld.com/threads/steering-rack-bushing-suggestions.523952/
     
    TrentonTDG and 02YotaGuy like this.
  4. Dec 12, 2017 at 11:00 PM
    #4
    El Taco Diablo

    El Taco Diablo [OP] Professional Pinstriper

    Joined:
    Nov 6, 2017
    Member:
    #235223
    Messages:
    13,281
    Gender:
    Male
    First Name:
    Matt - KN6DZP
    Hughson, CA
    Vehicle:
    Impulse Red DC, 5vz-fe, 4wd swap, LT, dual case, F/R locked
    Just 3 tons of fun!!!

    So now we get in to the fun stuff! All of the parts arrived to START the birth of my new truck. I'm starting off with a mild lift... mostly because I don't want to drop a grand (all at once) on new wheels and tires along with the grand+ I just dropped on these parts. I'm starting off with 1.5 inch add a leafs in the rear, and I'll set the Bilsteins up front to match the rear that avoids the lame sagging ass look. The 1.5 inch add a leaf lift in the rear is basically only to avoid damaging the shocks. I'll be going with a Deaver or All-pro leaf pack in the rear to be installed when I go with the 17 inch wheels and larger tires in a couple months.

    This weekend's list of goals are:
    Install UCAs
    Install new springs, top hats, and bushings on new front shocks
    Install shocks all around
    Install add a leafs
    Install LCA bushings
    Install Lower Ball Joints
    Install new sway bar bushings
    Install new sway bar disconnects
    Do the "pinch weld mod"
    Remove the air bow elbow
    Clean and oil air filter
    Clean Mass Air Flow sensor

    Lofty goals, I know... I'll prioritise and see how much of it I end up getting done.
     
  5. Dec 16, 2017 at 9:30 PM
    #5
    El Taco Diablo

    El Taco Diablo [OP] Professional Pinstriper

    Joined:
    Nov 6, 2017
    Member:
    #235223
    Messages:
    13,281
    Gender:
    Male
    First Name:
    Matt - KN6DZP
    Hughson, CA
    Vehicle:
    Impulse Red DC, 5vz-fe, 4wd swap, LT, dual case, F/R locked
    Just 3 tons of fun!!!
    So here's one last look at my (basically) bone stock Taco, before the improvements begin.


    Later on the same day... I basically tore the entire suspension off the front end... let the fun begin!


  6. Dec 19, 2017 at 11:43 AM
    #6
    El Taco Diablo

    El Taco Diablo [OP] Professional Pinstriper

    Joined:
    Nov 6, 2017
    Member:
    #235223
    Messages:
    13,281
    Gender:
    Male
    First Name:
    Matt - KN6DZP
    Hughson, CA
    Vehicle:
    Impulse Red DC, 5vz-fe, 4wd swap, LT, dual case, F/R locked
    Just 3 tons of fun!!!
    Well... Had a long stress filled weekend of tools not working parts not matching with the part numbers on the box... etc, etc. But all in all we got er done.

    New UCAs, LCA bushings, coil overs, sway bar bushings, and sway bar end links are installed.


    Wheelers 1.5 inch AAL and rear Bilstein 5100s were also installed.

    It's always nice when you check the part numbers on the boxes, and think you have an R and L lower ball joint... only to open the boxes to find this.
     
    Last edited: Dec 19, 2017
    unstpible, TrentonTDG and 02YotaGuy like this.
  7. Dec 19, 2017 at 11:47 AM
    #7
    El Taco Diablo

    El Taco Diablo [OP] Professional Pinstriper

    Joined:
    Nov 6, 2017
    Member:
    #235223
    Messages:
    13,281
    Gender:
    Male
    First Name:
    Matt - KN6DZP
    Hughson, CA
    Vehicle:
    Impulse Red DC, 5vz-fe, 4wd swap, LT, dual case, F/R locked
    Just 3 tons of fun!!!
    Hacked off the stupid looking tail pipe while I was under there.

    Just clamped on a 3 x 8 tip, painted black.
     
    TrentonTDG and 02YotaGuy like this.
  8. Dec 19, 2017 at 11:49 AM
    #8
    El Taco Diablo

    El Taco Diablo [OP] Professional Pinstriper

    Joined:
    Nov 6, 2017
    Member:
    #235223
    Messages:
    13,281
    Gender:
    Male
    First Name:
    Matt - KN6DZP
    Hughson, CA
    Vehicle:
    Impulse Red DC, 5vz-fe, 4wd swap, LT, dual case, F/R locked
    Just 3 tons of fun!!!
    Bought a second K&N air filter to put in, so I always have one cleaned, dry, and oiled to swap out. Cleaned the Mass Air Sensor... and did the "deck plate mod" since I didn't think my plate was full enough for the weekend already.

     
    unstpible, TrentonTDG and 02YotaGuy like this.
  9. Dec 19, 2017 at 8:23 PM
    #9
    Tacomeathead

    Tacomeathead New Member

    Joined:
    Dec 19, 2017
    Member:
    #238927
    Messages:
    3
    Gender:
    Male
    Vehicle:
    Looking for ‘03-04 double cab 4x4
    Nice start! Looking good!
     
    02YotaGuy and El Taco Diablo[OP] like this.
  10. Dec 25, 2017 at 2:33 PM
    #10
    El Taco Diablo

    El Taco Diablo [OP] Professional Pinstriper

    Joined:
    Nov 6, 2017
    Member:
    #235223
    Messages:
    13,281
    Gender:
    Male
    First Name:
    Matt - KN6DZP
    Hughson, CA
    Vehicle:
    Impulse Red DC, 5vz-fe, 4wd swap, LT, dual case, F/R locked
    Just 3 tons of fun!!!
    So... I got bored yesterday. Decided to do the pinch weld mod. I don't need it yet, my tires don't come close to rubbing. But who cares, I'll probably need the clearance sooner or later.

    It ended up being easier than I thought it would be... like 15 minutes easy. I figured I would add this for someone who may be looking at this thread and didn't know about the pinch weld.

    Here's what I used.

    This guy here is your friend. It's a roofing blade. You can pick them up at Homey D for like 5 bucks for 5 blades. This blade cuts straight, and like butter through your wheel well plastics.

    You want to find this area right here.

    And cut it something like this. The arrow is pointing at the pinch weld. That's what you want to wail on with your BFH (big f'n hammer). I bent it towards the center of the truck.

    Then just spray a little bit of Rubberized Undercoat on the area you just wailed on and your done.
     
    TrentonTDG and 02YotaGuy like this.
  11. Feb 13, 2018 at 2:00 PM
    #11
    El Taco Diablo

    El Taco Diablo [OP] Professional Pinstriper

    Joined:
    Nov 6, 2017
    Member:
    #235223
    Messages:
    13,281
    Gender:
    Male
    First Name:
    Matt - KN6DZP
    Hughson, CA
    Vehicle:
    Impulse Red DC, 5vz-fe, 4wd swap, LT, dual case, F/R locked
    Just 3 tons of fun!!!
    Been a while since I updated this thread. I've been staying at it, but mostly doing things to make the truck more functional for my personal purposes.

    Found a couple Weatherguard side boxes on Craigslist for 100 bucks.

    The boxes were in decent shape, but I wanted to go ahead and refinish them. Started by mocking them up in the bed, to get my measurments for the brackets I'll be mounting them with.

    Before I could mount them up properly, I fabbed a bed rail that will be mounted under the boxes. This rail is for extra support under the boxes... but more importantly, it's the rail the legs of my roof top tent rack will, eventually, be mounted to. This rail needed to be in under the boxes so I got the right measurements for the brackets. If I added it later, it would have caused the boxes to tilt up at the bed rails when it was added later.

    Sanded the gloss off the boxes and used self etching primer.

    Used Rustolium Truck bed spray for the top coat.
    Painted the brackets with Rustolium truck bed spray as well... needed a little heat to get things drying.
    And here's how they turned out. Decided to bolt the brackets instead of welding them, in case I ever need to take them out and store them. The boxes may be bigger than some would choose, but they give me options for secure storage. (Great place to transport rifles during hunting season). They also give me a place for tools and possibly a location for a second battery.

     
  12. Feb 13, 2018 at 2:14 PM
    #12
    El Taco Diablo

    El Taco Diablo [OP] Professional Pinstriper

    Joined:
    Nov 6, 2017
    Member:
    #235223
    Messages:
    13,281
    Gender:
    Male
    First Name:
    Matt - KN6DZP
    Hughson, CA
    Vehicle:
    Impulse Red DC, 5vz-fe, 4wd swap, LT, dual case, F/R locked
    Just 3 tons of fun!!!
    Next project is the Roof Top Tent rack. Not even sure when I'm getting the Roof Top Tent, but want to get this completed before this camping season because it will also serve as a place to mount work lights for bed illumination.

    Got a 20' stick of 1"x 2" steel and a 20' stick of 1"x 3" steel... the yard cut them in half for me, since I'm in a DC Taco with a 5' bed... lol
     
    Last edited: Mar 4, 2019
    unstpible and TrentonTDG like this.
  13. Feb 13, 2018 at 2:30 PM
    #13
    El Taco Diablo

    El Taco Diablo [OP] Professional Pinstriper

    Joined:
    Nov 6, 2017
    Member:
    #235223
    Messages:
    13,281
    Gender:
    Male
    First Name:
    Matt - KN6DZP
    Hughson, CA
    Vehicle:
    Impulse Red DC, 5vz-fe, 4wd swap, LT, dual case, F/R locked
    Just 3 tons of fun!!!
    Took a look at what I have going on with the truck bed/boxes/etc... got what I thought would work for measurements and started cutting... All the sudden, I had a bunch of pieces to mock up for the platform of the rack.

    Cut some corner angles to act as mounting tabs for 4" led work lights in each corner. They are also, essentially, corner gussets that should add some strength.

    Got all the weld locations ground down to bare, clean, metal.
    Borrowed a buddie's cheapo Habor Frieght MIG welder... and lets get this going... (I've never welded anything in my life, but fook it)

    My welds, so far, are not all that pretty... but the rack is definately strong enough to do it's job.

    Mocked the rack up on the truck, to get angles and measurements for the legs.

    And then cut all the legs... still need to clean them up and practice my welding a bit more, seeing as these welds will be the most noticable. (All of the cuts on this rack have been made freehand with a 4" angle grinder)

    Will probably try and complete the rack next weekend.
     
    Last edited: Feb 13, 2018
    andywear, j-utah, unstpible and 3 others like this.
  14. Feb 13, 2018 at 5:57 PM
    #14
    El Taco Diablo

    El Taco Diablo [OP] Professional Pinstriper

    Joined:
    Nov 6, 2017
    Member:
    #235223
    Messages:
    13,281
    Gender:
    Male
    First Name:
    Matt - KN6DZP
    Hughson, CA
    Vehicle:
    Impulse Red DC, 5vz-fe, 4wd swap, LT, dual case, F/R locked
    Just 3 tons of fun!!!
    Also started collecting parts, and tools, for replacing the timing belt, waterpump, and the other associated parts. Still havent bought the kit, but this is what I'll be using.

    While I'm doing the swap, I plan on replacing some other items associated with the cooling system.

    The guy in the big Brown Truck has stopped by with a few things so far.

    High pressure, high heat, silicone, upper and lower hoses.

    All aluminum 3 row radiator.

    Seal puller and harmonic balancer tool.

    Hope to get this project started soon. Need a few more things, but I'm getting too many irons in the fire.
     
    Last edited: Feb 13, 2018
  15. Feb 13, 2018 at 9:24 PM
    #15
    El Taco Diablo

    El Taco Diablo [OP] Professional Pinstriper

    Joined:
    Nov 6, 2017
    Member:
    #235223
    Messages:
    13,281
    Gender:
    Male
    First Name:
    Matt - KN6DZP
    Hughson, CA
    Vehicle:
    Impulse Red DC, 5vz-fe, 4wd swap, LT, dual case, F/R locked
    Just 3 tons of fun!!!
    Figured it would be a good idea to clean up the engine compartment. Will do it again when I flush the cooling system before doing the Timing belt etc.

    Before =

    After =
     
    Last edited: Feb 14, 2018
  16. Feb 13, 2018 at 9:36 PM
    #16
    El Taco Diablo

    El Taco Diablo [OP] Professional Pinstriper

    Joined:
    Nov 6, 2017
    Member:
    #235223
    Messages:
    13,281
    Gender:
    Male
    First Name:
    Matt - KN6DZP
    Hughson, CA
    Vehicle:
    Impulse Red DC, 5vz-fe, 4wd swap, LT, dual case, F/R locked
    Just 3 tons of fun!!!
    I pretty much did what this video suggests. I didn't go all the way to some of the extremes (painting stuff etc) and wasn't quite as detailed about it.

    https://youtu.be/PRSoRkM8GcM
     
  17. Feb 13, 2018 at 9:42 PM
    #17
    El Taco Diablo

    El Taco Diablo [OP] Professional Pinstriper

    Joined:
    Nov 6, 2017
    Member:
    #235223
    Messages:
    13,281
    Gender:
    Male
    First Name:
    Matt - KN6DZP
    Hughson, CA
    Vehicle:
    Impulse Red DC, 5vz-fe, 4wd swap, LT, dual case, F/R locked
    Just 3 tons of fun!!!
    I've had mine for 13 years... never cleaned under the hood. Ya, I know what you're saying. It took me and my son a couple hours to do, but it'll be worth it when we start pulling things apart to get to the water pump.

    I took a lot of the big, easy, stuff off (air box, battery, intake tube) to allow room to get down in there.
     
  18. Feb 14, 2018 at 7:58 PM
    #18
    El Taco Diablo

    El Taco Diablo [OP] Professional Pinstriper

    Joined:
    Nov 6, 2017
    Member:
    #235223
    Messages:
    13,281
    Gender:
    Male
    First Name:
    Matt - KN6DZP
    Hughson, CA
    Vehicle:
    Impulse Red DC, 5vz-fe, 4wd swap, LT, dual case, F/R locked
    Just 3 tons of fun!!!
    The dude in the big Brown Truck stopped by, today, while I was at work. If anyone is looking to mount a fire extinguisher, let me just say I highly recommend this thing. VERY heavy duty. Mounts vertical, horizantal... pretty much what ever direction you want. The clamp is sturdy and adjustable, and there are rubber pads to help with shocks.

    And at 21 bucks on Amazon... that's less than half what I've seen it elsewhere.


    So, I figured out a nice place to mount it, where, I think, it's discrete enough to leave mounted, yet accessible in an emergency.

     
    unstpible, TrentonTDG and burntkat like this.
  19. Feb 17, 2018 at 3:15 PM
    #19
    El Taco Diablo

    El Taco Diablo [OP] Professional Pinstriper

    Joined:
    Nov 6, 2017
    Member:
    #235223
    Messages:
    13,281
    Gender:
    Male
    First Name:
    Matt - KN6DZP
    Hughson, CA
    Vehicle:
    Impulse Red DC, 5vz-fe, 4wd swap, LT, dual case, F/R locked
    Just 3 tons of fun!!!

    So... last night, my son and I got the RTT rack to this point. Mocked it up and tack welded all the legs on. When we got the boxes pulled and went to pull the rack off the truck, all the tack welds failed on the legs.

    I have no pictures of the aftermath... I think there was a couple profanities invloved, but not that many. I was so pissed, I think I went to my "quiet space."
     
    TrentonTDG and SilverGhost like this.
  20. Feb 17, 2018 at 3:17 PM
    #20
    El Taco Diablo

    El Taco Diablo [OP] Professional Pinstriper

    Joined:
    Nov 6, 2017
    Member:
    #235223
    Messages:
    13,281
    Gender:
    Male
    First Name:
    Matt - KN6DZP
    Hughson, CA
    Vehicle:
    Impulse Red DC, 5vz-fe, 4wd swap, LT, dual case, F/R locked
    Just 3 tons of fun!!!
    So... we started again this morning. This time my tack welds didn't fail.

    ----> :yes: this is my happy face.


Products Discussed in

To Top